> For the complete documentation index, see [llms.txt](https://academy.pentaho.com/llms.txt). Markdown versions of documentation pages are available by appending `.md` to page URLs; this page is available as [Markdown](https://academy.pentaho.com/pentaho-ctools/c-tools/community-graphics-generator/carrier-dashboard.md).
# Carrier Dashboard
Setting CGG Chart values with postFetch ..
{% hint style="warning" %}
#### Workshop - Carrier Dashboard CGG Charts
Professional business intelligence applications require more than interactive dashboard displays—they demand the ability to export high-quality chart visualizations optimized for presentations, reports, and executive distribution where formatting requirements differ from on-screen display. In this focused workshop, you'll master Community Graphics Generator (CGG), learning how to create dual-rendering chart components that display one way in interactive dashboards while exporting with different formatting optimized for static image distribution.
Working with the completed Wireless Carrier dashboard from previous workshops, you'll implement advanced postFetch functions that detect the rendering context, apply conditional formatting logic, and customize chart properties including dimensions, titles, legends, padding, and axis labels specifically for PNG and SVG exports that maintain professional presentation standards.
In this hands-on workshop, you'll experience the complete CGG customization workflow, beginning with understanding the CGG context detection mechanism that distinguishes between dashboard rendering and export generation, progressing through postFetch function implementation that applies conditional formatting rules, and culminating in the creation of export-optimized chart configurations that deliver publication-ready visualizations. You'll learn how to leverage the CGG object to detect export context using typeof checks, implement conditional code blocks that execute only during dashboard display versus export generation, and configure chart definition properties that override dashboard settings to produce properly formatted export images.
As you work through the exercises, you'll master critical techniques including passing CDE parameters to CGG exports through query parameter syntax, accessing parameter values in postFetch functions using params.get() method for dynamic content customization, and configuring chart properties like width for optimal page layout, title and titlePaddings for clear labeling, legendAlign and legendPosition for effective legend placement, and baseAxisOverlappedLabelsMode for proper axis label rendering in exported formats.
**What You'll Accomplish:**
* **Understand CGG Context Detection**: Learn the distinction between dashboard rendering and CGG export contexts, implement typeof cgg checks to detect export generation, create conditional code blocks using if(typeof cgg == 'undefined') for dashboard-only logic versus else blocks for export-only logic, and understand when each rendering context executes during component lifecycle
* **Implement PostFetch Functions for Dual Rendering**: Configure postFetch property in chart component Advanced Properties, write conditional formatting logic that applies different chart definitions based on context, maintain single component definition that serves both dashboard display and export generation, and test rendering differences between dashboard view and exported images
* **Pass Parameters to CGG Exports**: Configure component Parameters property to pass CDE parameter values to export context, use underscore prefix convention (\_paramName) for export-only query parameters, implement parameter passing in preExecution using Dashboards.propertiesArrayToObject and objectToPropertiesArray methods, and access parameter values in postFetch using params.get() for dynamic content generation
* **Customize Export Chart Properties**: Set chartDefinition.width to optimize exported chart dimensions for page layout, configure chartDefinition.title and titlePaddings for clear export labeling, adjust legendAlign and legendPosition for bottom-centered legend placement, set legendPaddings and legendItemPadding for proper spacing in exported format, and configure baseAxisOverlappedLabelsMode to display axis labels that may be hidden in dashboard view
* **Validate Export Customization**: Save dashboard with postFetch configuration, access export functionality through Export Popup Component, generate PNG preview to verify export customization, compare dashboard rendering with exported image to confirm conditional formatting application, and ensure exported charts meet professional presentation standards with appropriate titles, legends, labels, and dimensions
By the end of this workshop, you'll have mastered CGG's dual-rendering capabilities that enable dashboard components to serve both interactive exploration and professional distribution requirements. You'll understand how to architect chart components that optimize user experience in web dashboards while generating publication-ready exports for presentations, reports, and executive briefings.
**Prerequisites:** Completion of Carrier Dashboard Layout, CDA, and Components workshops with working dashboard including lineChart component and Export Popup functionality, understanding of JavaScript and CCC chart properties, Pentaho Business Analytics Server with CTools and CGG installed\
**Estimated Time:** 20 minutes
{% endhint %}
{% hint style="info" %}
#### Dashboard vs. Export Visualization:
You can create different versions of chart visualizations for dashboard display versus export by using conditional code blocks in the postFetch function. The code checks for the presence of the CGG object to determine the context - if CGG is undefined, the code runs in the dashboard, otherwise it runs during export.
{% endhint %}
```
if ( typeof cgg == 'undefined' ){
// ... This block only runs in the dashboard ...
} else {
// ... This block only runs in CGG (export) ...
}
// ... This block runs everywhere ...
```
{% hint style="info" %}
#### Handling Parameters in Exports:
Since CGG export scripts can't directly access CDE parameters or CDF functions like Dashboards.getParameterValue, you can pass these values through query parameters. This allows you to maintain rendering options based on parameter values during export. To implement this, add the parameter to the component parameters by either setting the 'arg' and 'value' properties directly, or by configuring them in the preExecution function.
For example, to append a date parameter value to a chart title, you would set:
arg: '\_date' value: 'dateParam'
in the component Parameters property, or by doing the same but in preExecution function, using the following code:
{% endhint %}
```
var objParams = Dashboards.propertiesArrayToObject( this.parameters );
objParams['_date'] = 'dateParam';
this.parameters = Dashboards.objectToPropertiesArray( objParams );
```
{% hint style="info" %}
Note we used the syntax \_date (with an underscore prefix) to denote a query parameter that will not actually be used by the query, but that's just a personal preference.
After that we need to change the title in postFetch using the parameter value:
{% endhint %}
```
var titleDate = ( typeof cgg == 'undefined' ) ?
Dashboards.getParameterValue('dateParam') : params.get('_date');
this.chartDefinition.title = "Chart rendered on " + titleDate;
```
{% hint style="info" %}
Its obvious, the date value rendered in the export will be the one stored as a parameter when the component was executed and will not reflect any changes made to dateParam in the meantime.
{% endhint %}
{% tabs %}
{% tab title="lineChart" %}
{% hint style="info" %}
Let's give this a go ..
So .. we're going to add a postFetch script to lineChart when exported. The Chart definitions ensure the Chart correctly renders:
• width
• title
• legend alignment
• padding
{% endhint %}
Export lineChart
1. Edit: /Public/CTools Dashboard/Carrier-Dashboard-Expand/Layout ( providing you've completed all the workshops..!)
2. In the Components pane, click to expand the Charts group, and then click to select the lineChart.
3. Click Advanced Properties.
4. Specify the postFetch function
• Click the ellipsis icon to the right of the postFetch property.
5. Copy & paste the following:
```javascript
function f(data){
// This block only runs in CGG (export)
if ( typeof cgg != 'undefined' ){
// Change or set some chart properties to look differently from what we see on the dashboard
this.chartDefinition.width = 700;
this.chartDefinition.title = "Number of Calls vs Number of Users";
this.chartDefinition.titlePaddings = "10";
this.chartDefinition.legendAlign = "center";
this.chartDefinition.legendPosition = "bottom";
this.chartDefinition.legendPaddings = "15 5";
this.chartDefinition.legendItemPadding = "10";
this.chartDefinition.baseAxisOverlappedLabelsMode = "leave";
}
}
```
6. Save the dashboard.
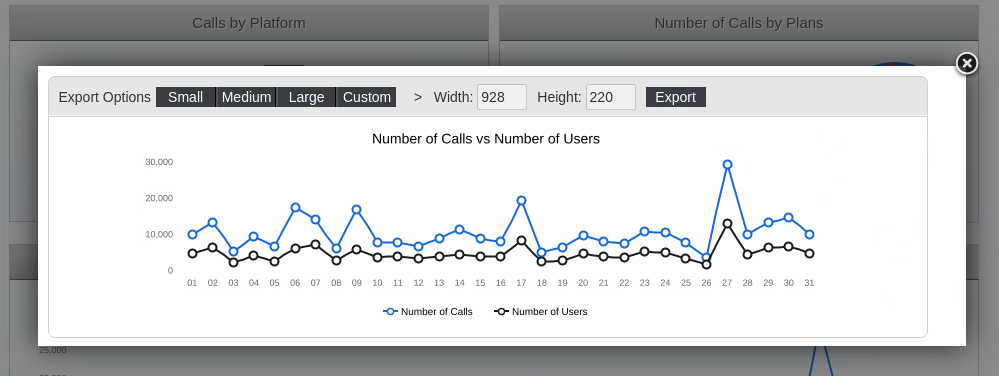
7. Check the visualization differences between the lineChart component displayed in the dashboard and the exported chart image:
• Click on the Number of Calls vs Number of Users Export link.
• Click on the Export PNG popup option.
• Check the preview of the lineChart export
{% hint style="info" %}
Notice the layout differences:
− there is a title on the top
− the legend is now bottom & centred
− the baseAxis labels are visible.
{% endhint %}
Export Chart
{% endtab %}
{% tab title="Second Tab" %}
{% endtab %}
{% endtabs %}
---
# Agent Instructions
This documentation is published with GitBook. GitBook is the documentation platform designed so that both humans and AI agents can read, navigate, and reason over technical content effectively. Learn more at gitbook.com.
## Querying This Documentation
If you need additional information that is not directly available in this page, you can query the documentation dynamically by asking a question.
Perform an HTTP GET request on the current page URL with the `ask` query parameter, and the optional `goal` query parameter:
```
GET https://academy.pentaho.com/pentaho-ctools/c-tools/community-graphics-generator/carrier-dashboard.md?ask=&goal=
```
`ask` is the immediate question: it should be specific, self-contained, and written in natural language.
`goal` is optional and describes the broader end goal you are ultimately trying to accomplish on behalf of the user. GitBook uses it to tailor the answer towards what is most useful for that goal.
The response will contain a direct answer to the question and relevant excerpts and sources from the documentation.
Use this mechanism when the answer is not explicitly present in the current page, you need clarification or additional context, or you want to retrieve related documentation sections.