# Jenkins

{% hint style="info" %}
Jenkins is an open-source automation server that enables developers to build, test, and deploy software efficiently. It's mainly used for Continuous Integration (CI) and Continuous Delivery (CD), automating the parts of software development related to building, testing, and deploying, facilitating continuous improvement and collaboration.
{% endhint %}

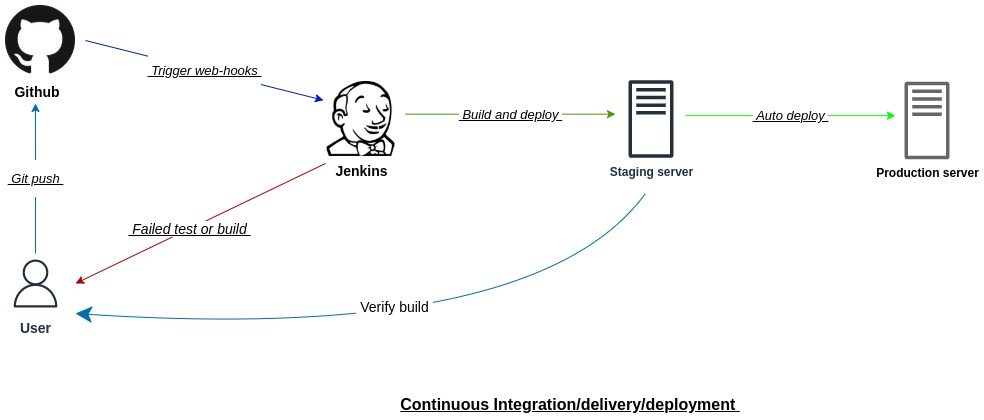
<figure><img src="/files/wsU2y1R6Um509GqVz1JP" alt=""><figcaption><p>CI/CD</p></figcaption></figure>

{% tabs %}
{% tab title="Setup" %}
{% hint style="success" %}
The following section is for Reference only.

Jenkins + plugins have been installed and configured.
{% endhint %}

{% tabs %}
{% tab title="Docker" %}
{% hint style="info" %}
*Docker* is a platform designed to help developers build, share, and run container applications.

*Docker Compose* is a tool for defining and running multi-container applications.
{% endhint %}

1. Run update & upgrade (optional).

```bash
sudo apt update -y && sudo apt upgrade -y
```

2. Create a Jenkins folder.

```bash
cd
mkdir ~/Jenkins
```

3. Create docker-compose.yml

```bash
cd
cd ~/Jenkins
nano docker-compose.yml
```

```bash
services:
  jenkins:
    image: jenkins/jenkins:lts
    restart: always
    privileged: true
    user: root
    ports:
      - 9080:8080
      - 50000:50000
    container_name: jenkins-1
    volumes:
      - /home/pentaho/Jenkins/jenkins_configuration:/var/jenkins_home
      - /var/run/docker.sock:/var/run/docker.sock
```

```
image          — lts will download latest version.
ports          — defines ports: 9080 (www) and 50000 (api)
container_name — the name of our container: jenkins-1
volumes        — these are the virtual volumes used by the container. 
```

4. Save.

```
CTRL + O
Enter
CTRL + X
```

5. Create jenkins container.

```bash
cd
cd ~/Jenkins
sudo docker compose up -d
```

```
[+] Running 13/13
 ✔ jenkins Pulled                                                         10.3s 
   ✔ ca4e5d672725 Pull complete                                            4.1s 
   ✔ 5c2c33065c08 Pull complete                                            6.4s 
   ✔ 92488061783e Pull complete                                            6.6s 
   ✔ 283fc5f22098 Pull complete                                            6.6s 
   ✔ a9c4c37656d4 Pull complete                                            6.7s 
   ✔ ba8c648ced13 Pull complete                                            7.5s 
   ✔ 1cf1dfaee3c9 Pull complete                                            7.5s 
   ✔ 94f0d5472c4d Pull complete                                            7.6s 
   ✔ f8b0d06461dd Pull complete                                            8.5s 
   ✔ 43dde4536f7b Pull complete                                            8.6s 
   ✔ cdaf12c3ce9b Pull complete                                            8.6s 
   ✔ 70d4bec61dab Pull complete                                            8.6s 
[+] Running 2/2
 ✔ Network jenkins_default  Created                                        0.2s 
 ✔ Container jenkins-1        Started                                        3.6s 

```

6. Verify the logs

```bash
sudo docker compose logs --follow
```

```
jenkins  | 2024-08-14 09:49:09.249+0000 [id=47]	INFO	jenkins.install.SetupWizard#init: 
jenkins  | 
jenkins  | *************************************************************
jenkins  | 
jenkins  | Jenkins initial setup is required. An admin user has been created and a password generated.
jenkins  | Please use the following password to proceed to installation:
jenkins  | 
jenkins  | 3d56d7ddc87c459ebaafe1117f7f56e7
jenkins  | 
jenkins  | This may also be found at: /var/jenkins_home/secrets/initialAdminPassword
jenkins  | 
jenkins  | *************************************************************

```

7. Make a note of the password: 3d56d7ddc87c459ebaafe1117f7f56e7
8. You can also retrieve the password with:

```bash
cd
sudo cat /var/lib/jenkins/secrets/initialAdminPassword
```

***

**Configure Jenkins**

1. Access Jenkins UI.

{% embed url="<http://localhost:9080>" %}
Link to Jenkins UI
{% endembed %}

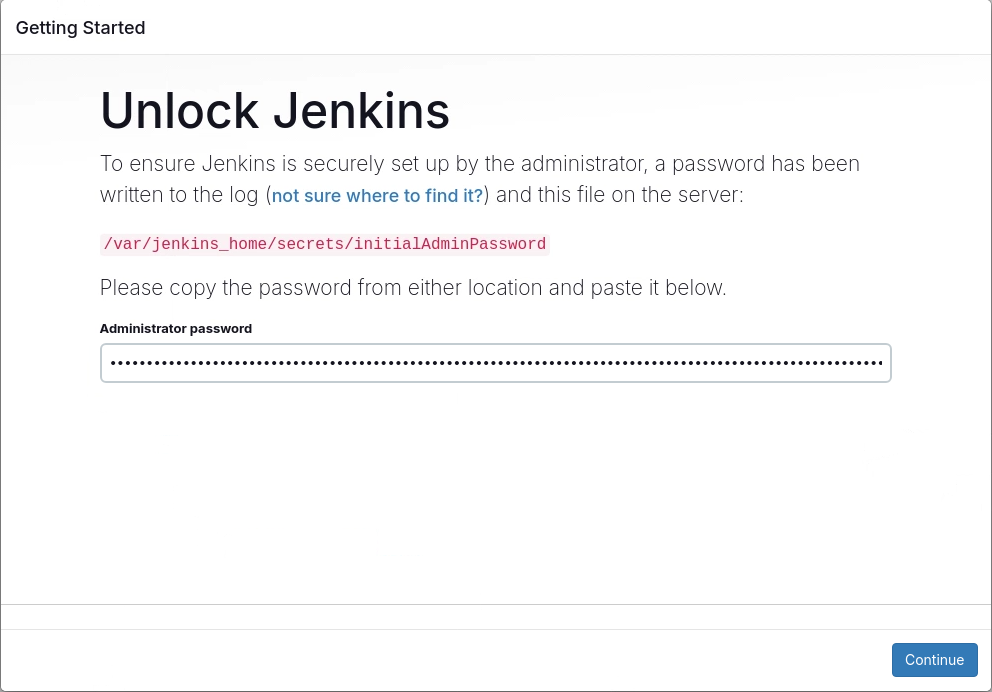
2. Copy and paste the password.

<figure><img src="/files/jBj5DJsh4x9WglXQkC4X" alt=""><figcaption><p>Setup Admin account</p></figcaption></figure>

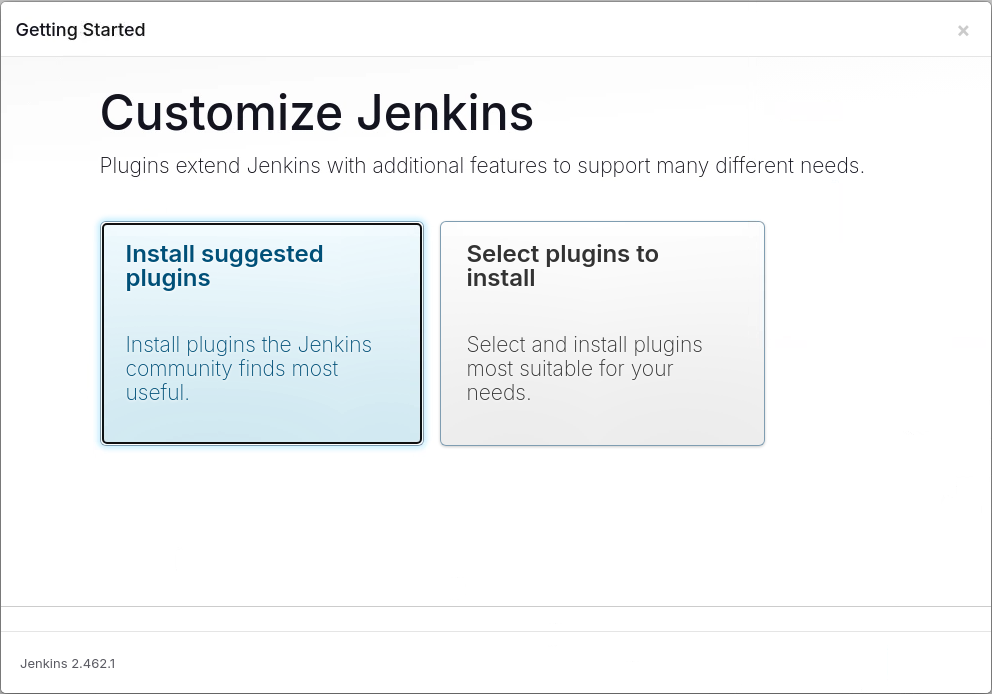
3. Click 'Continue' & keep the default option 'Install suggested plugins'.

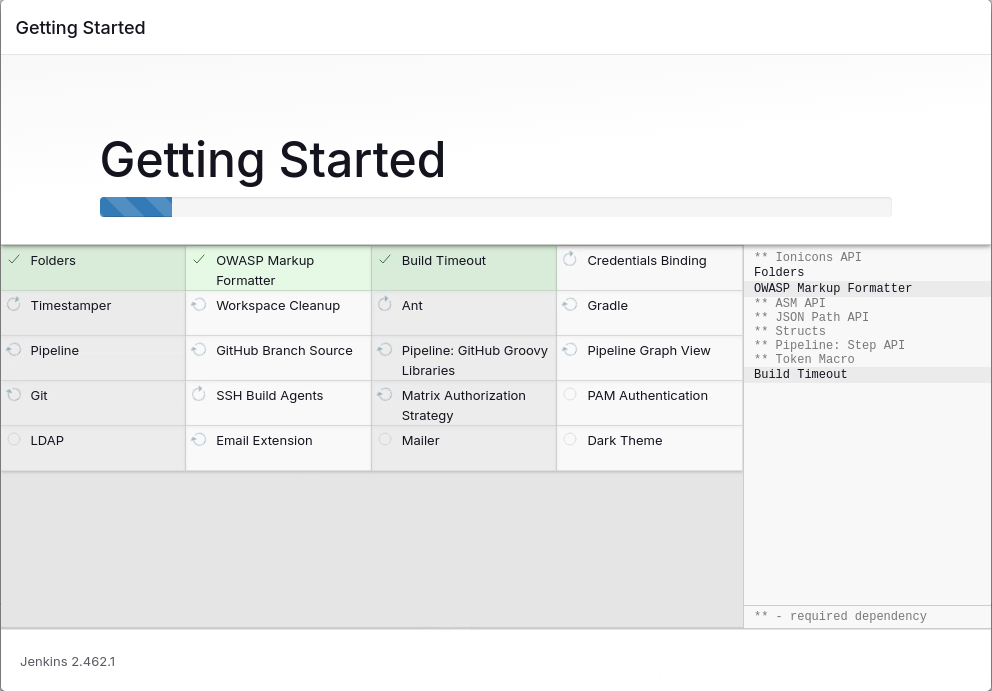
<figure><img src="/files/LIBPMVxA9vzLq7EXi9Hb" alt=""><figcaption><p>Install suggested plugins</p></figcaption></figure>

<figure><img src="/files/wjUJba9t6erfWnNx0Eu5" alt=""><figcaption><p>Default plugins</p></figcaption></figure>

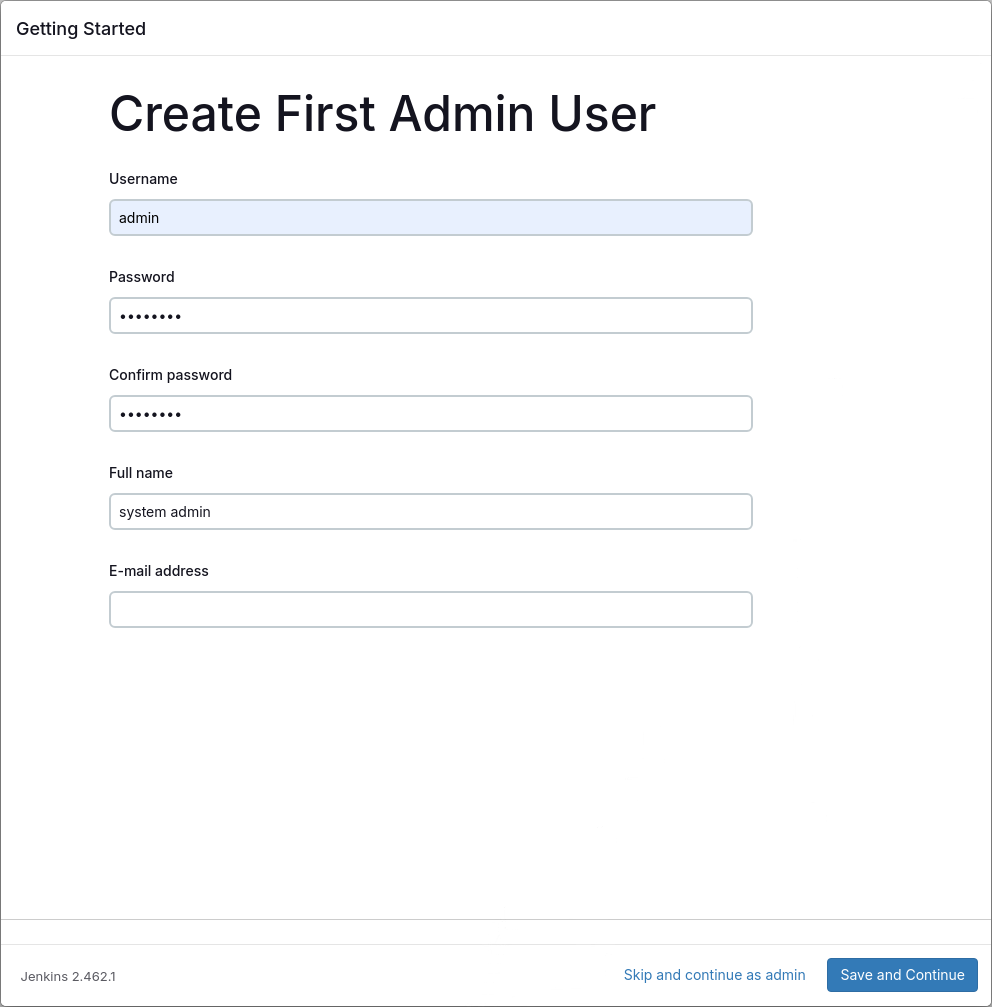
4. Create Admin User.

<table data-header-hidden><thead><tr><th width="236"></th><th></th></tr></thead><tbody><tr><td>Username</td><td>admin</td></tr><tr><td>Password</td><td>Welcome123!</td></tr><tr><td>Full name</td><td>system admin</td></tr><tr><td></td><td></td></tr></tbody></table>

<figure><img src="/files/Gnj8RJWFDmXDW1clQlwW" alt=""><figcaption><p>admin user</p></figcaption></figure>

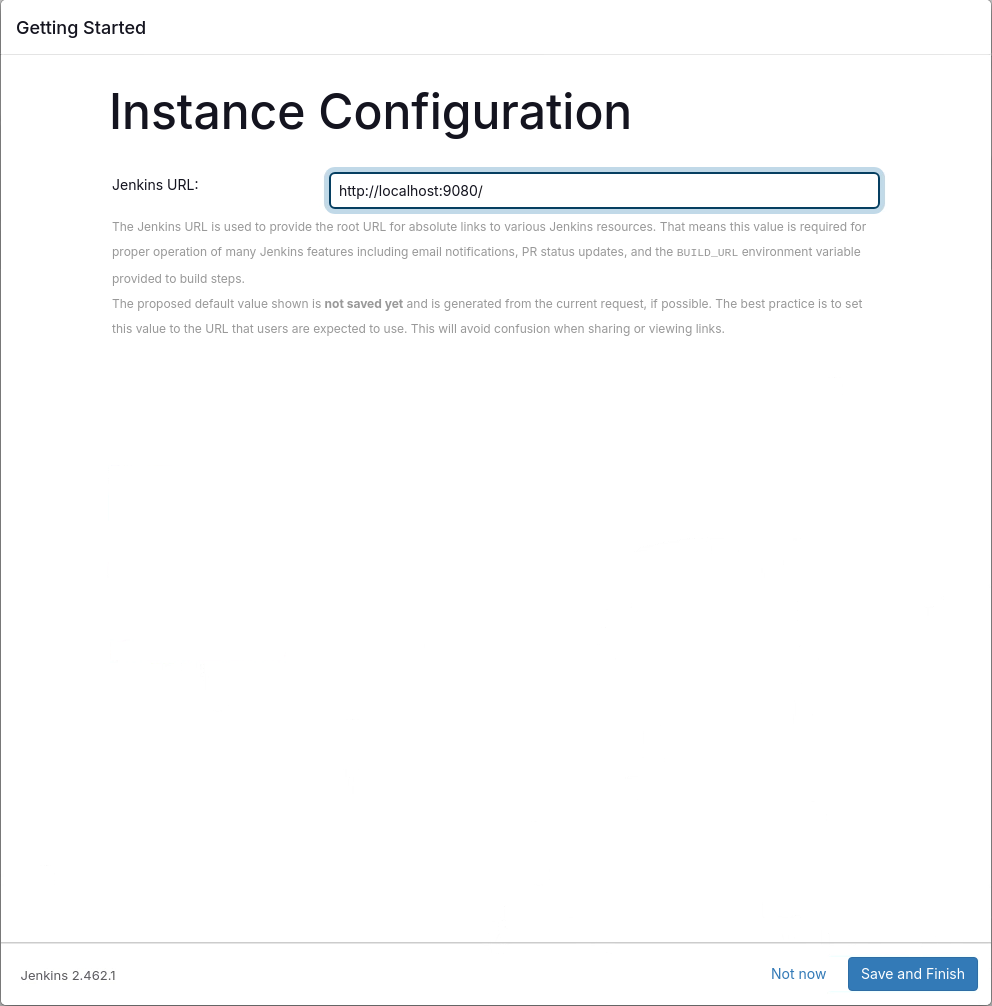
5. Save & Finish. You are now able to access Jenkins with the default admin account.

<figure><img src="/files/KISpgOfdxr6omL3j9Nf9" alt=""><figcaption><p>Jenkins URL confirmtion</p></figcaption></figure>
{% endtab %}

{% tab title="Jenkins Agent" %}
{% hint style="success" %}
This section is for Reference only.

Best Practice is to configure a specific system account - Jenkins
{% endhint %}

{% hint style="info" %}
The Jenkins architecture is designed for distributed build environments. It allows us to use different environments for each build project balancing the workload among multiple agents running jobs in parallel.

The Jenkins controller is the original node in the Jenkins installation. The Jenkins controller administers the Jenkins agents and orchestrates their work, including scheduling jobs on agents and monitoring agents. Agents may be connected to the Jenkins controller using either local or cloud computers.

The agents require a Java installation and a network connection to the Jenkins controller.
{% endhint %}

1. Generate an SSH key. This key will allow the controller to access the agent via SSH.

```bash
cd
ssh-keygen -f ~/.ssh/jenkins_agent
```

```
Generating public/private rsa key pair.
Enter passphrase (empty for no passphrase): 
Enter same passphrase again: 
Your identification has been saved in /home/pentaho/.ssh/jenkins_agent
Your public key has been saved in /home/pentaho/.ssh/jenkins_agent.pub
The key fingerprint is:
SHA256:w+logzz6LDa6zZqmBNqbjLBAmF8Tw06vIuBwYFReA1U pentaho@pentaho
The key's randomart image is:
+---[RSA 3072]----+
| ..oo+.E         |
|. ... .          |
|.. .=            |
|oo o + . .       |
|*.. + . S        |
|B+ o + o .       |
|=o+ = + .        |
|+X+* o .         |
|@=B+o            |
+----[SHA256]-----+
```

{% hint style="info" %}
This command creates two files:

jenkins\_agent - private key.

jenkins-agent.pub - public key.
{% endhint %}

2. Navigate to your Jenkins dashboard.

{% embed url="<http://localhost:9080/>" %}
Link to jenkins UI
{% endembed %}

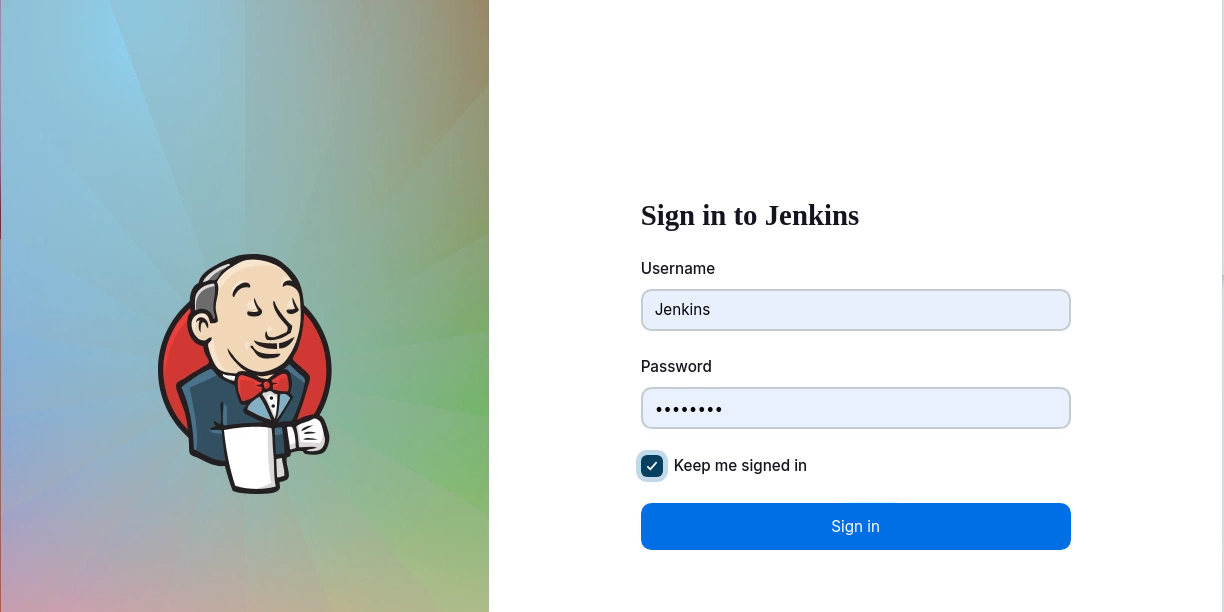
3. Log in as user: Jenkins

<figure><img src="/files/3cqSolthVD0WH8NF5i4b" alt=""><figcaption><p>Jenkins UI</p></figcaption></figure>

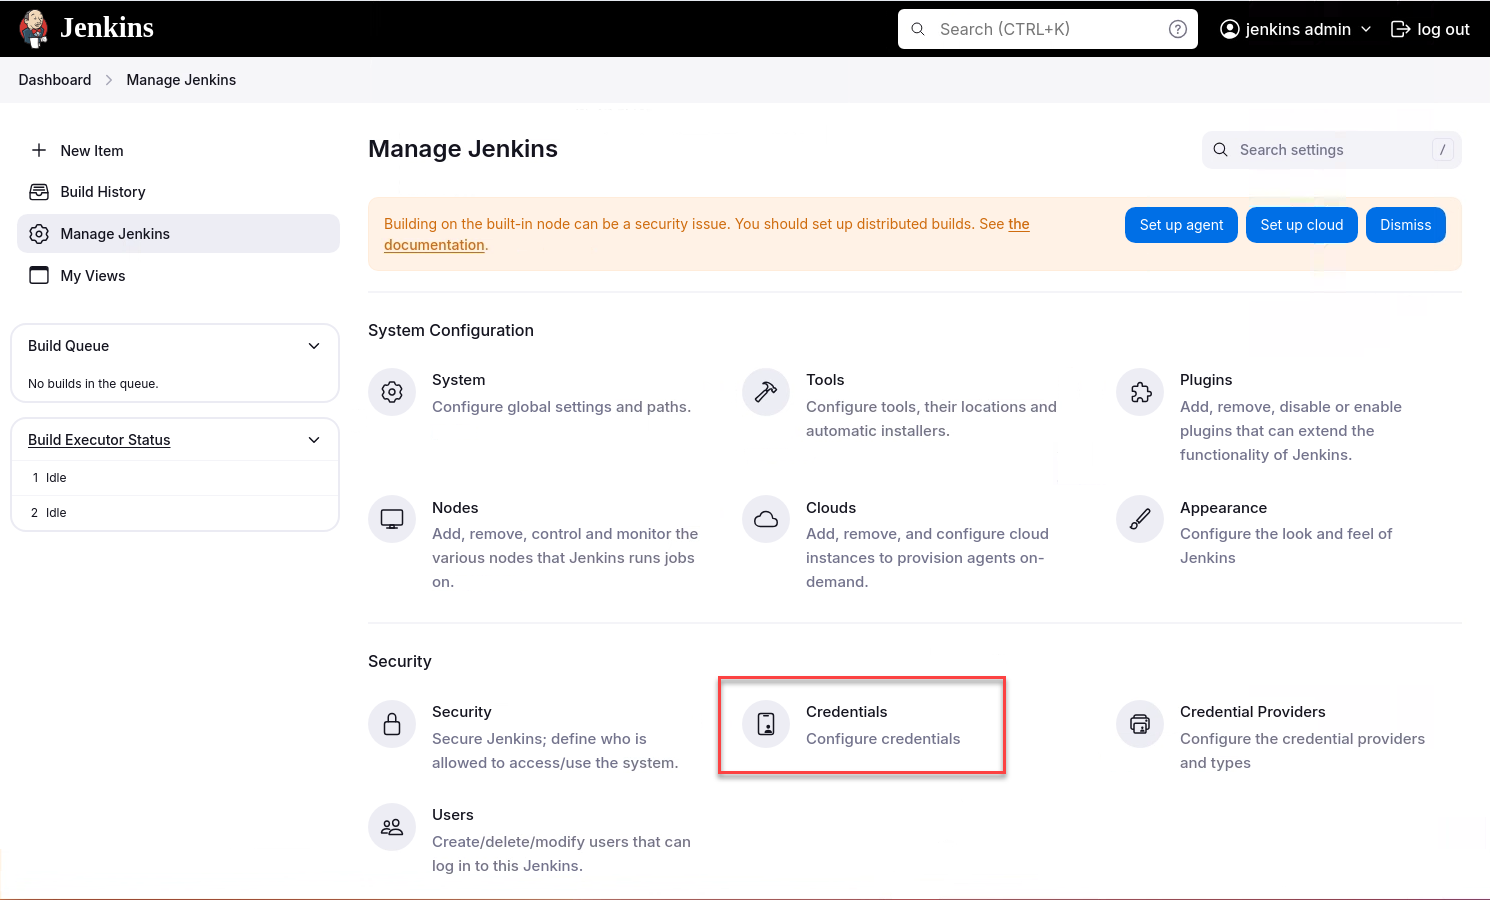
2. Go to `Manage Jenkins` option in main menu and click on `Credentials` button.

<figure><img src="/files/ntYL30c0B3cLhZ3hLqLn" alt=""><figcaption><p>Jenkins UI - Credentials</p></figcaption></figure>

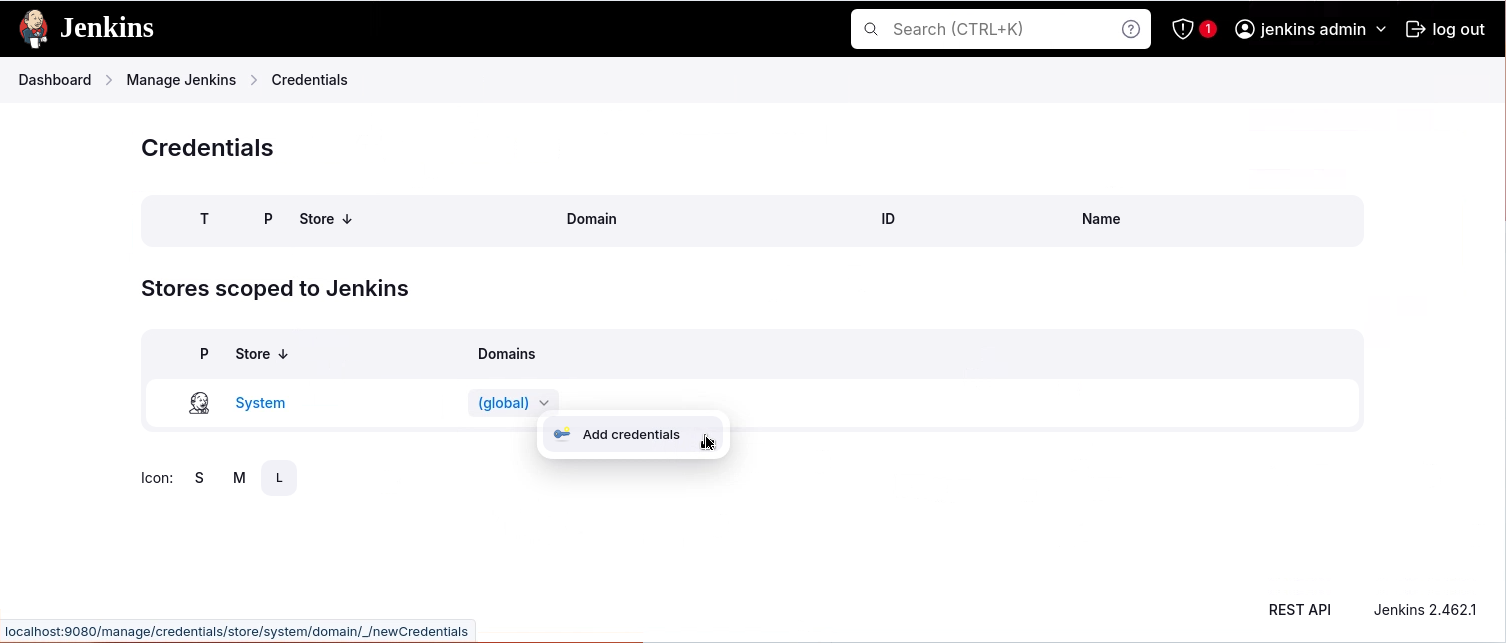
3. From the drop down select: Add Credentials

<figure><img src="/files/2jylMmFFaX0JTtUTZrt8" alt=""><figcaption><p>Add credentials to</p></figcaption></figure>

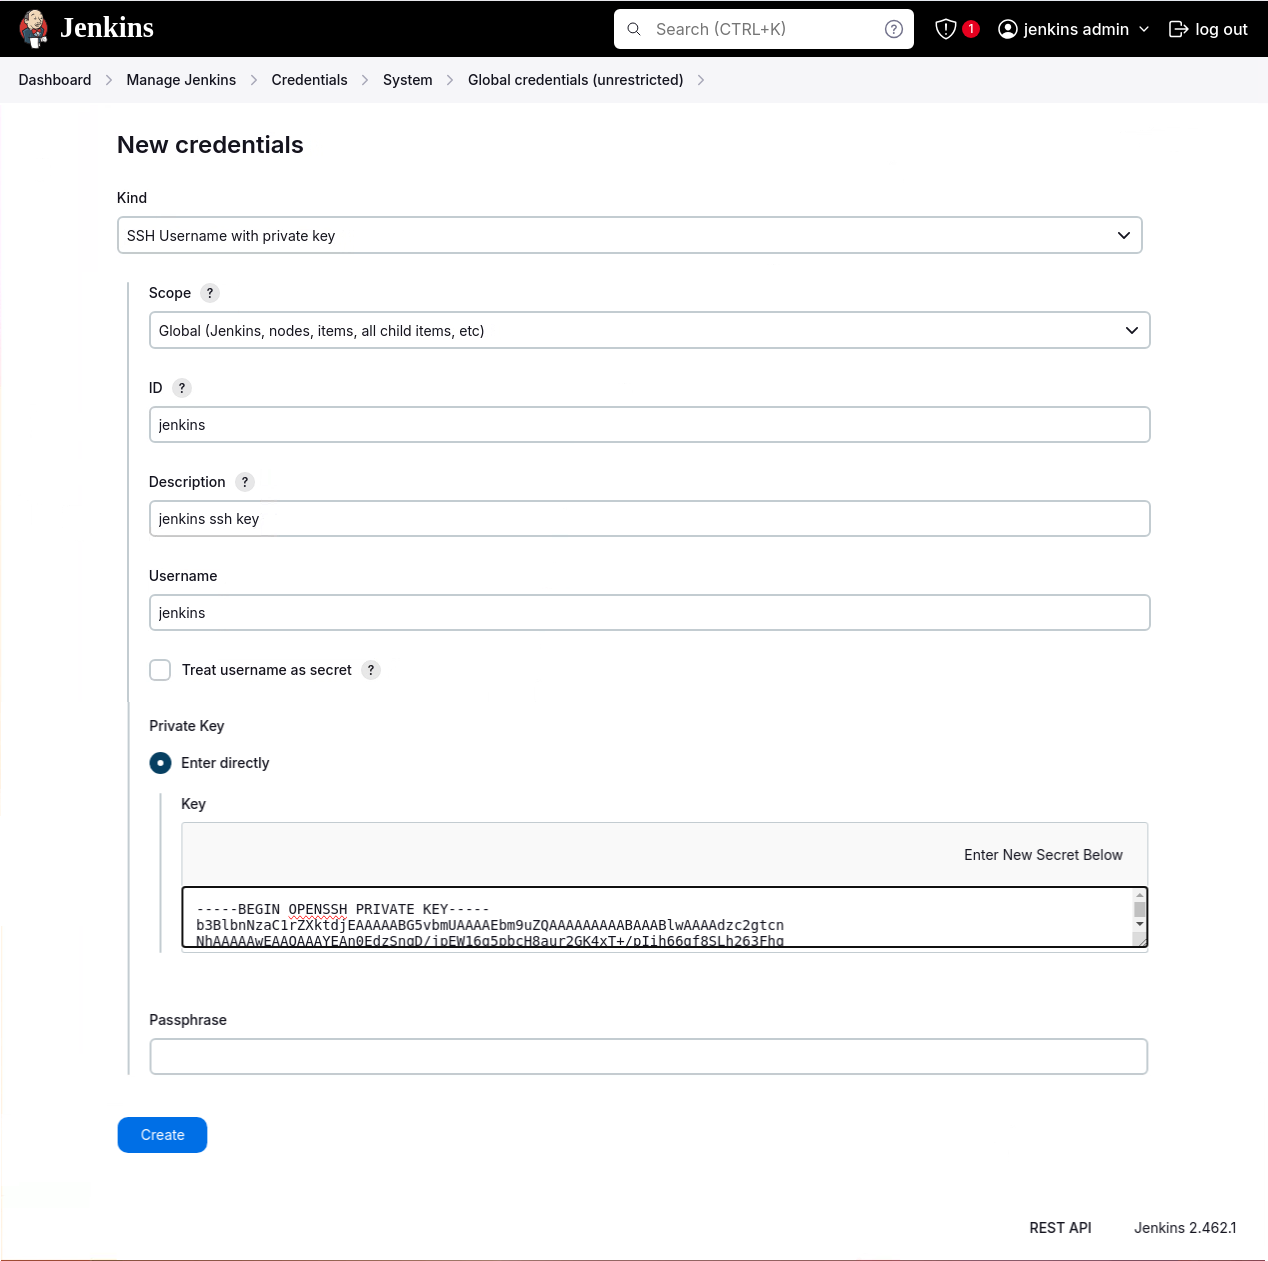
4. Fill in the form:

<figure><img src="/files/sQOErazt9HQPOtWJwkcU" alt=""><figcaption><p>Configure connection to Agent</p></figcaption></figure>

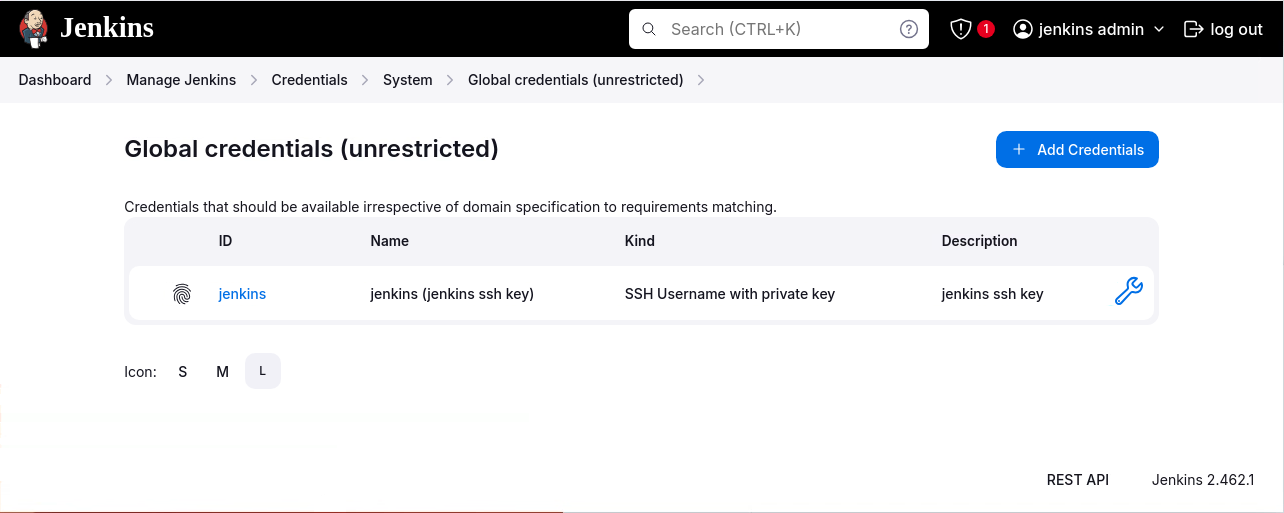
<table><thead><tr><th width="156"></th><th></th></tr></thead><tbody><tr><td>Kind</td><td>SSH Username with private key</td></tr><tr><td>id</td><td>jenkins</td></tr><tr><td>Description</td><td>jenkins ssh key</td></tr><tr><td>Username</td><td>jenkins - jenkins' user already exists by default in the jenkins_agent-1 container.</td></tr><tr><td>Private Key</td><td>select <code>Enter directly</code> and press the Add button to insert the content of your private key file at <code>~/.ssh/jenkins_agent</code></td></tr><tr><td>Paraphrase</td><td>fill your passphrase used to generate the SSH key pair.</td></tr></tbody></table>

5. Click on 'Create'.

<figure><img src="/files/TDQa2zscHl9KqPvZUsin" alt=""><figcaption><p>Credentials to access agents - SSH Key</p></figcaption></figure>

***

**Jenkins Agent on Docker**

1. Run the command to start your first agent.

```bash
docker run -d --rm --name=jenkins_agent-1 -p 22:22 \
-e "JENKINS_AGENT_SSH_PUBKEY=[your-public-key]" \
jenkins/ssh-agent:alpine-jdk17
```

{% hint style="info" %}
• Replace the tag \[your-public-key] for your own SSH **public** key.

• Your public key value in this example could be found by issuing : `cat ~/.ssh/jenkins_agent_key.pub` on the machine your created it. Do not add the square brackets `[]` around the key value

• The value of \[your-public-key] MUST include the full contents of your .pub file, including the `ssh-XXXX` prefix.

• Ex: `ssh-rsa AAAAB3NzaC1yc2EAAAADAQABAAAAQQCo9+BpMRYQ/dL3DS2CyJxRF+j6ctbT3/Qp84+KeFhnii7NT7fELilKUSnxS30WAvQCCo2yU1orfgqr41mM70MB`

• If your machine already has a ssh server running on the `22` port (if you logged onto this machine thanks to the `ssh` command, that’s the case), you should use another port for the `docker` command, such as `-p 4444:22`
{% endhint %}

or you can modify the docker-compose.yml to include the agent and public key.

2. Bring the jenkins-1 container down.

```bash
cd
cd ~/Jenkins
docker-compose down
```

3. Edit the docker-compose.yml

```bash
cd
cd ~/Jenkins
nano docker-compose.yml
```

{% hint style="warning" %}
Add the \~/.ssh/jenkins\_agent.pub - the public key that will authentiacte the connection to the agent.
{% endhint %}

```
services:
  jenkins:
    image: jenkins/jenkins:lts
    restart: always
    privileged: true
    user: root
    ports:
      - 9080:8080
      - 50000:50000
    container_name: jenkins-1
    volumes:
      - /home/pentaho/Jenkins/jenkins_configuration:/var/jenkins_home
      - /var/run/docker.sock:/var/run/docker.sock
  agent:
    image: jenkins/ssh-agent:jdk17
    privileged: true
    user: root
    container_name: jenkins_agent-1
    expose:
      - 22
    environment:
      - JENKINS_AGENT_SSH_PUBKEY=ssh-rsa
AAAAB3NzaC1yc2EAAAADAQABAAABgQCfQR3NKeoP+OkRbXqDmltwfxq6vYYrjFP7+kiKHrqB/xIuHbrcWGrRpb65qaPXstzxZLopiN1lkdn0kCeJAHwe38tHB+CJESqjvGemq0hRPAY/YGT1DqyP0l5IQAck6NGRC6VM7Gto/vGTgJQF5eNh+hPa+4wfTvkzfwy5gB5rJN9zfqW08uYNurqOJCHoCBb0FnyRVCO3WzWReib+A5YVP880jOLLR3jhyNkJEjsDH1yFPPc5sS11bHcK9yl8NZeVsi9KpPFCOYSuZCmBai+uXXX+vMTwQ95k4qUMorQqV8ctZ1U8b7PlcuBlv0OSz+LyxOBELPxHYuoRGn4T5bWiQCUakSzaTmsstsyRFQXL5tG+TZwGxzvsbyGNUY7ybvh08tr4a8XowkctrdLEJKKr3n+Meag1FpHwEI0c+X96hL3RyC6+pAOTeW1ZbljydNTW59LM47nzrqmGn/mZF6PHSlmjfy9IUWZuHT1E0pTfq+ro+XNfNHcnhnqzIu7v5OM= pentaho@pentaho
```

```
[+] Running 9/9
 ✔ agent Pulled                                                            6.6s 
   ✔ ca4e5d672725 Already exists                                           0.0s 
   ✔ e5f960337628 Pull complete                                            0.4s 
   ✔ a05e468af172 Pull complete                                            4.0s 
   ✔ e60e3fc02759 Pull complete                                            4.0s 
   ✔ 4f4fb700ef54 Pull complete                                            4.0s 
   ✔ dee10b008112 Pull complete                                            4.9s 
   ✔ 670563ebccf3 Pull complete                                            4.9s 
   ✔ 1b4075dda320 Pull complete                                            5.0s 
[+] Running 3/3
 ✔ Network jenkins_default    Created                                      0.1s 
 ✔ Container jenkins          Started                                      1.5s 
 ✔ Container jenkins_agent-1  Started                                      1.5s 
```

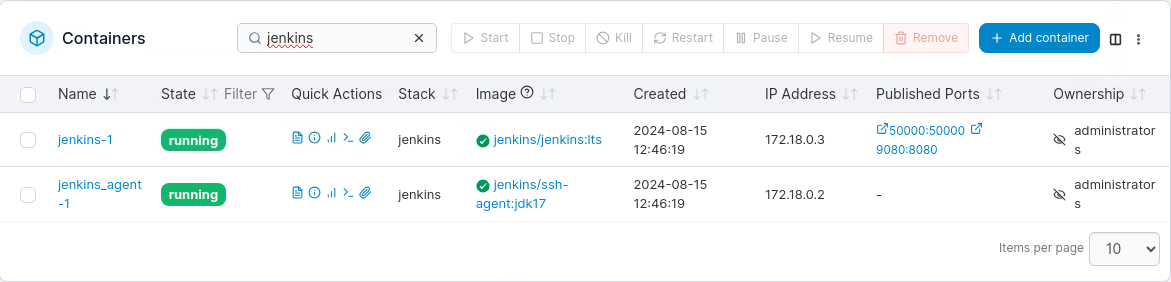
4. Check that the Jenkins Docker Agent is up and running.

<figure><img src="/files/bTKD4gTOX0SZDKKiJJr6" alt=""><figcaption><p>Portainer - jenkins containers</p></figcaption></figure>

***

**Configure the Agent**

{% hint style="info" %}
This is a very basic setup - everything is installed on a single server, i.e. from the master node we can deploy a new slave node & run our Jobs using the deployed Agent.
{% endhint %}

1. Navigate to your Jenkins dashboard.
2. Log in as user: Jenkins

<figure><img src="/files/3cqSolthVD0WH8NF5i4b" alt=""><figcaption><p>Jenkins UI</p></figcaption></figure>

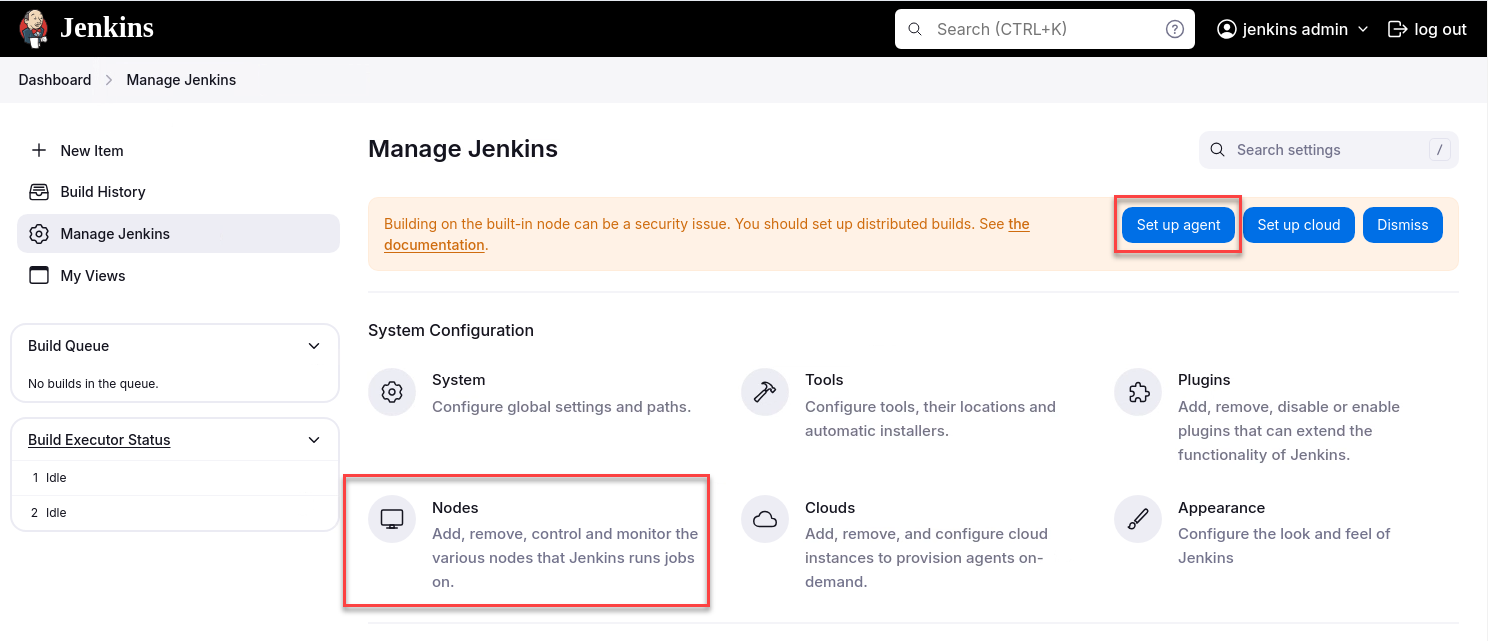
2. Go to `Manage Jenkins` option in main menu and click on `Nodes` button.

Or click on the Set Up agent message.

<figure><img src="/files/J7iuIjf9jvLQCY9rDVMK" alt=""><figcaption><p>Configure Node</p></figcaption></figure>

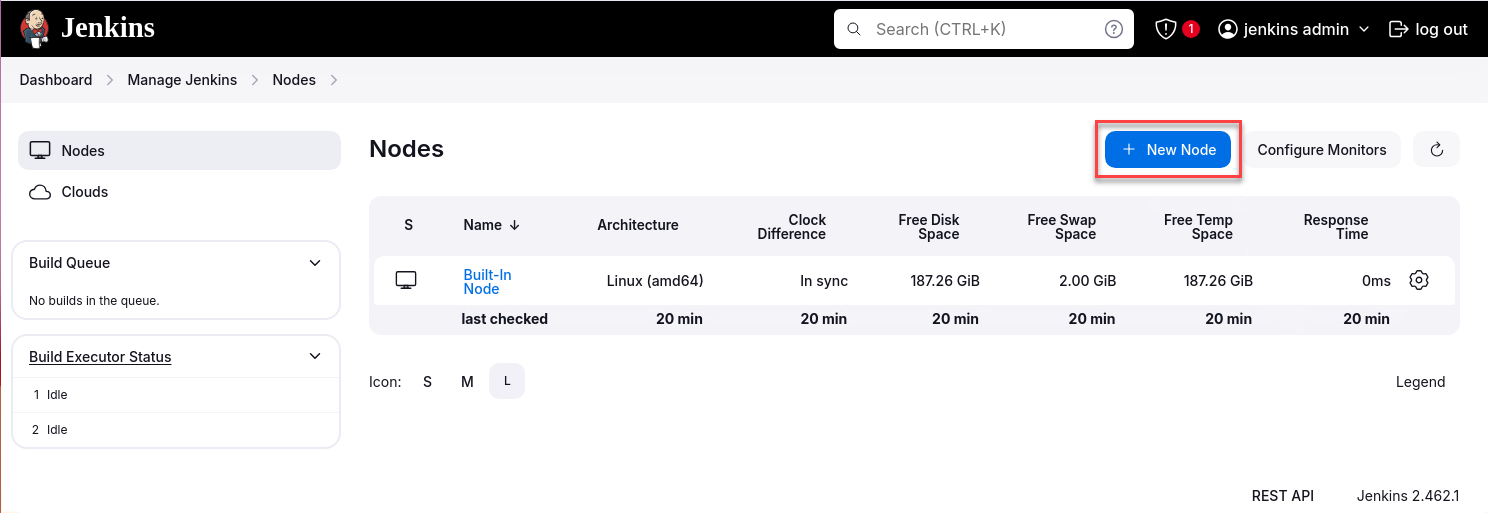
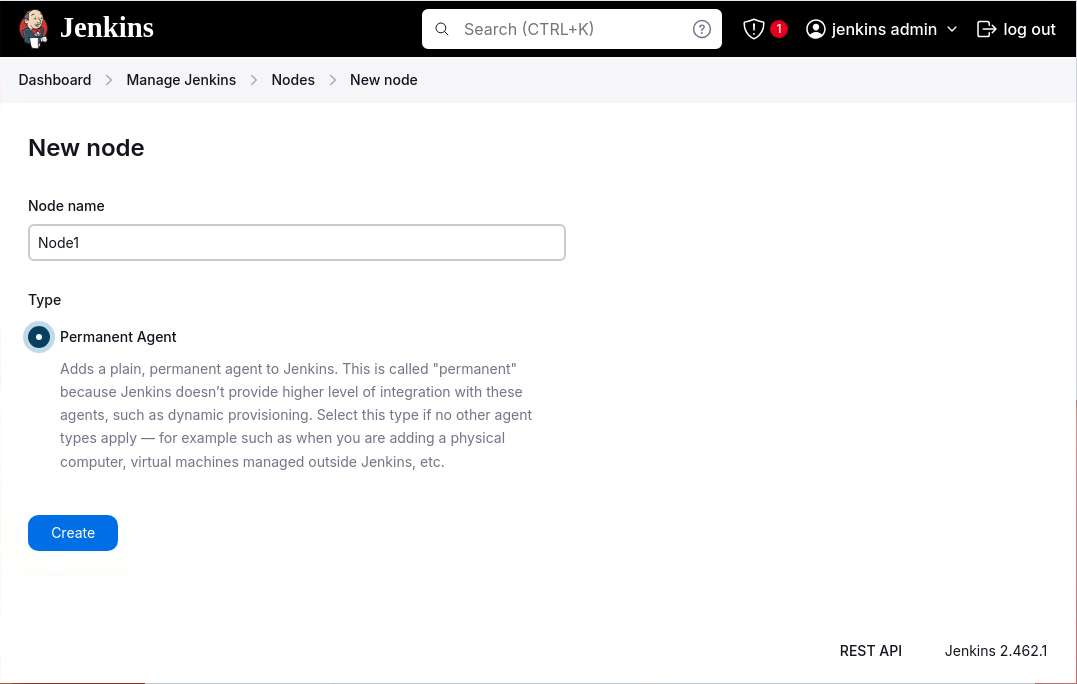
3. Click on `New Node` button.

<figure><img src="/files/QXZQ7xLX3NYbbx6dcNS3" alt=""><figcaption><p>Create New Node</p></figcaption></figure>

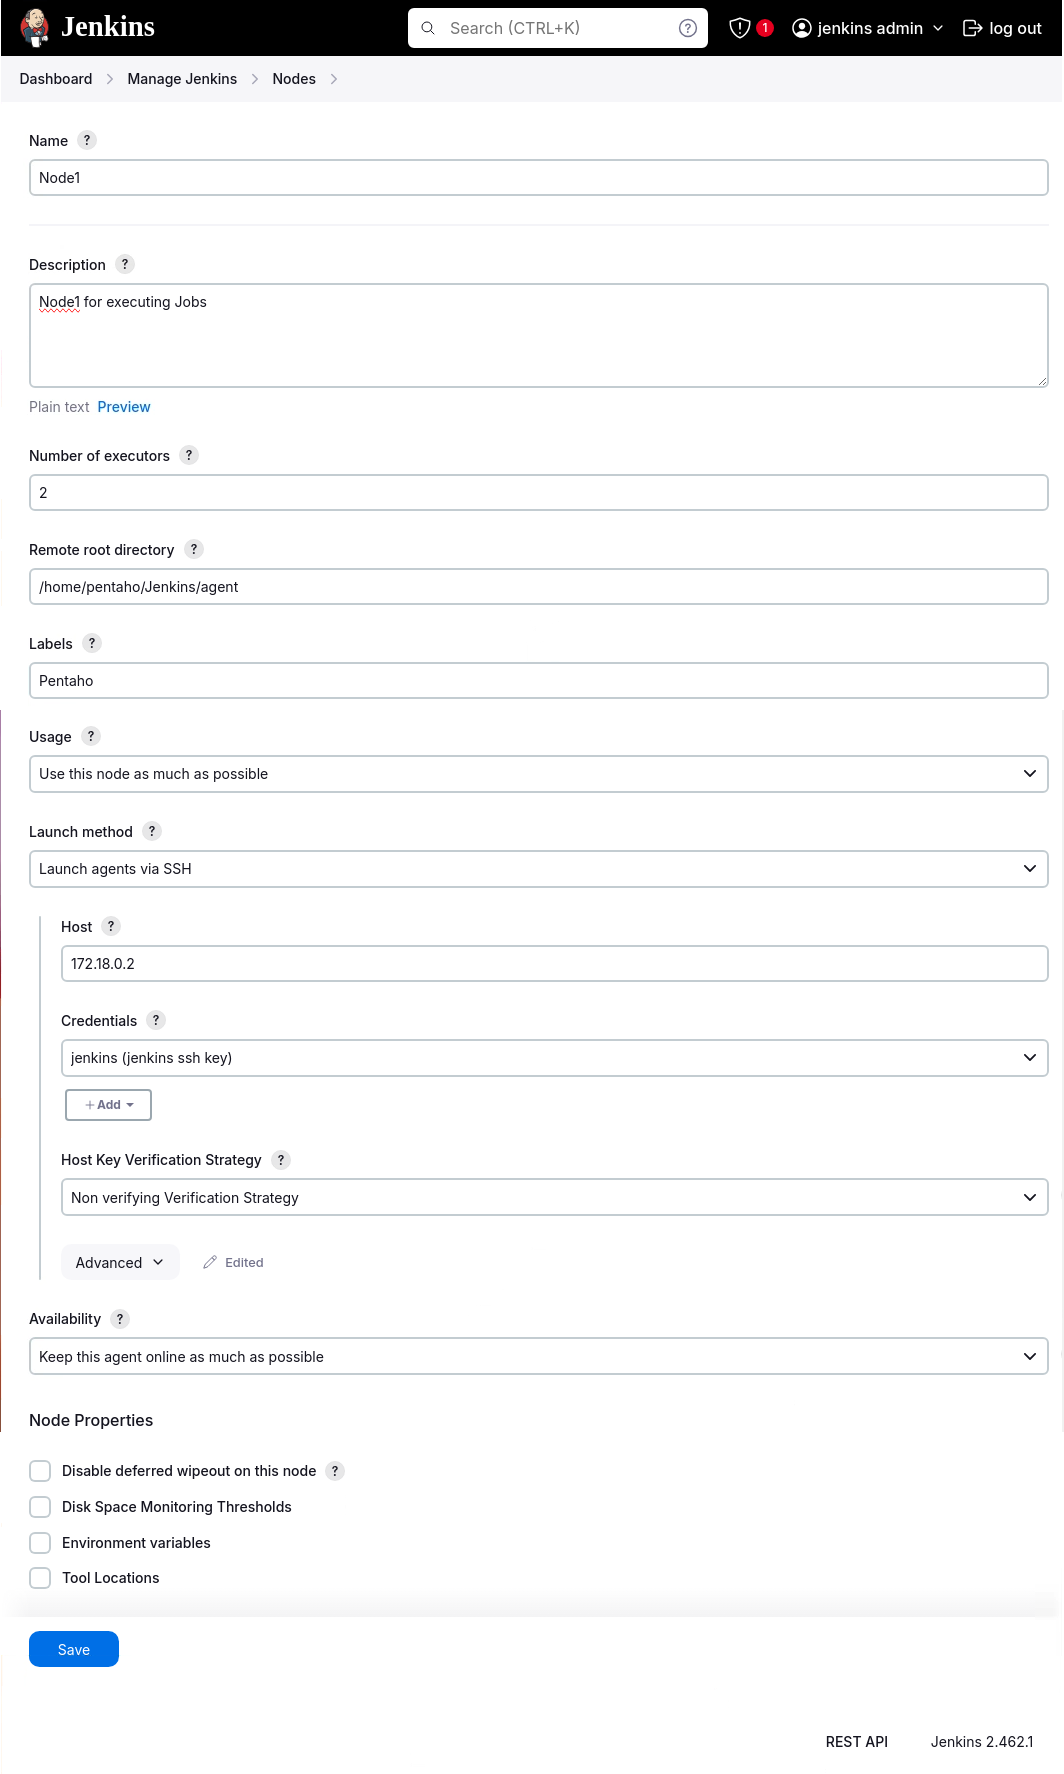
4. Enter the following details:

<figure><img src="/files/4jPa3jHS12VRAEfm0mAk" alt=""><figcaption><p>New Node</p></figcaption></figure>

x

<figure><img src="/files/Kiu7Dqm4NQ1biuxRiIXR" alt=""><figcaption><p>Node1 configuration</p></figcaption></figure>
{% endtab %}
{% endtabs %}
{% endtab %}

{% tab title="Jenkins" %}
{% hint style="info" %}
Let's run through a couple of Jenkins scenarios:

**Periodic Build** - demonstrates the first stages of the CI/CD pipeline. Developers commit to a Github repository which, periodically, triggers a 'build'.

The 'build' executes a shell 'PUT' script which uploads the Jobs & Transformations into the Pentaho Repository.

**Commit Build** - a Github commit triggers a 'build'.
{% endhint %}

{% tabs %}
{% tab title="Periodic Build" %}
{% hint style="info" %}
You could simply set a CRON schedule to trigger the 'build' process ..
{% endhint %}

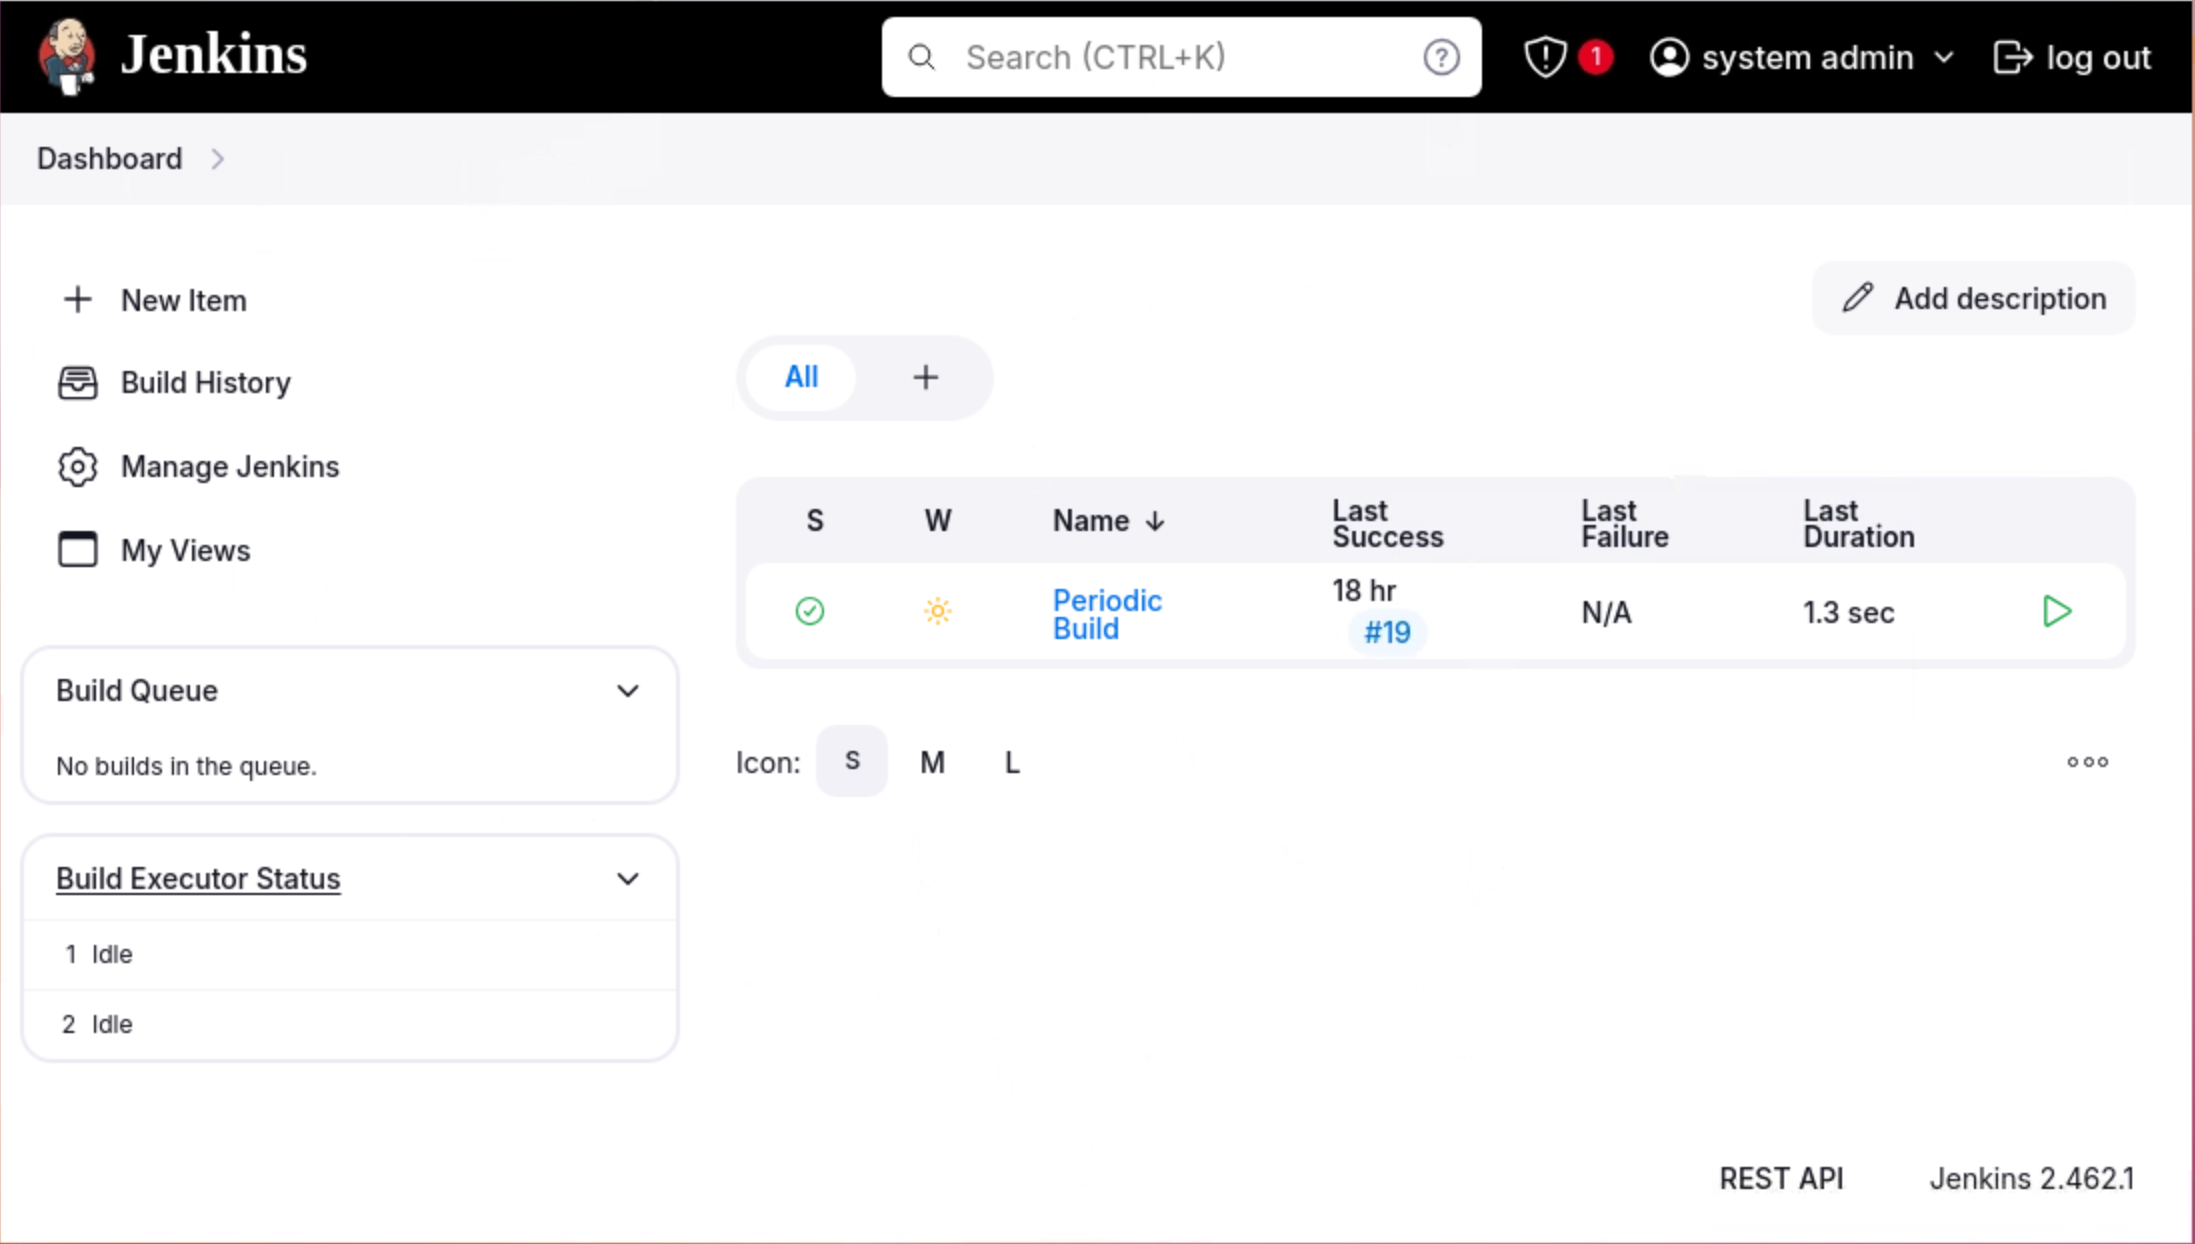
1. Log into Jenkins.

{% embed url="<http://localhost:9080>" %}
Link to Jenkins
{% endembed %}

| Username | admin       |
| -------- | ----------- |
| Password | Welcome123! |

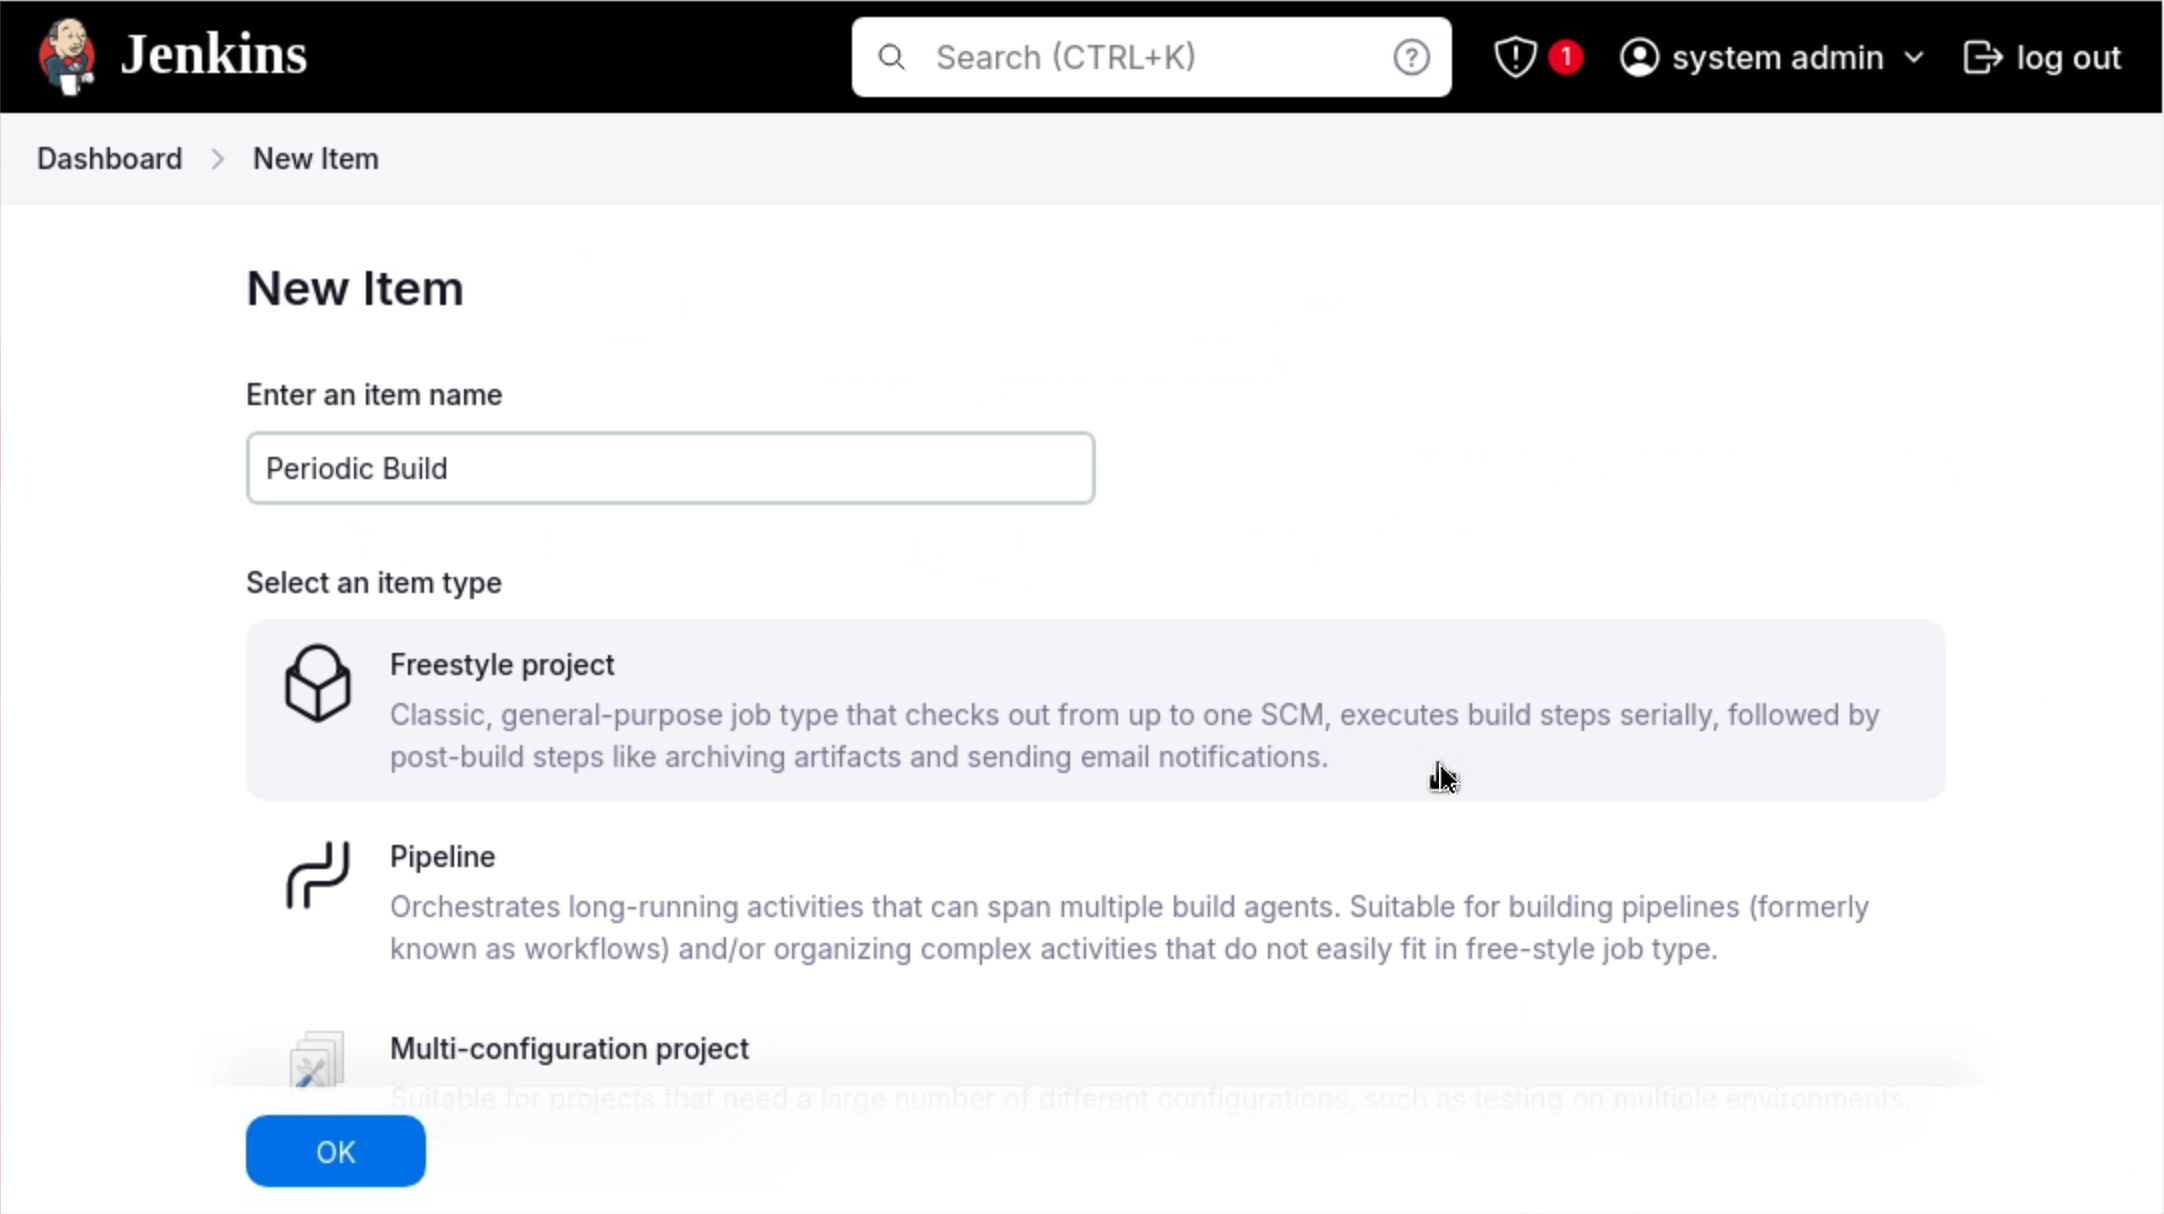
2. Click on 'Create a Job' or 'New Item'.
3. Provide a name - Periodic Build - for the item and then choose: 'Freestyle project' & click: 'OK'

<figure><img src="/files/atxi3IGoXBX519YBe5AV" alt=""><figcaption><p>Freestyle project - Periodic Build</p></figcaption></figure>

4. Set the following project options - execute every 5 mins:

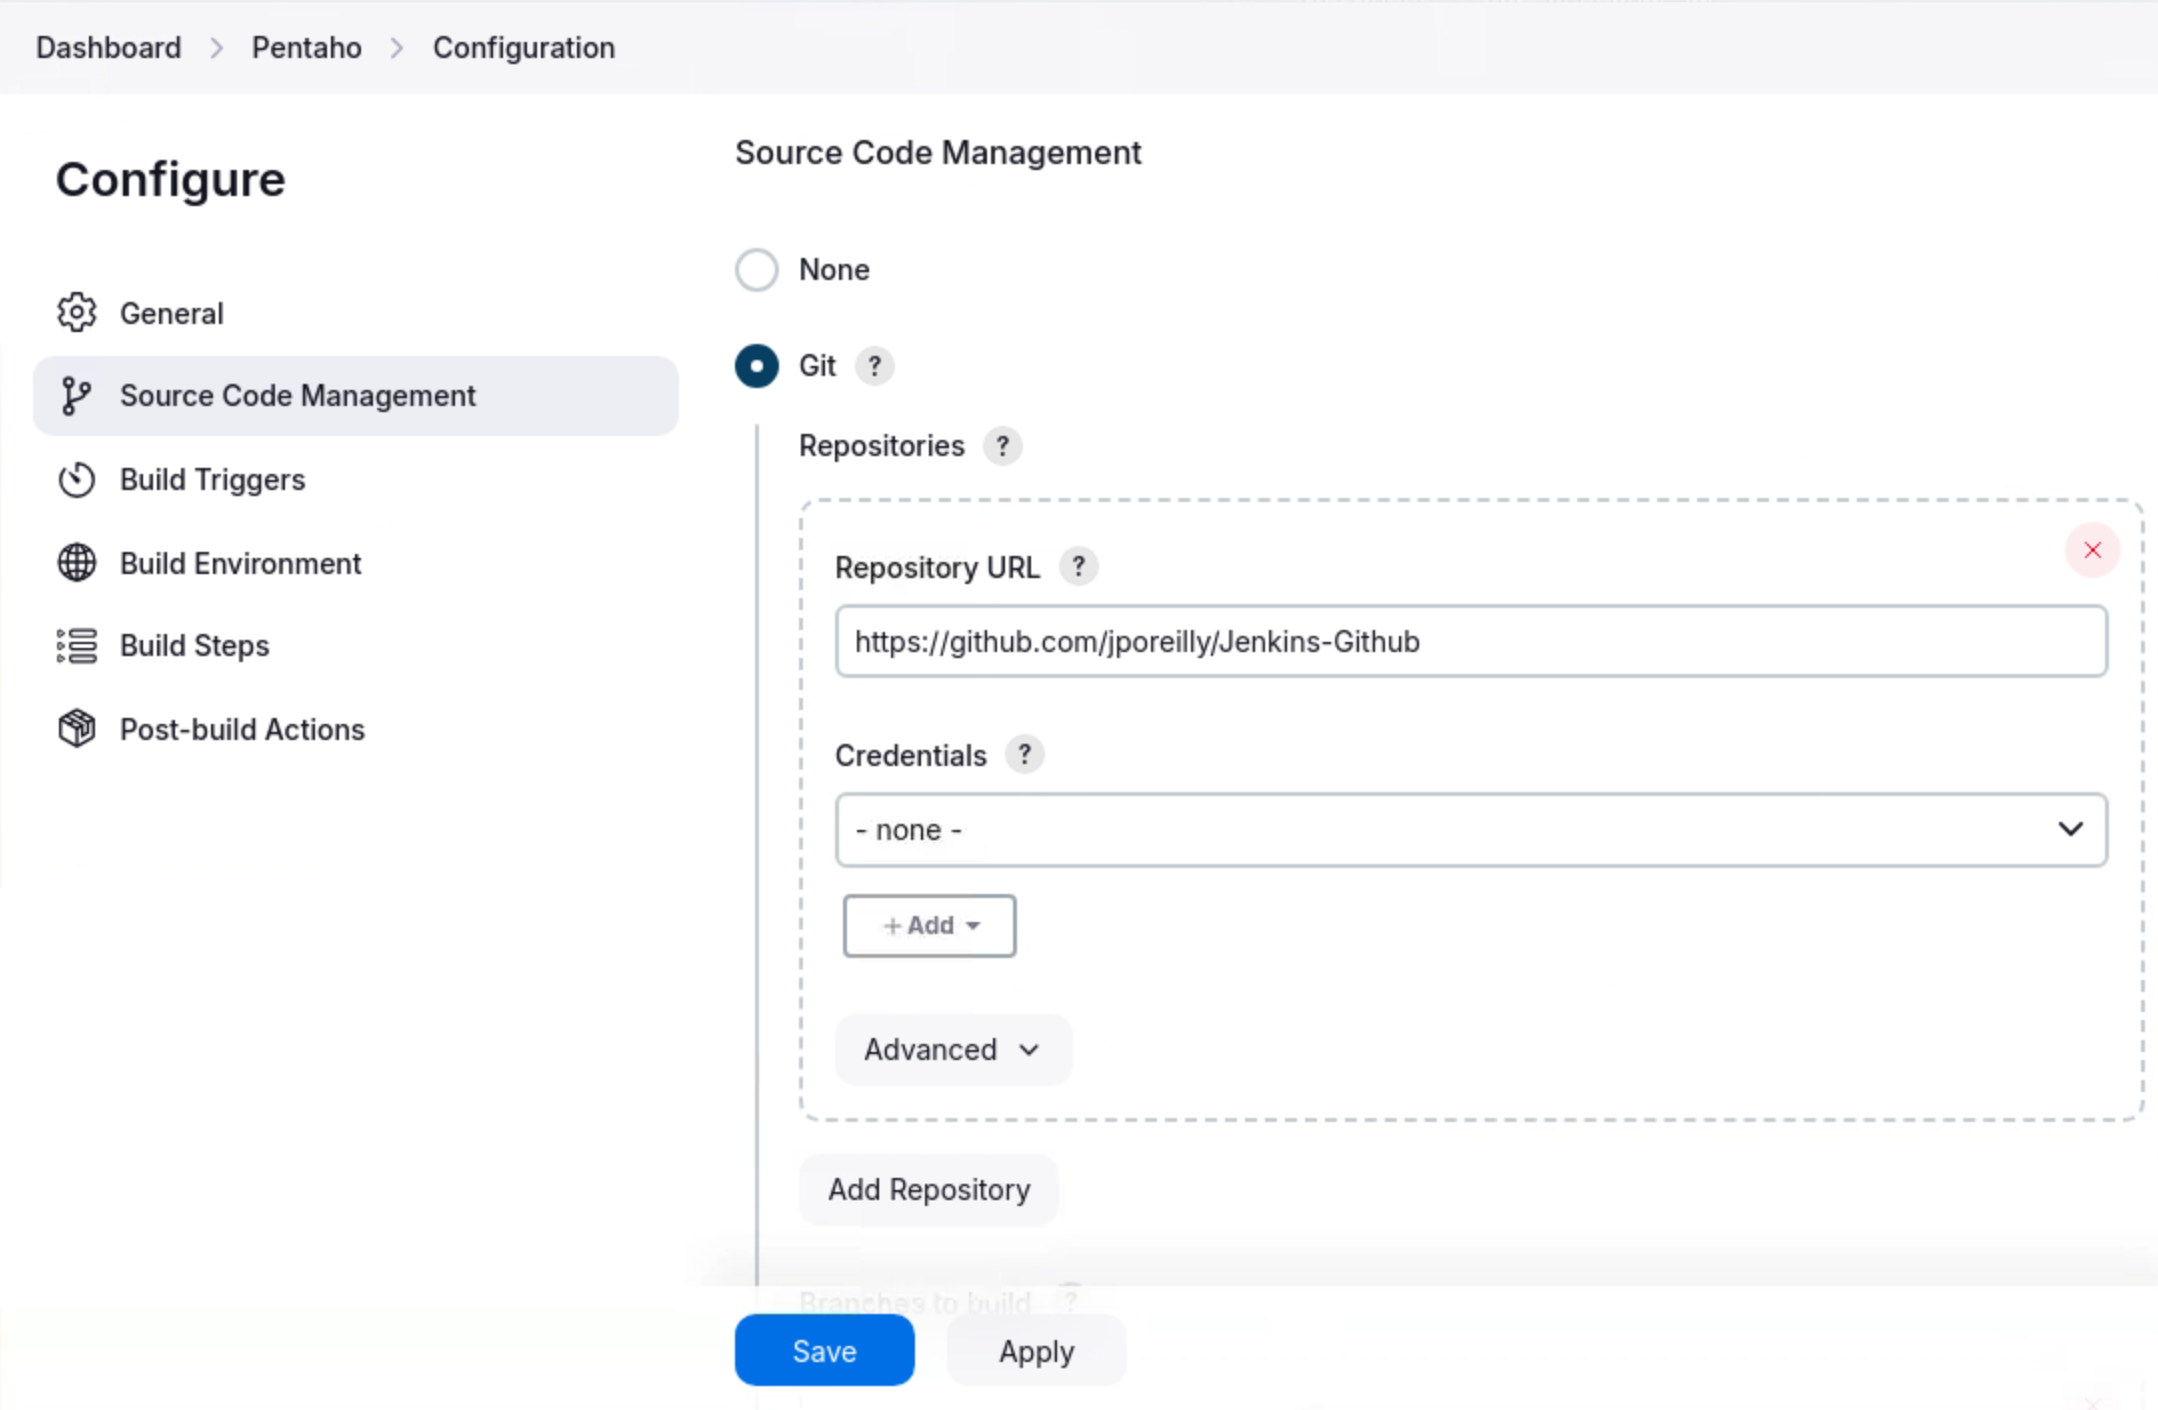
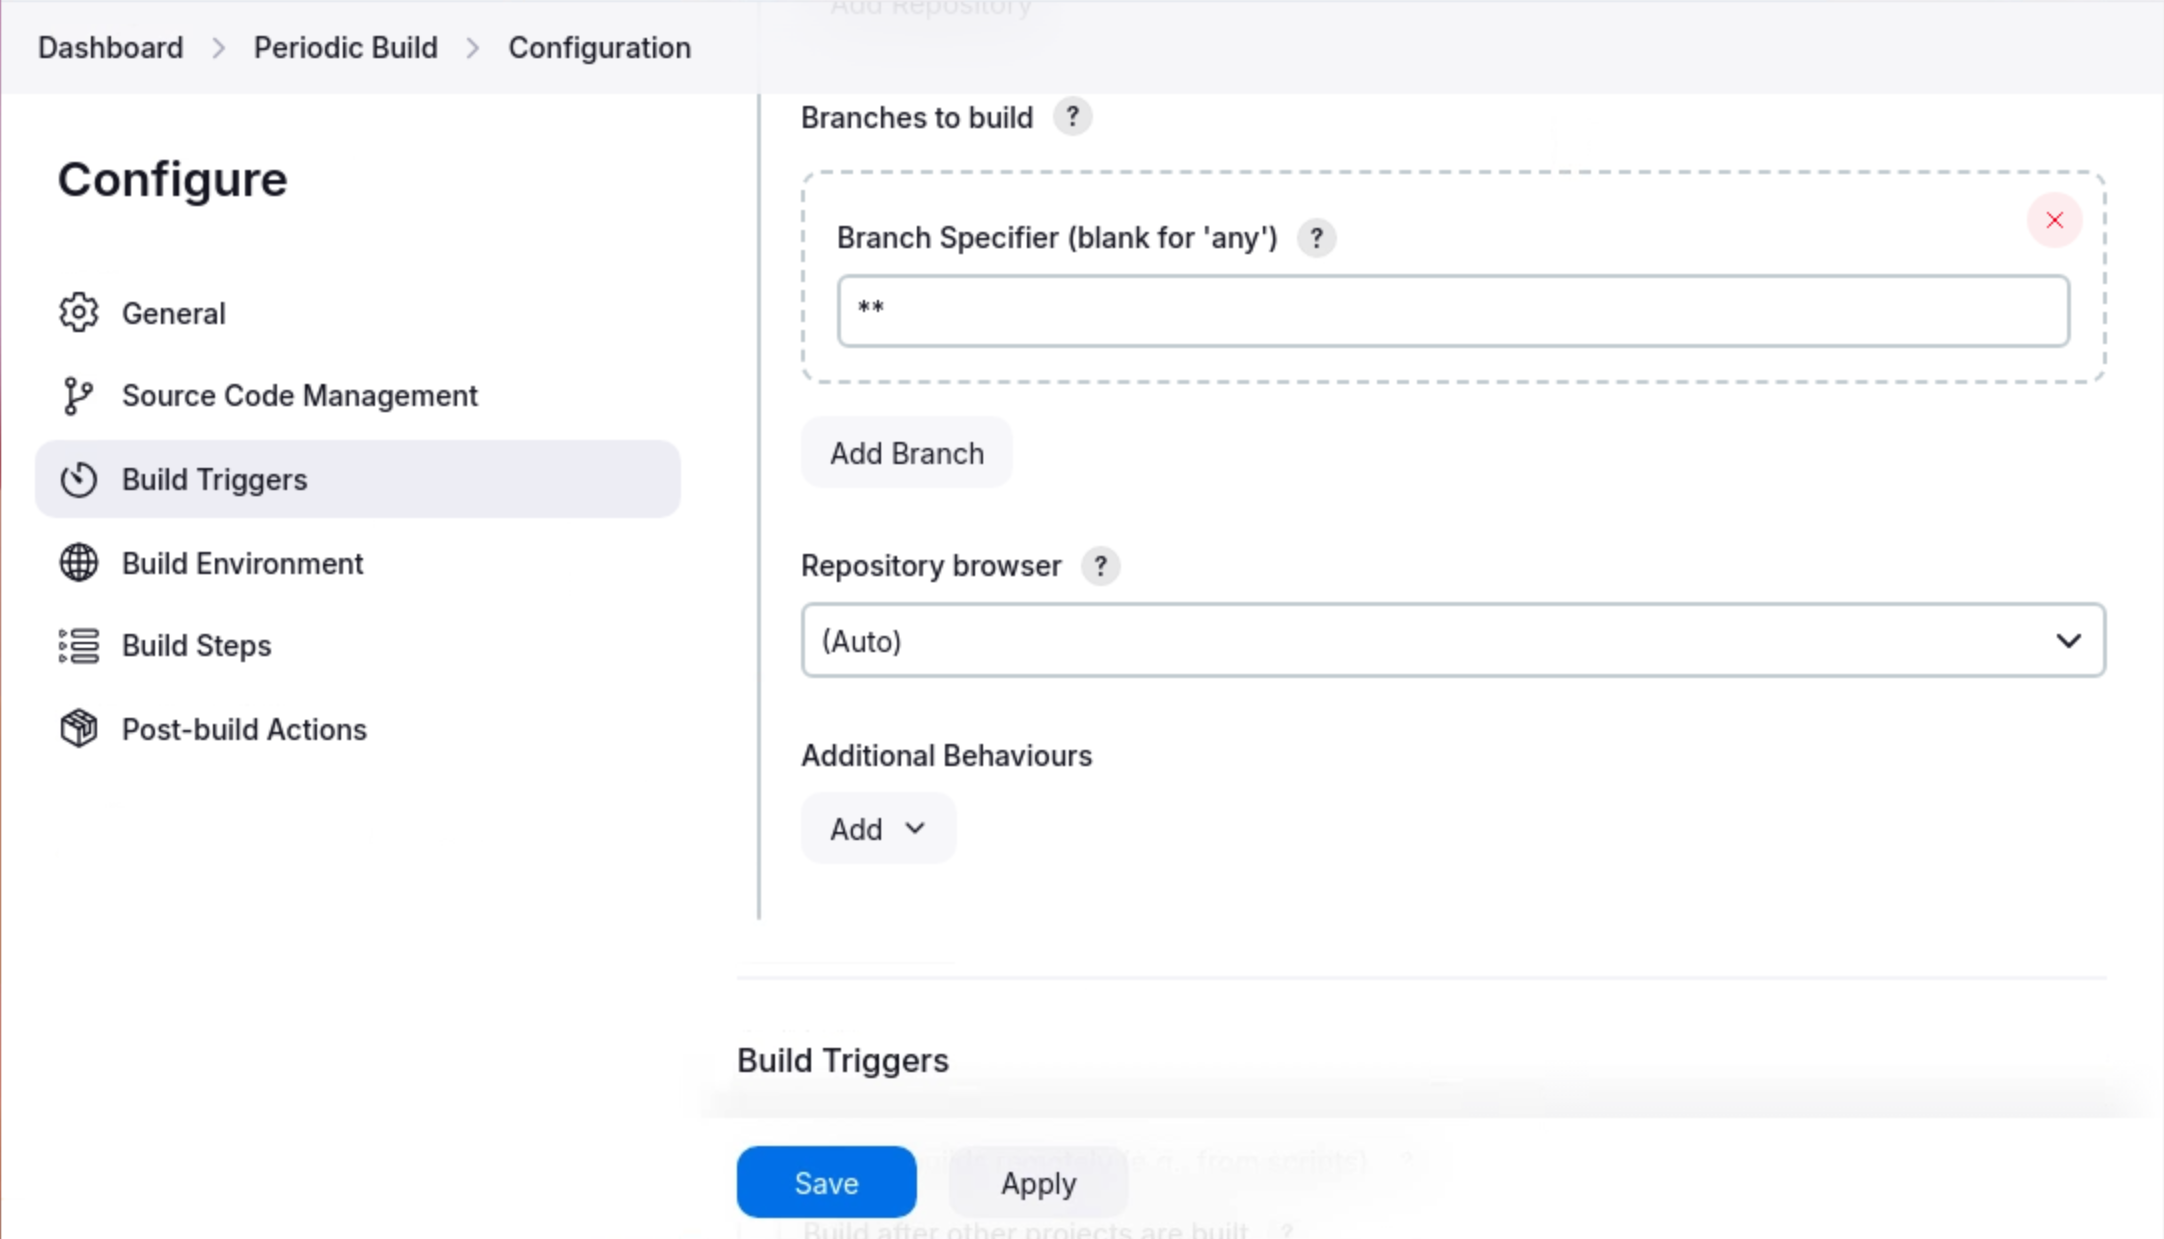
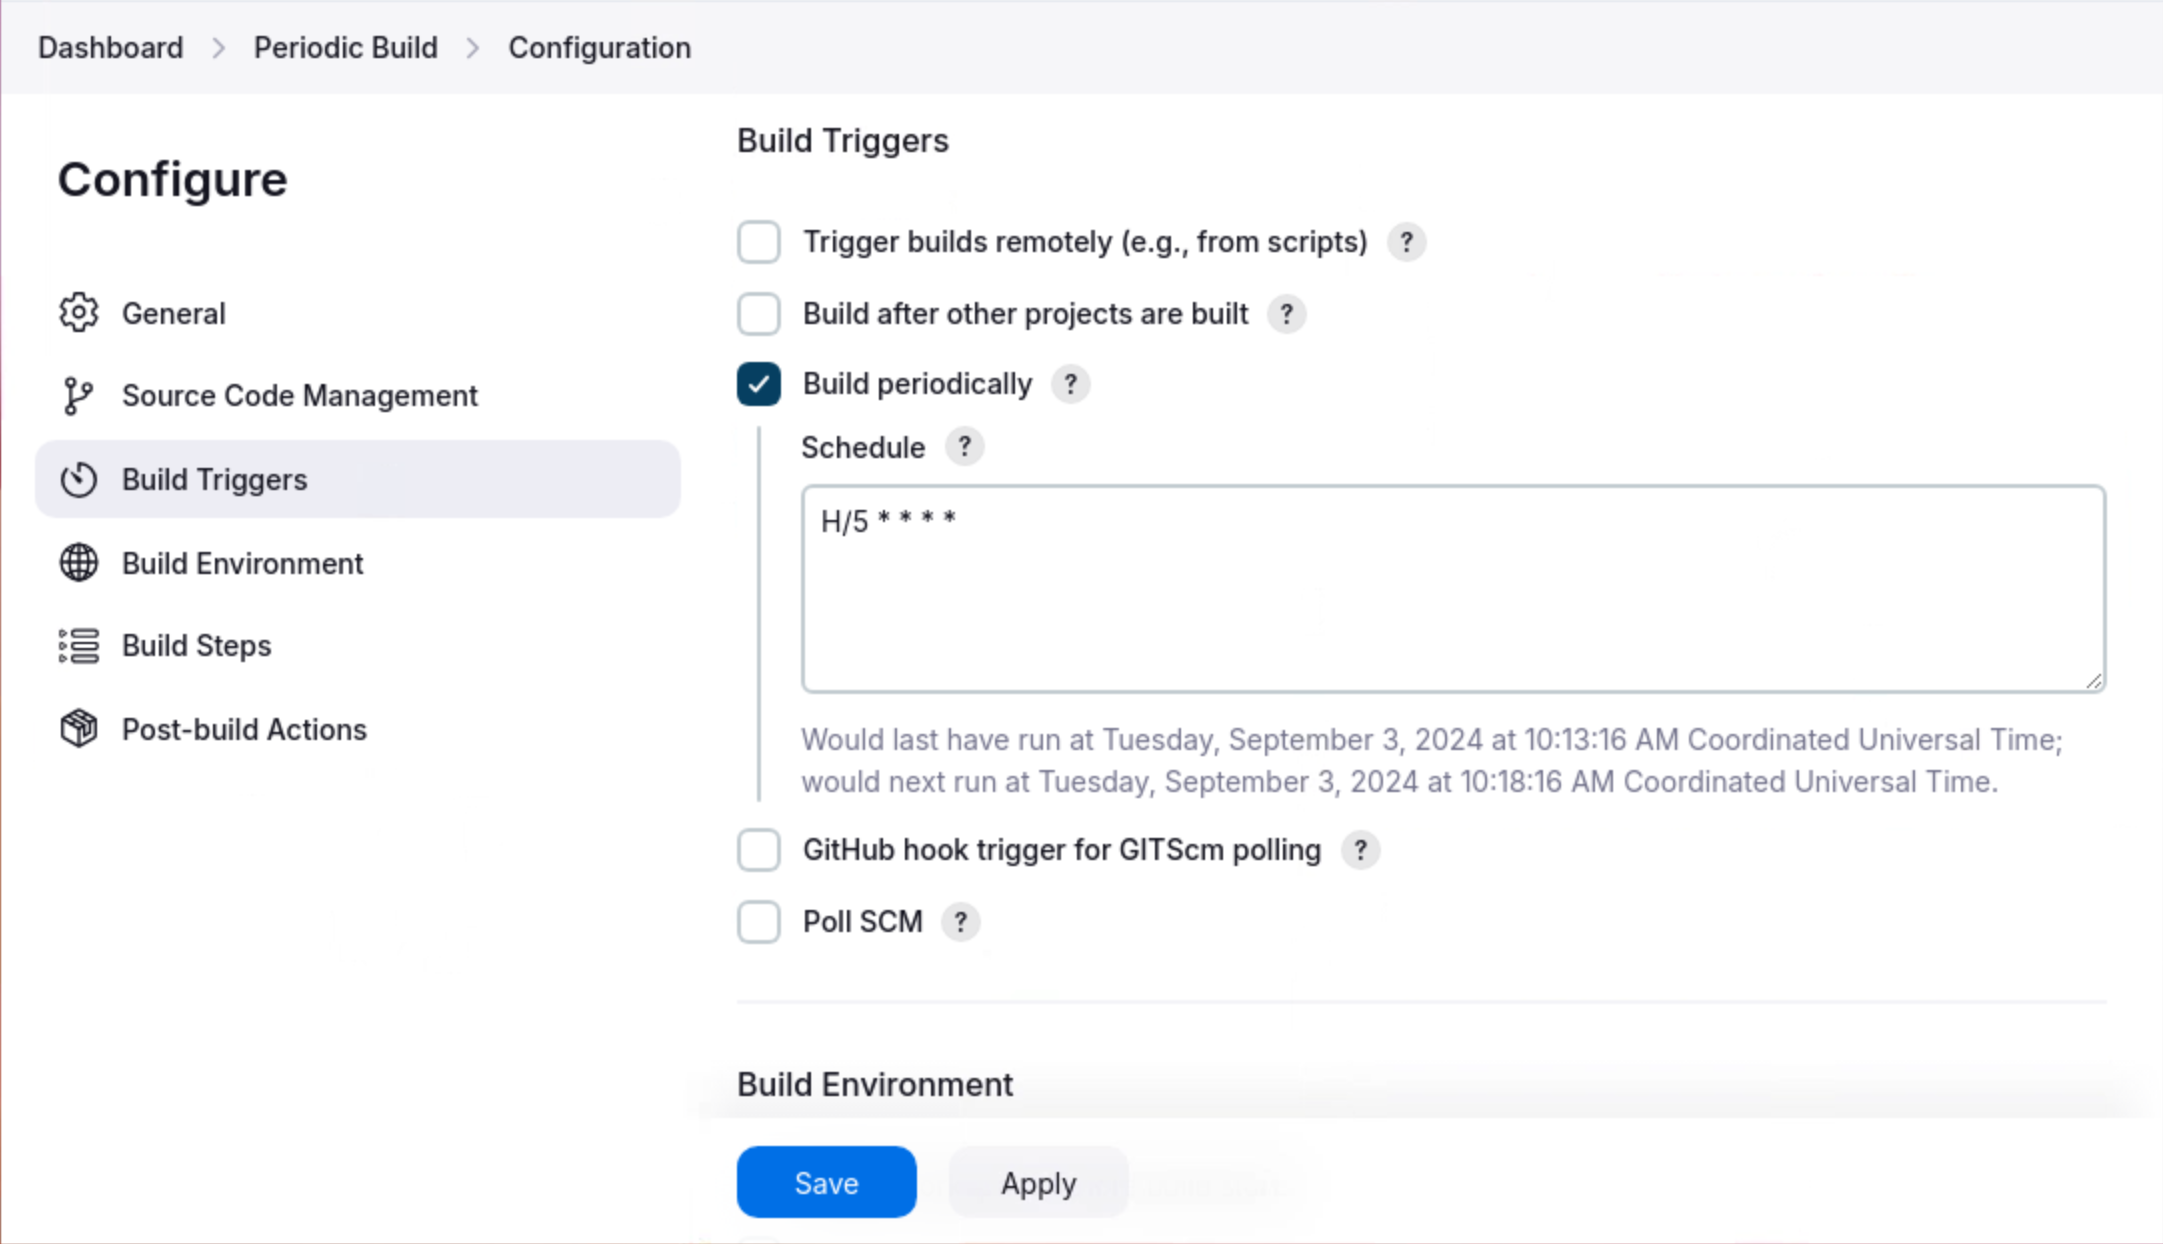
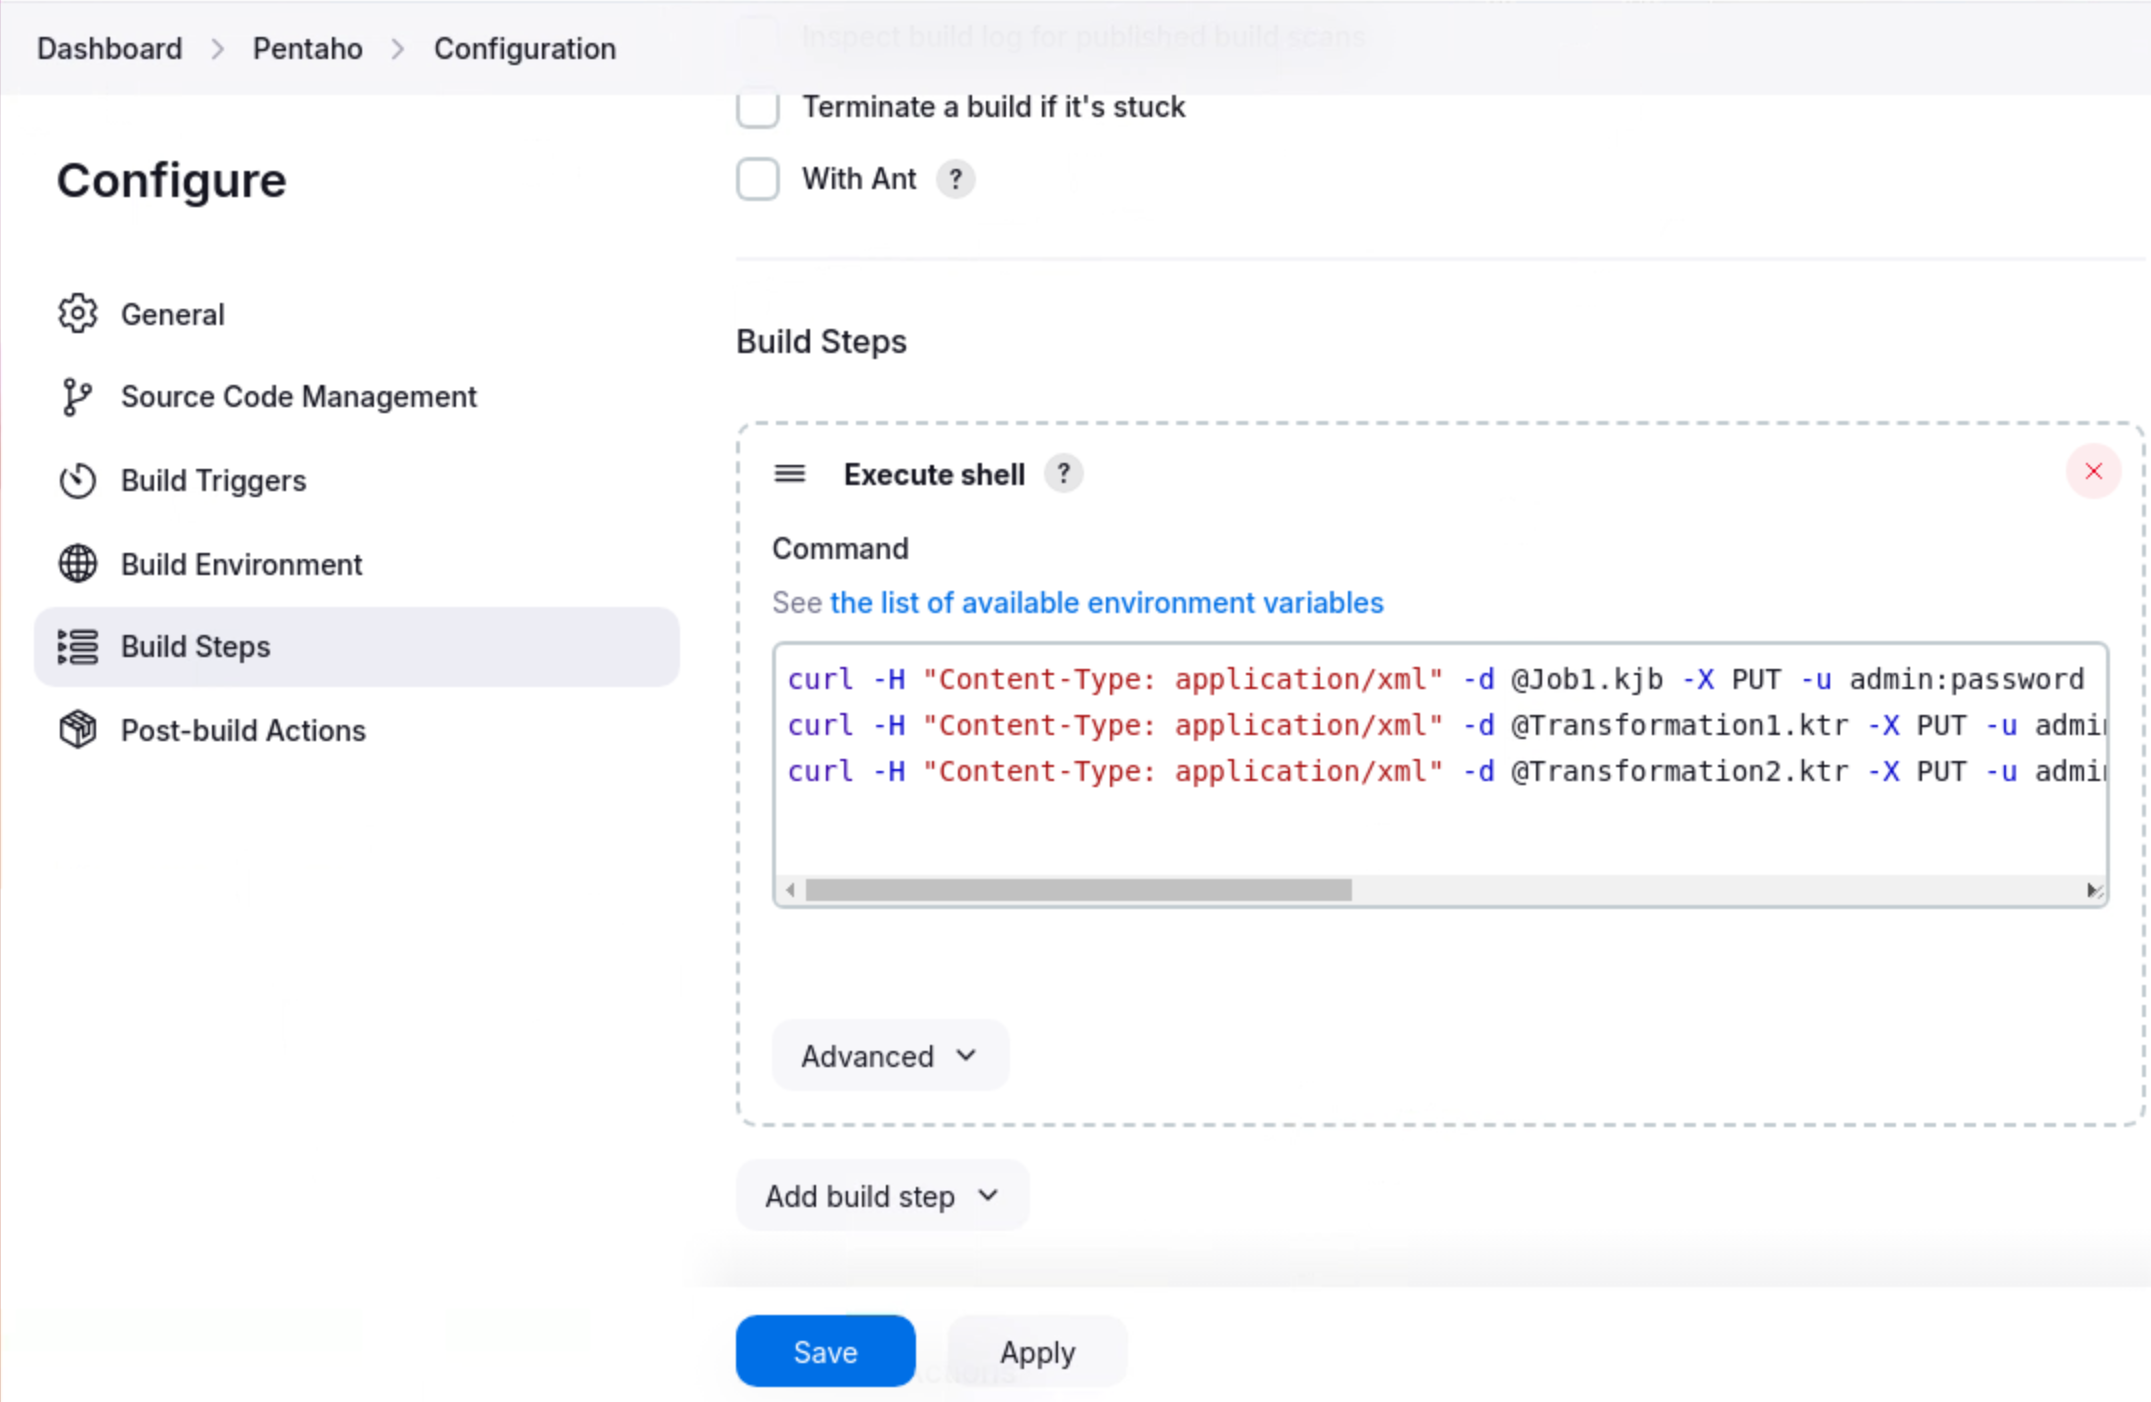
<table><thead><tr><th width="203">Section</th><th width="144">Option</th><th>Value</th></tr></thead><tbody><tr><td><strong>Source Management</strong></td><td></td><td></td></tr><tr><td>Git</td><td>Repository URL</td><td><a href="https://github.com/jporeilly/Jenkins-Github">https://github.com/jporeilly/Jenkins-Github</a></td></tr><tr><td></td><td></td><td></td></tr><tr><td><strong>Branches to build</strong></td><td></td><td></td></tr><tr><td>Branch Specifier</td><td></td><td>**</td></tr><tr><td></td><td></td><td></td></tr><tr><td><strong>Build Triggers</strong></td><td></td><td></td></tr><tr><td>Build periodically</td><td>Schedule</td><td>H/5 * * * *</td></tr><tr><td></td><td></td><td></td></tr><tr><td><strong>Build Steps</strong></td><td></td><td></td></tr><tr><td>Execute shell</td><td>Command</td><td>curl -H "Content-Type: application/xml" -d @Job1.kjb -X PUT -u admin:password -i http://pentaho.pentaho.lab:8080/pentaho/api/repo/files/:public:Jenkins:Job1.kjb</td></tr><tr><td></td><td></td><td>curl -H "Content-Type: application/xml" -d @Transformation1.ktr -X PUT -u admin:password -i http://pentaho.pentaho.lab:8080/pentaho/api/repo/files/:public:Jenkins:Transformation1.ktr</td></tr><tr><td></td><td></td><td>curl -H "Content-Type: application/xml" -d @Transformation2.ktr -X PUT -u admin:password -i http://pentaho.pentaho.lab:8080/pentaho/api/repo/files/:public:Jenkins:Transformation2.ktr</td></tr></tbody></table>

{% hint style="info" %}
After specifying the Repository URL, and the error **"Failed to connect to repository..."** is displayed - indicates Git has not been installed.

If the Repository is private, Jenkins wil validate the Github credentials when pulling the source code.
{% endhint %}

**Source Code Management**

<figure><img src="/files/Gw5e8MCSpT7bn5wJIokk" alt=""><figcaption><p>Configure Git Repository</p></figcaption></figure>

**Build Triggers**

<figure><img src="/files/vupkn6L17B4Q9KzM5XBW" alt=""><figcaption><p>Branches to build</p></figcaption></figure>

<figure><img src="/files/l7ekUl5CWG3Zcyg69Gon" alt=""><figcaption><p>Build periodically - every 5 minutes</p></figcaption></figure>

**Build Steps**

<figure><img src="/files/1sdFs0xvr6jpN2wlcdEN" alt=""><figcaption><p>Build Steps</p></figcaption></figure>

{% hint style="info" %}
Before you click Save, just check:

• Pentaho Server is up and running.

• Create a Public/Jenkins folder & is empty.
{% endhint %}

```bash
cd
cd/opt/pentaho/server/pentaho-server/
sudo ./start-pentaho.sh
```

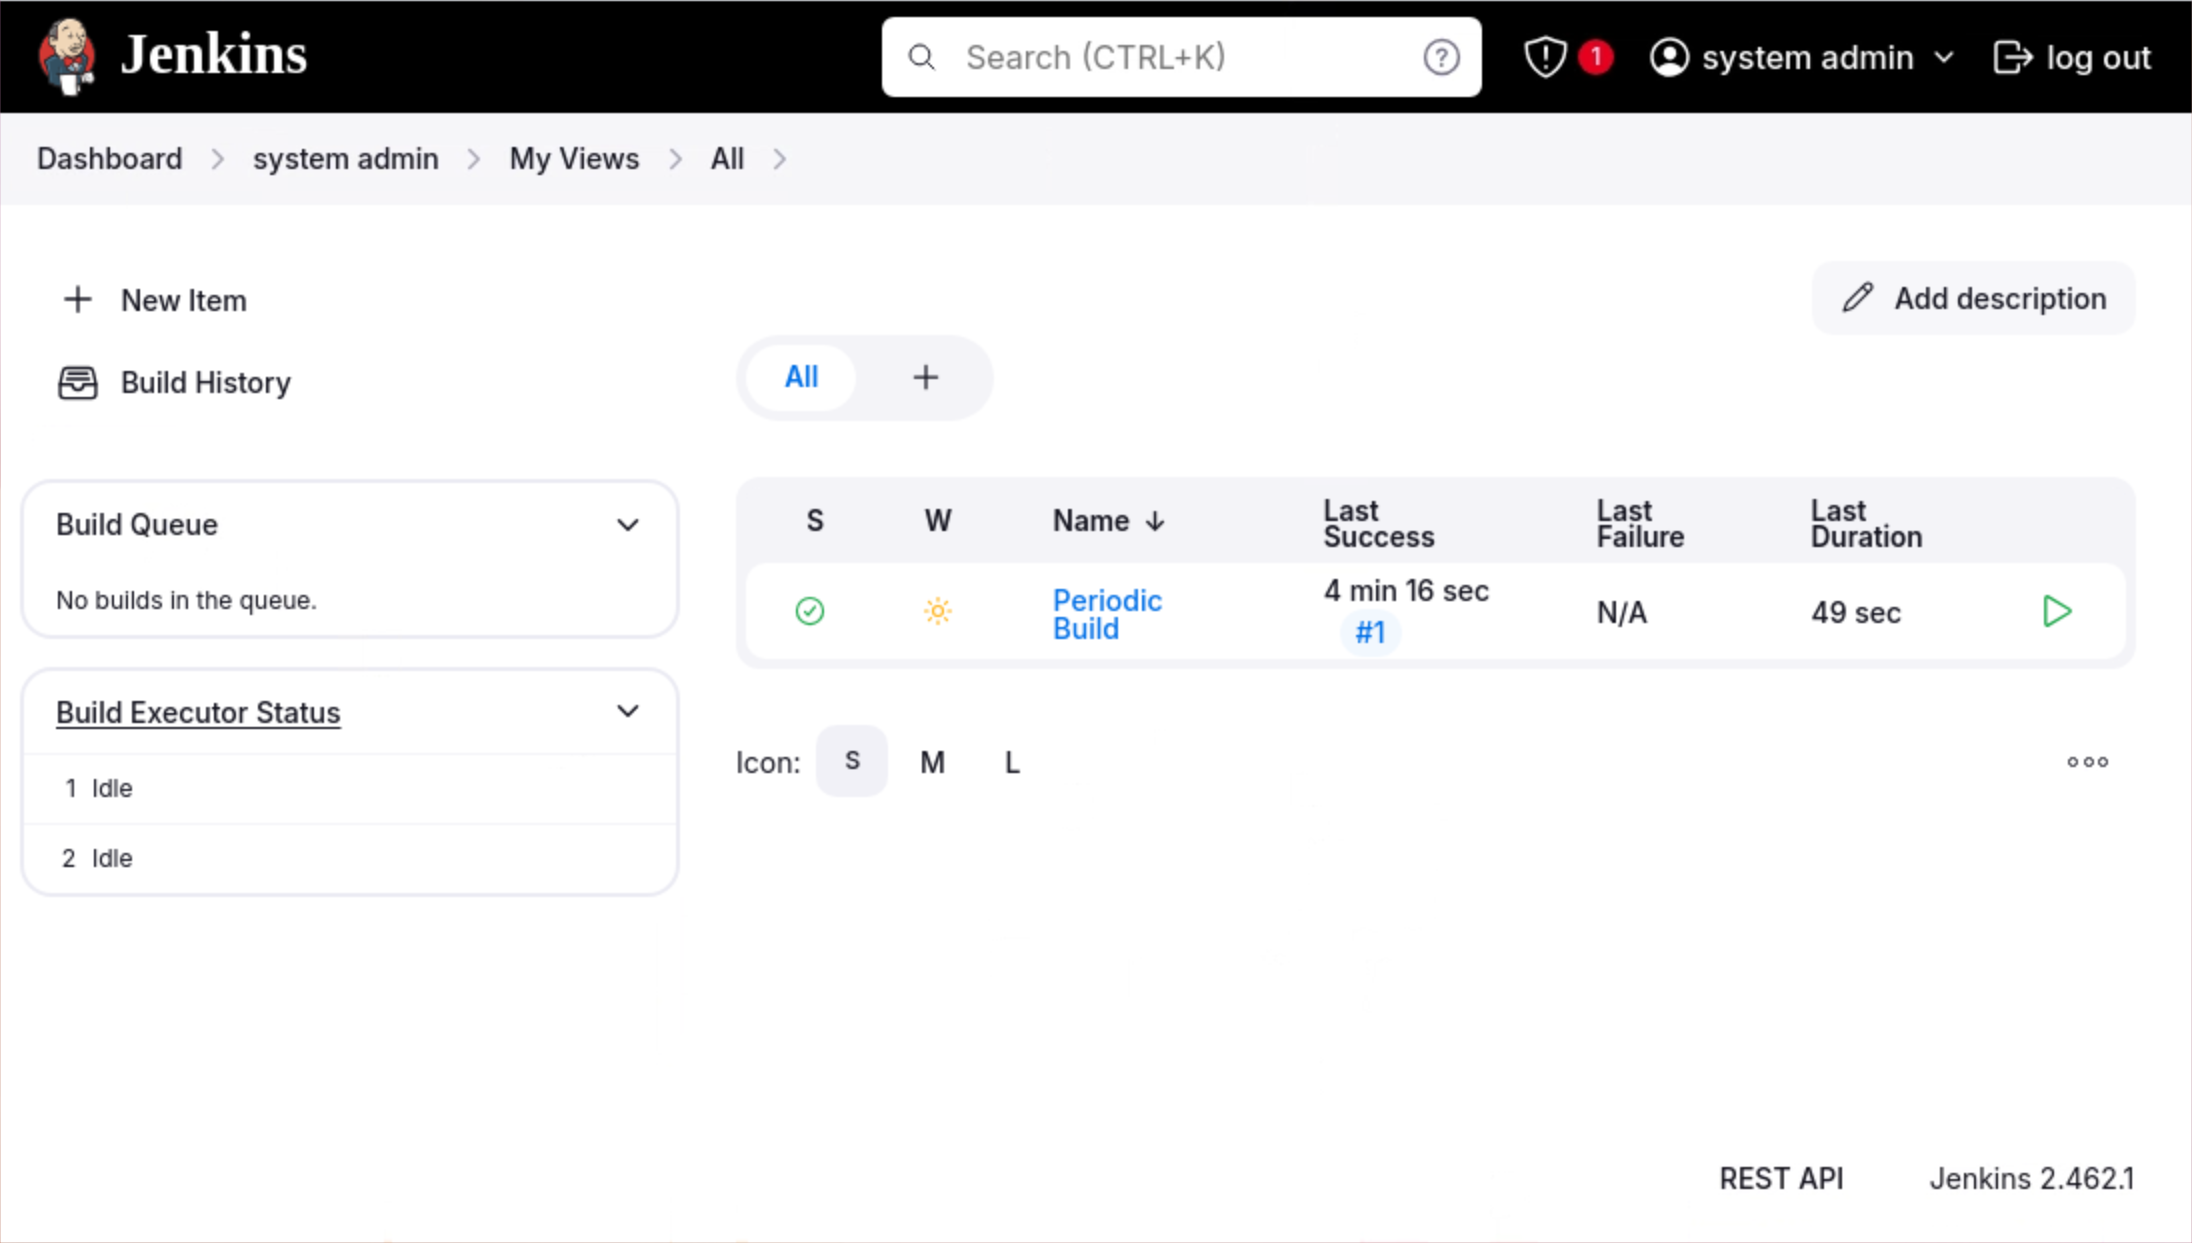
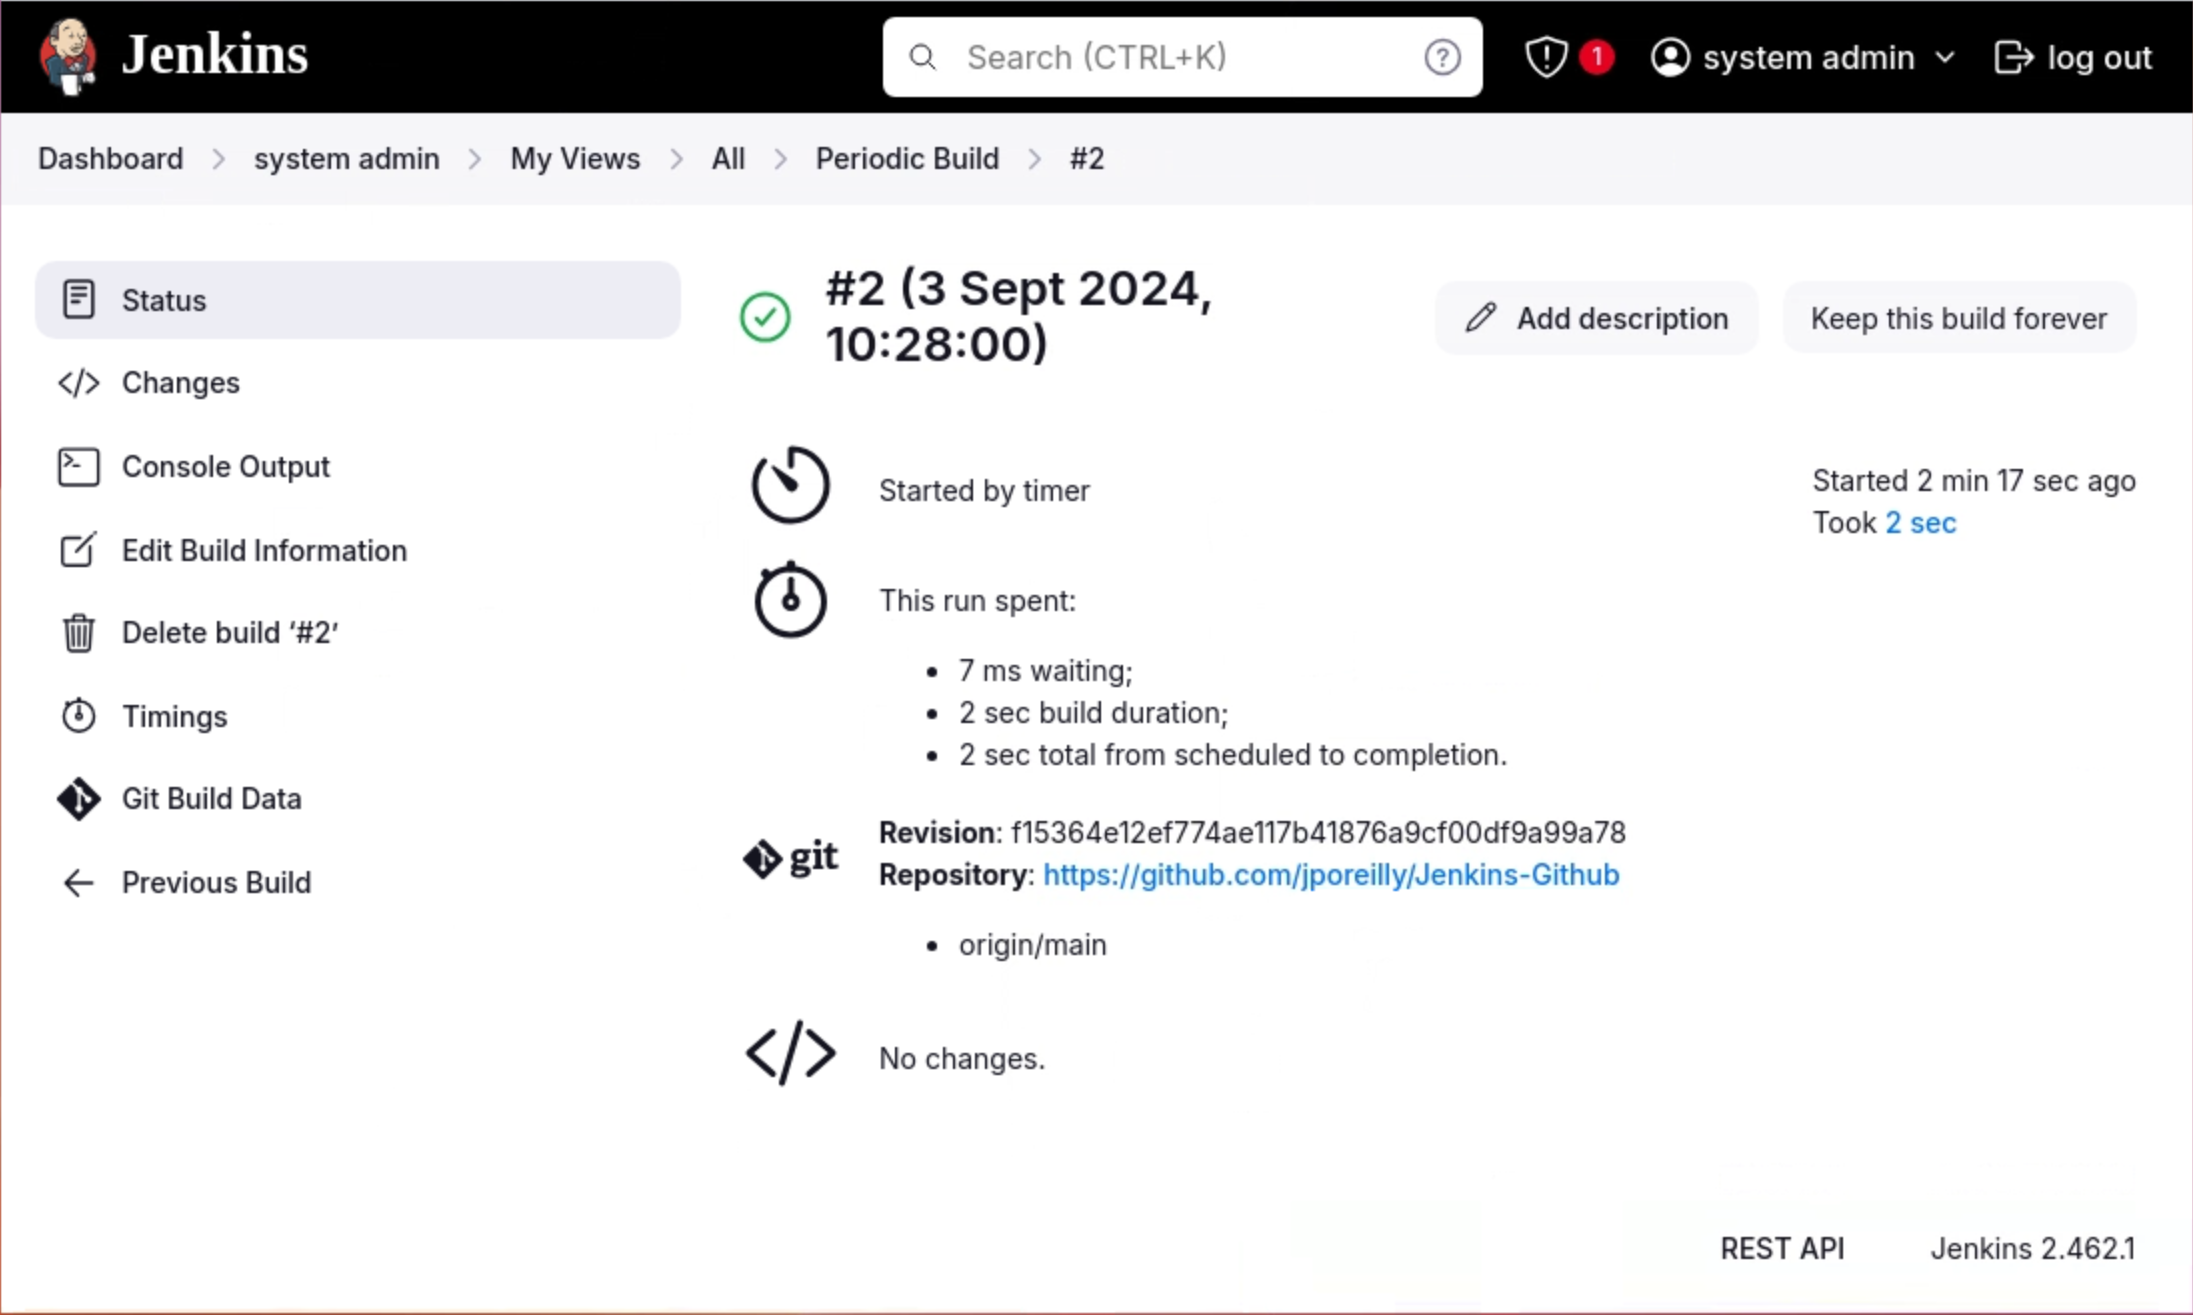
5. Check the 'Build Status' in the Dashboard.

<figure><img src="/files/9d0LGd2hmE50GlyNP2fU" alt=""><figcaption></figcaption></figure>

6. Click on a build

<figure><img src="/files/fkpWxavu8ta6tCSXmQSR" alt=""><figcaption></figcaption></figure>

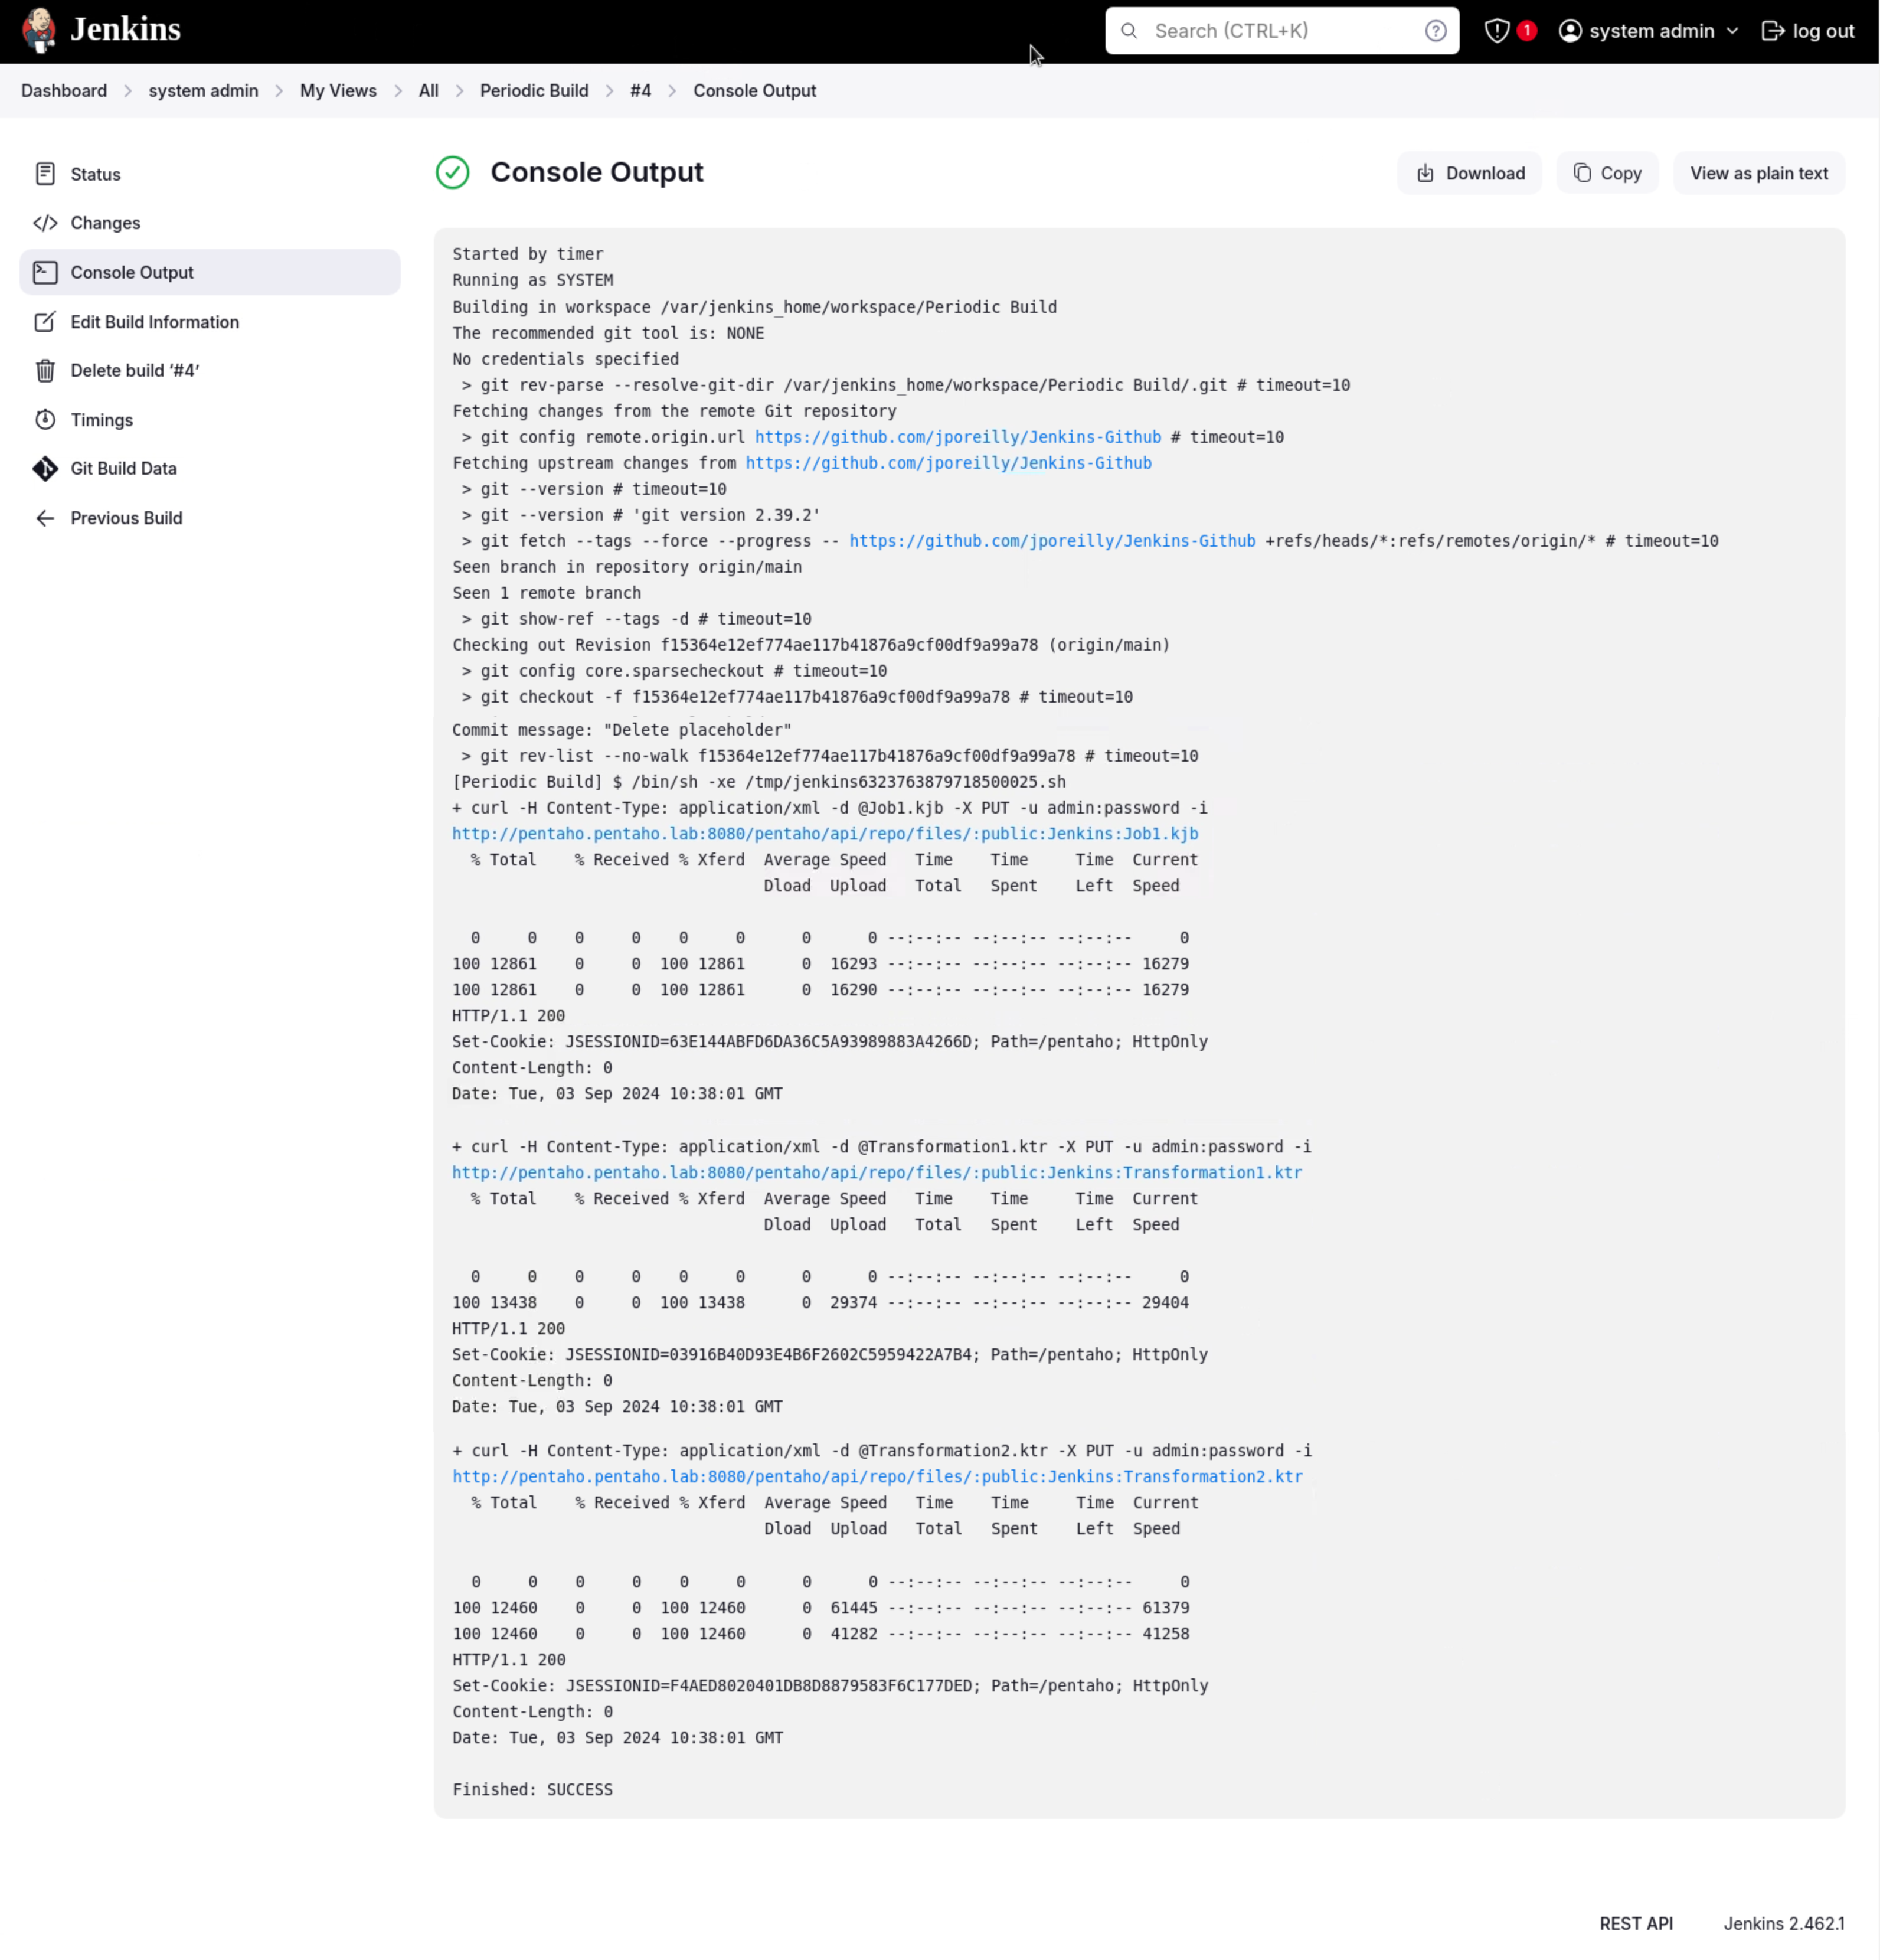
6. View the 'Console Ouput'.

<figure><img src="/files/E1j5uNNQINaJYvf87Urn" alt=""><figcaption><p>Console Output</p></figcaption></figure>

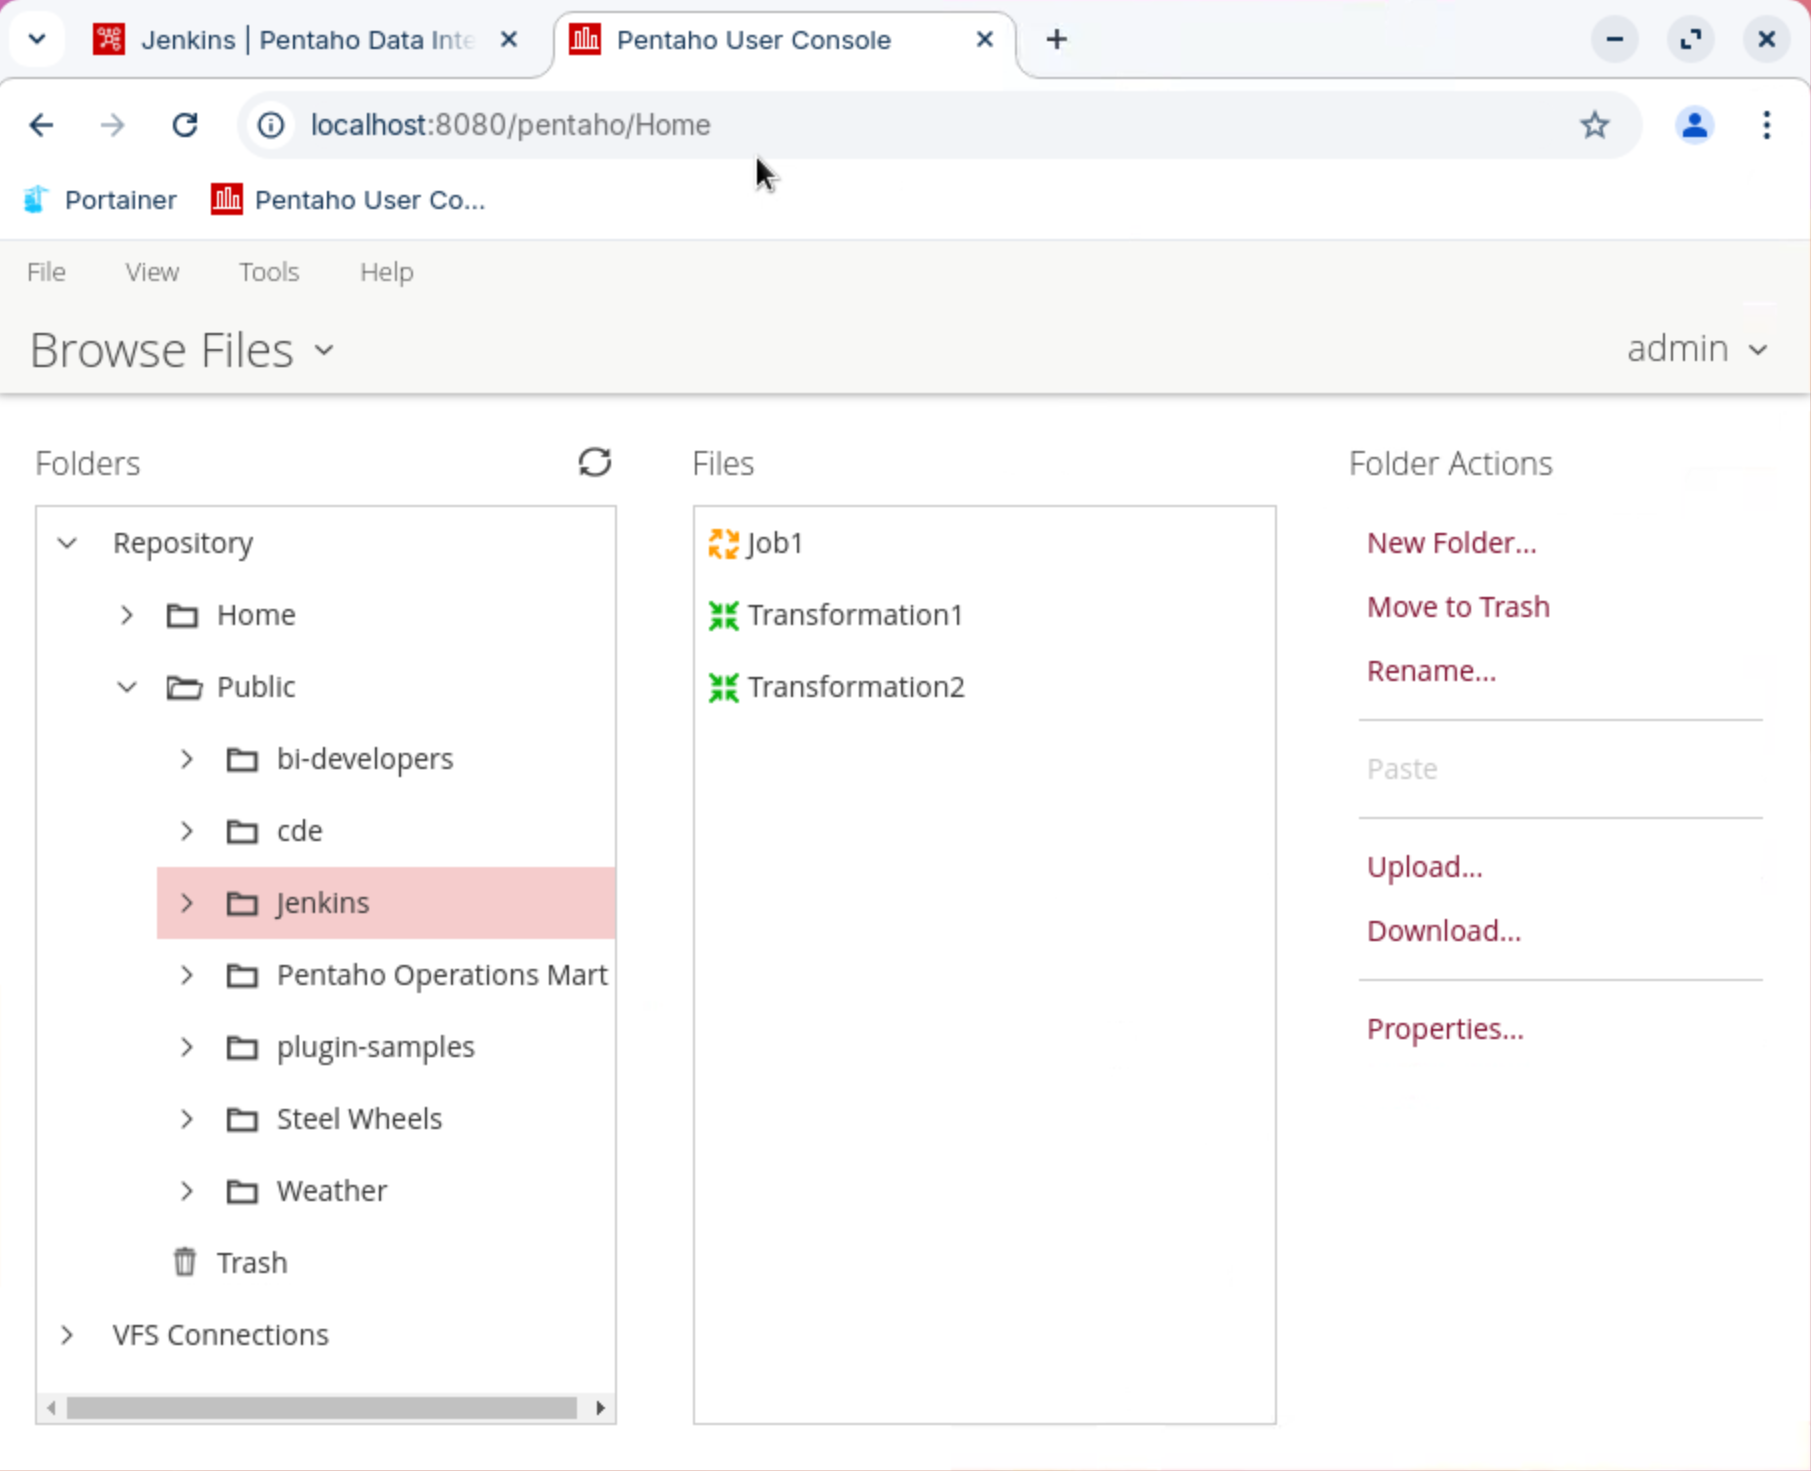
7. Finally .. check the Pentaho Repository.

<figure><img src="/files/smwQqn9PiZiVXnDKwtvL" alt=""><figcaption><p>Pentaho Repsoitory</p></figcaption></figure>
{% endtab %}

{% tab title="Commit Build" %}
{% hint style="info" %}
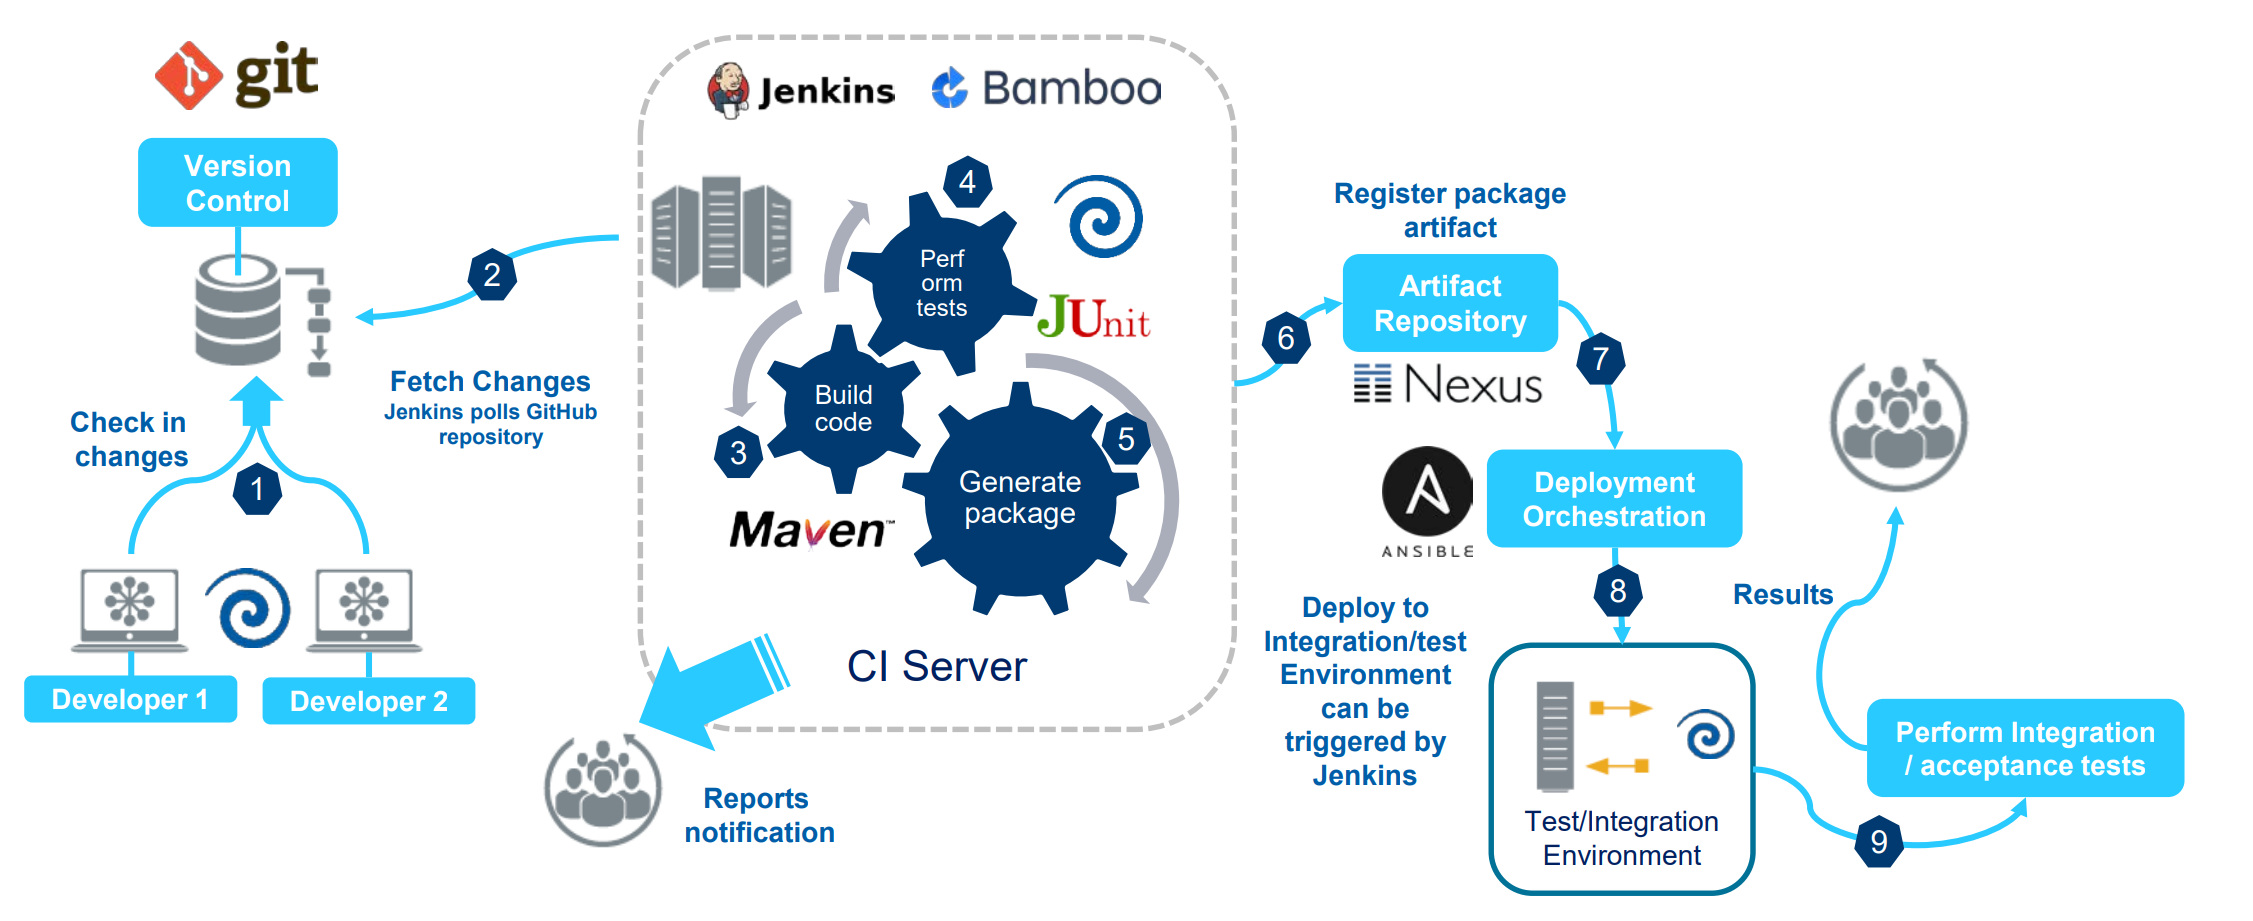
In CI/CD we want to trigger the build once we **commit** our code to **git**.

There are at least two approaches to achieving this:

You could have **Jenkins** continuously polling the git repository for changes or more efficiently, have Github tell Jenkins about any commits that happen.
{% endhint %}

<figure><img src="/files/fwXq6R4z7z5kNQEtV1tc" alt=""><figcaption></figcaption></figure>

1. Log into Jenkins.

{% embed url="<http://localhost:9080>" %}
Link to Jenkins
{% endembed %}

| Username | admin       |
| -------- | ----------- |
| Password | Welcome123! |

2. Click on 'New Item'.

<figure><img src="/files/1yEPzEG5bUdLqRllzgoB" alt=""><figcaption><p>New Item</p></figcaption></figure>

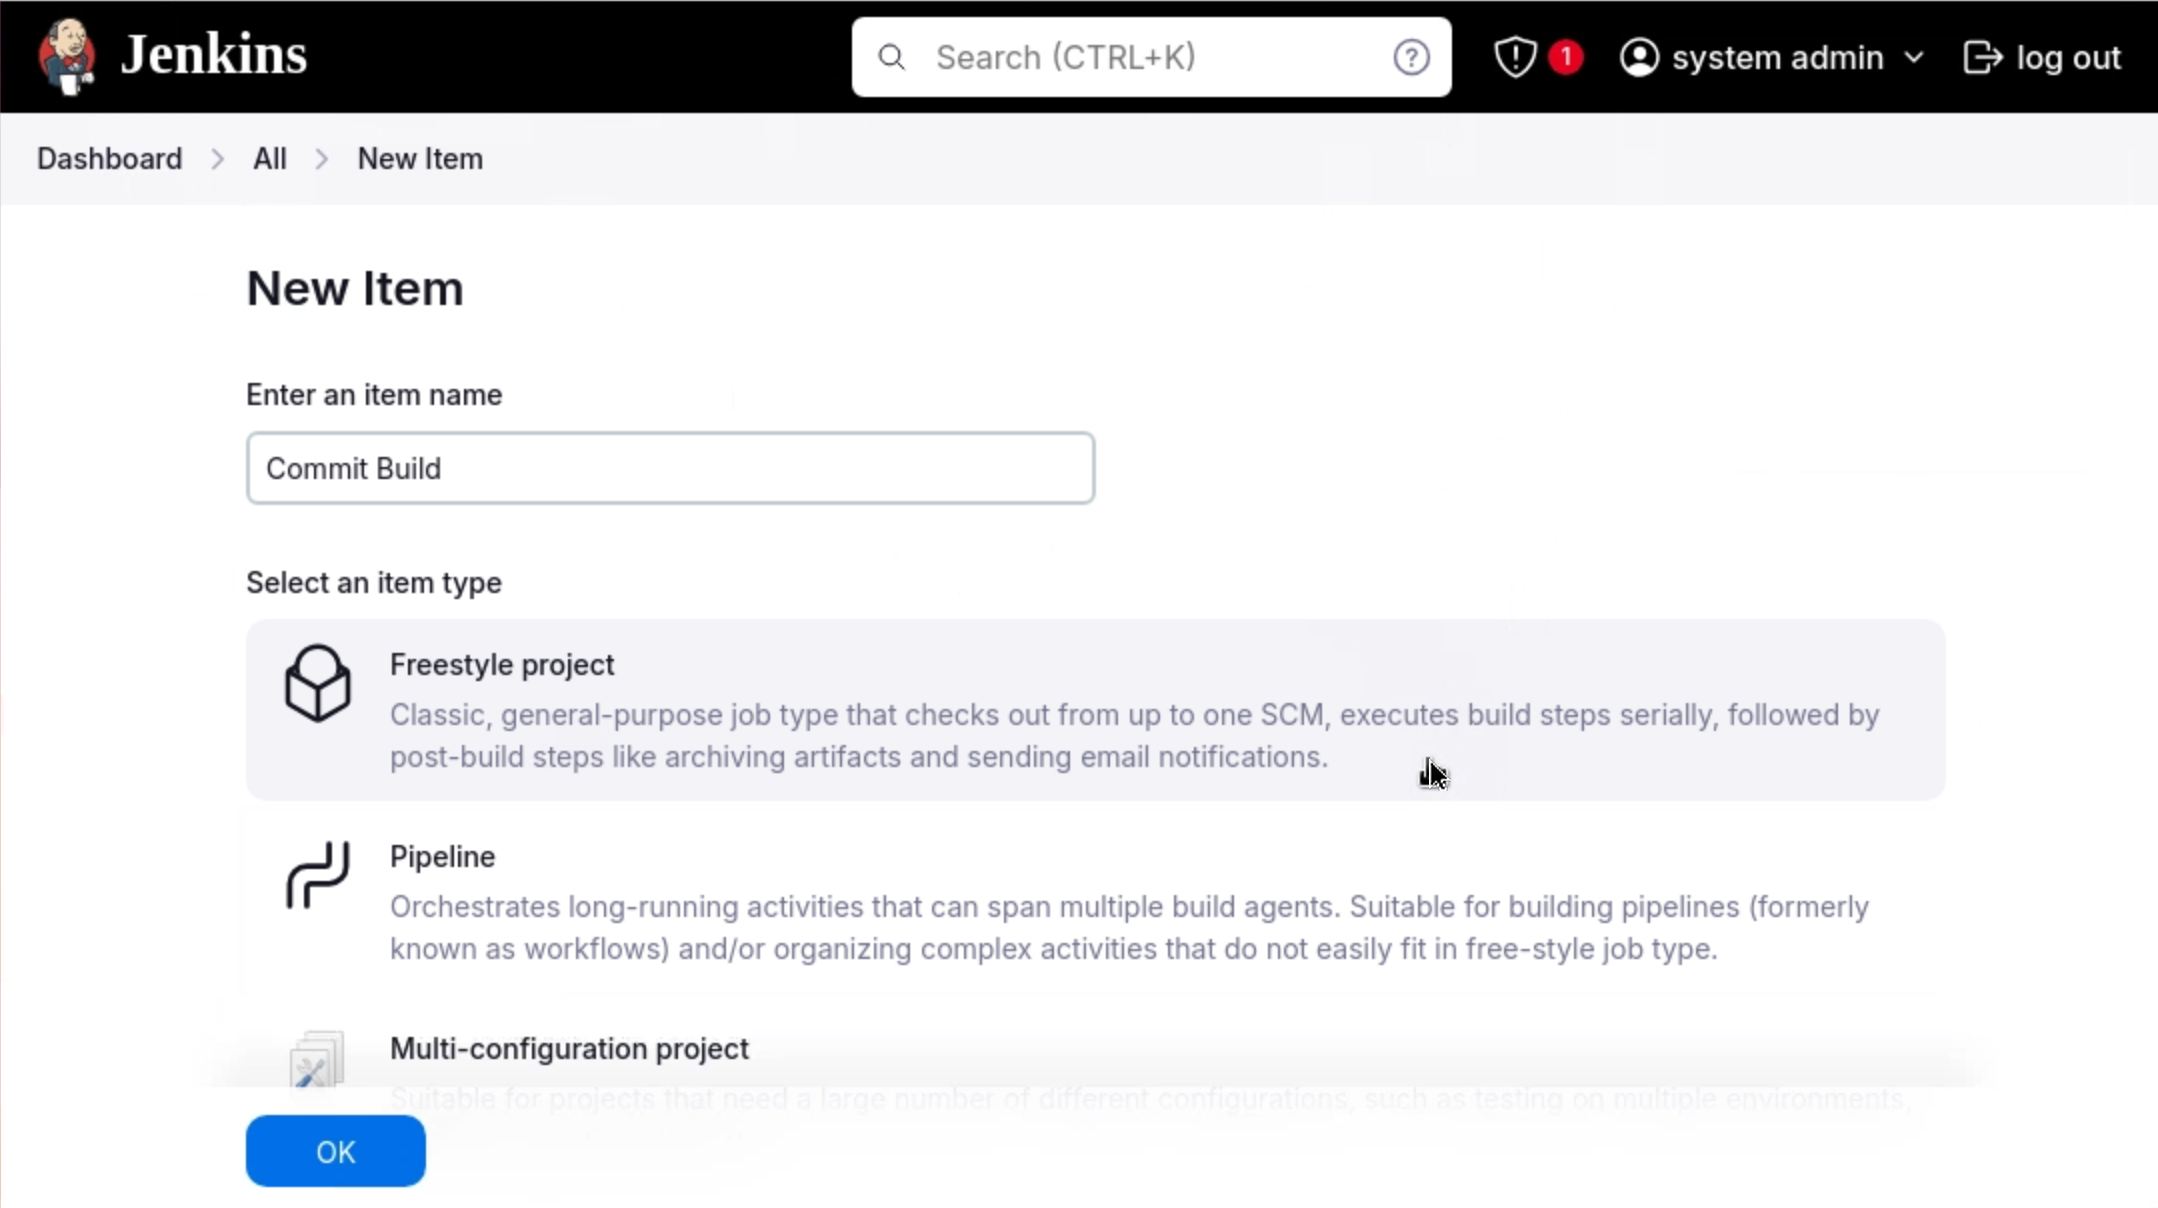
2. Provide a name - Commit Build - for the item and then choose: 'Freestyle project' & click: 'OK'

<figure><img src="/files/G9V5PLwKvShaPUqnTF2O" alt=""><figcaption><p>Freestyle Project - Commit Build</p></figcaption></figure>

2. Set the following project options - Git commit:

<table><thead><tr><th width="203">Section</th><th width="144">Option</th><th>Value</th></tr></thead><tbody><tr><td><strong>Source Management</strong></td><td></td><td></td></tr><tr><td>Git</td><td>Repository URL</td><td><a href="https://github.com/jporeilly/Jenkins-Github">https://github.com/jporeilly/Jenkins-Github</a></td></tr><tr><td></td><td></td><td></td></tr><tr><td><strong>Branches to build</strong></td><td></td><td></td></tr><tr><td>Branch Specifier</td><td></td><td>**</td></tr><tr><td></td><td></td><td></td></tr><tr><td><strong>Build Triggers</strong></td><td></td><td></td></tr><tr><td>Build periodically</td><td>Schedule</td><td>H/5 * * * *</td></tr><tr><td></td><td></td><td></td></tr><tr><td><strong>Build</strong></td><td></td><td></td></tr><tr><td>Execute shell</td><td>Command</td><td>curl -H "Content-Type: application/xml" -d @Job1.kjb -X PUT -u admin:password -i http://pentaho.pentaho.lab:8080/pentaho/api/repo/files/:public:Jenkins:Job1.kjb</td></tr><tr><td></td><td></td><td>curl -H "Content-Type: application/xml" -d @Transformation1.ktr -X PUT -u admin:password -i http://pentaho.pentaho.lab:8080/pentaho/api/repo/files/:public:Jenkins:Transformation1.ktr</td></tr><tr><td></td><td></td><td>curl -H "Content-Type: application/xml" -d @Transformation2.ktr -X PUT -u admin:password -i http://pentaho.pentaho.lab:8080/pentaho/api/repo/files/:public:Jenkins:Transformation2.ktr</td></tr></tbody></table>

{% hint style="info" %}
After specifying the Repository URL, and the error **"Failed to connect to repository..."** is displayed - indicates Git has not been installed.

If the Repository is private, Jenkins wil validate the Github credentials when pulling the source code.
{% endhint %}

x

x
{% endtab %}
{% endtabs %}
{% endtab %}
{% endtabs %}


---

# Agent Instructions: Querying This Documentation

If you need additional information that is not directly available in this page, you can query the documentation dynamically by asking a question.

Perform an HTTP GET request on the current page URL with the `ask` query parameter:

```
GET https://academy.pentaho.com/pentaho-data-integration/use-cases/jenkins.md?ask=<question>
```

The question should be specific, self-contained, and written in natural language.
The response will contain a direct answer to the question and relevant excerpts and sources from the documentation.

Use this mechanism when the answer is not explicitly present in the current page, you need clarification or additional context, or you want to retrieve related documentation sections.