> For the complete documentation index, see [llms.txt](https://academy.pentaho.com/llms.txt). Markdown versions of documentation pages are available by appending `.md` to page URLs; this page is available as [Markdown](https://academy.pentaho.com/pentaho-data-integration/use-cases/ai-pdi-pipelines/genai.md).
# GenAI
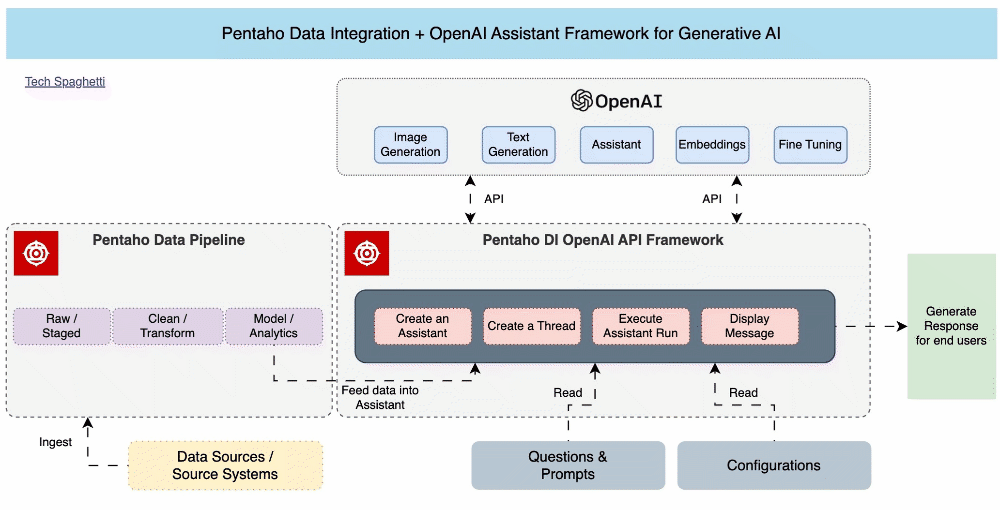
Generative artificial intelligence (GenAI) can create certain types of images, text, videos, and other media in response to prompts ..
GenAI components
{% hint style="info" %}
**So does it work?**
At its core, a GenAI system is built around a large language model (LLM) — a neural network trained on vast amounts of text. Through that training, it learns patterns in language: grammar, facts, reasoning styles, and how ideas connect. When you interact with it, the model isn't "looking things up" — it's generating responses based on those learned patterns.
Before the model generates anything, everything relevant gets assembled into a **prompt context**. This is the full picture the model sees: a system prompt (instructions defining how it should behave), your message, any documents retrieved from a knowledge source, and any results from tool calls made earlier in the conversation. The richer and more relevant this context, the better the output.
Knowledge sources extend what the model knows beyond its training data. Using a technique called RAG (Retrieval-Augmented Generation), the system searches a database or document store for content relevant to your query and injects it into the context. This is how GenAI systems can answer questions about your own documents or up-to-date information.
Tools give the model the ability to act — not just respond. During a conversation, the model can decide to call an external API, run a piece of code, or search the web. The result comes back into the context, and the model uses it to form its final answer. This loop is what makes agentic AI possible.
Finally, the **inference engine** takes the assembled context and generates a response token by token — each word (or part of a word) is predicted based on everything that came before it. This continues until the response is complete. The output might be plain text, structured data, or a trigger for another action.
{% endhint %}
***
{% hint style="info" %}
Let's take a look at the GenAI steps availble as an EE plugin ..
{% endhint %}
1. Start Pentaho Data Integration:
```bash
cd
cd Pentaho/design-tools/data-integration
sh spoon.sh
```
{% tabs %}
{% tab title="HTML Parser" %}
{% hint style="info" %}
#### HTML Parser
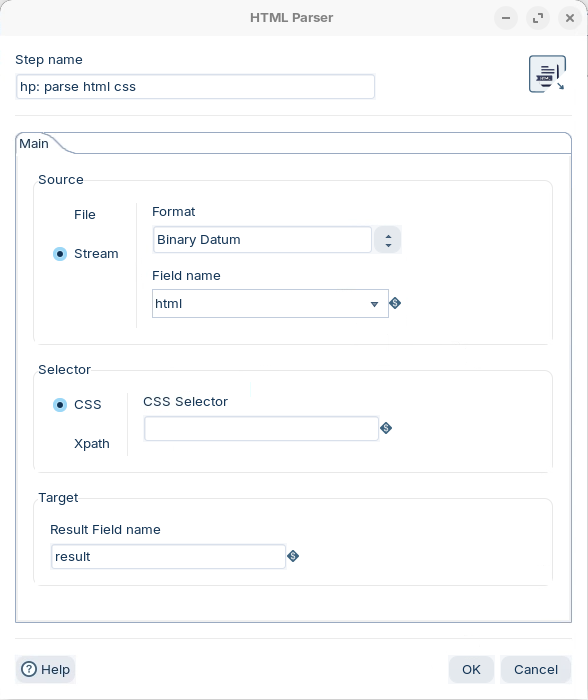
The HTML Parser is a utility plugin for Pentaho Data Integration (PDI) that extracts desired text from HTML or XML files. Useful for cleaning data for natural language processing tasks like sentiment analysis and SEO keyword analysis.
* Accepts input from both data streams and files
* Supports parsing using Xpath expressions or CSS selectors
* Can process single files or multiple inputs from a stream
* Compatible with local and virtual file systems
The plugin utilizes jsoup, a Java library, that simplifies working with real-world HTML and XML. It offers an easy-to-use API for URL fetching, data parsing, extraction, and manipulation using DOM API methods, CSS, and Xpath selectors.
The step is located in the Input folder.
{% endhint %}
{% embed url="" %}
***
Select XPath or CSS Selectors as the parsing method:
{% tabs %}
{% tab title="Xpath" %}
{% hint style="info" %}
#### XPath
XPath (XML Path Language) is a query language for selecting nodes from an XML or HTML document. While Jsoup doesn't natively support XPath, we can use a combination of Jsoup and Java's built-in XPath capabilities to achieve this.
Here's an overview of some common XPath syntax:
`/` - Selects from the root node
`//` - Selects nodes anywhere in the document
`.` - Selects the current node
`..` - Selects the parent of the current node
`@` - Selects attributes
`[] -`Used for predicates (conditions)
Some examples:
* `//div` - Selects all div elements in the document
* `//div[@class='content']` - Selects all div elements with class 'content'
* `//h1/text()` - Selects the text content of all h1 elements
* `//div[@class='content']/p` - Selects all p elements that are direct children of div elements with class 'content'
{% endhint %}
***
**HTML Data Source**
```html
XPath Example Page
1. Open the following transformation.
**Filepath**
{% hint style="info" %}
The data source is referenced in a path.
{% endhint %}
**Linux**
\~/Projects/genai/html/HTML Parser - Xpath.ktr
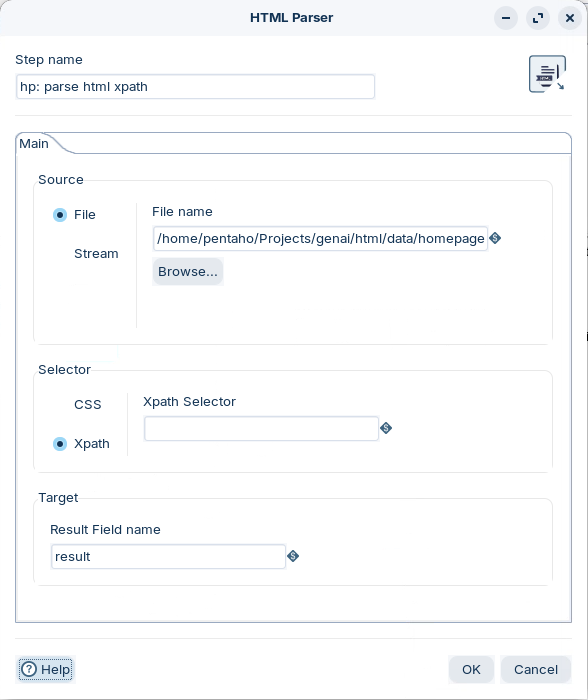
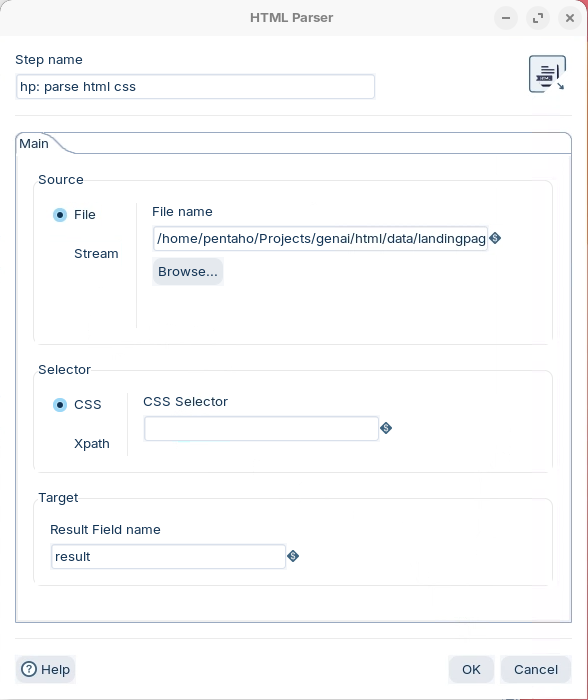
2. Double-click on the hp: html and configure with the following settings:
Set path to file
{% hint style="info" %}
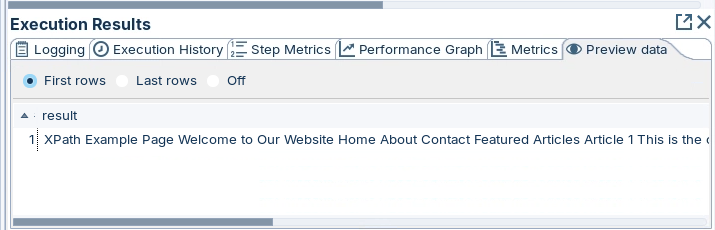
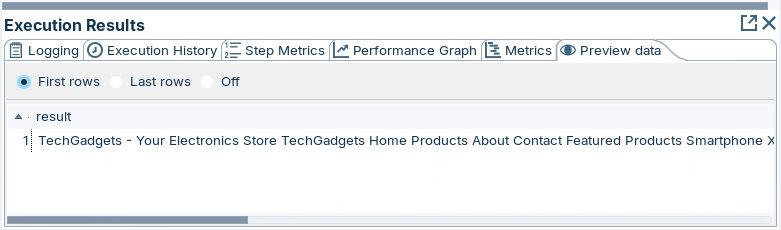
Leaving Xpath field blank will result in all tags being removed and all the content returned.
{% endhint %}
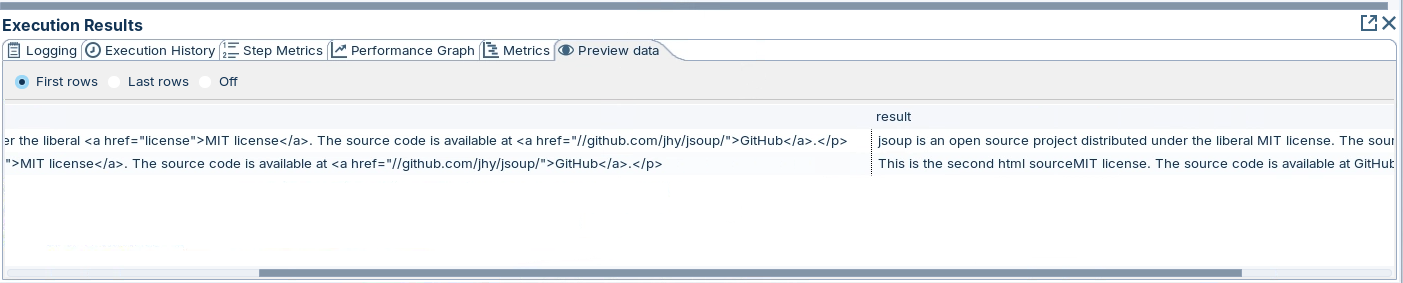
3\. RUN and preview the results.
Results - no Xpath
{% hint style="info" %}
These XPath queries will help you navigate and extract specific content from the homepage.html
{% endhint %}
Select the main title:
```xpath
//h1[@id='main-title']
```
Select all navigation links:
```xpath
//nav//a
```
Select all article titles (h3 elements within articles):
```xpath
//article/h3
```
Select all paragraph content within articles:
```xpath
//article/p[@class='content']
```
Select all author names:
```xpath
//span[@class='author']
```
Select the latest news items:
```xpath
//section[@id='latest-news']//li
```
Select the footer text:
```xpath
//footer/p/text()
```
Select all section titles (h2 elements that are direct children of section elements):
```xpath
//section/h2
```
Select the second article:
```xpath
(//article)[2]
```
Select all elements with a class attribute:
```xpath
//*[@class]
```
{% endtab %}
{% tab title="Filepath from stream" %}
{% hint style="info" %}
#### **Filepath from stream**
The data source is referenced as a filepath in a datastream field.
{% endhint %}
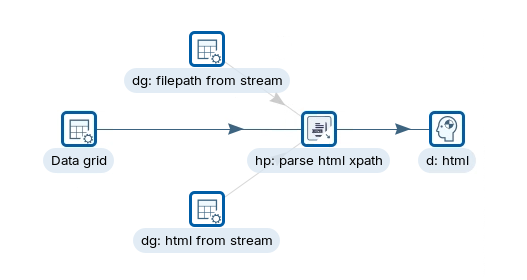
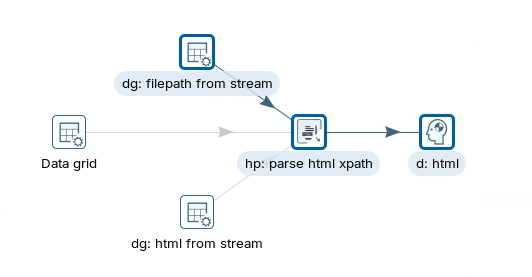
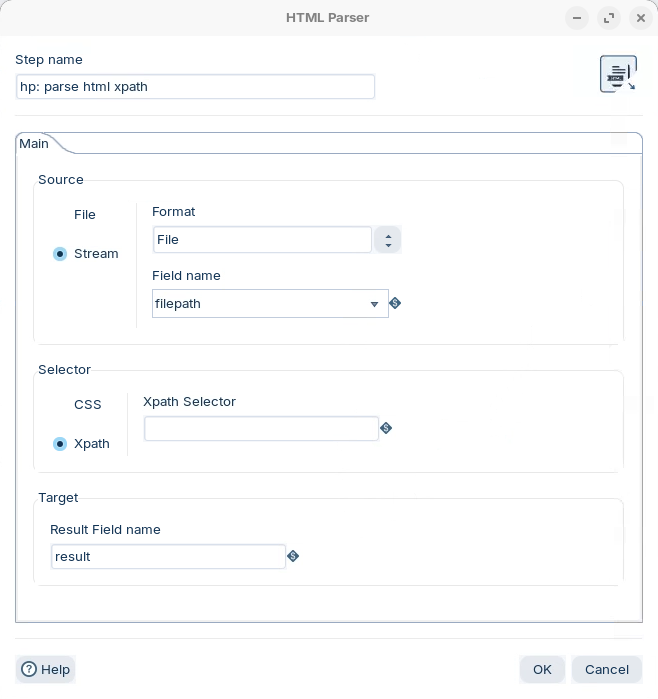
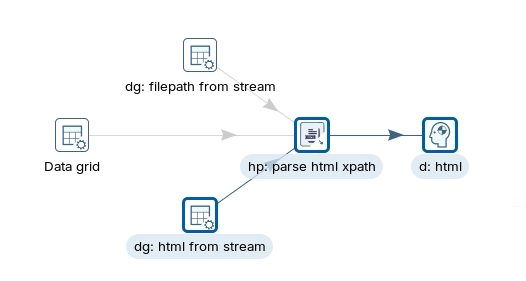
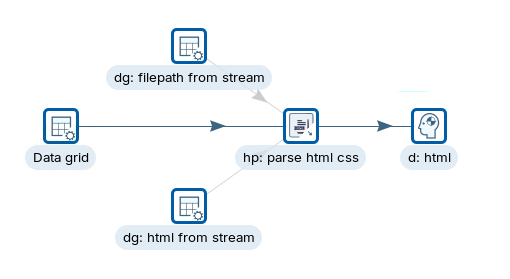
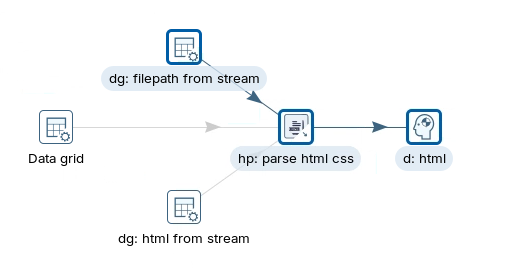
1. Enable the hop between: dg: filepath from stream -> hp: parse html xpath.
2. Disable the hop between: Data Grid -> hp: parse html xpath
dg: html from stream -> hp: parse html xpath
Filepath from stream
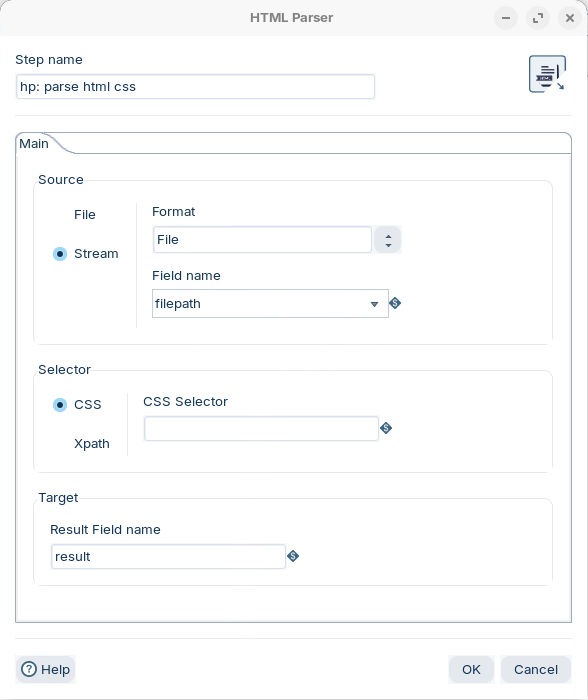
3. Double-click on the hp: html and configure with the following settings:
Filepath from stream
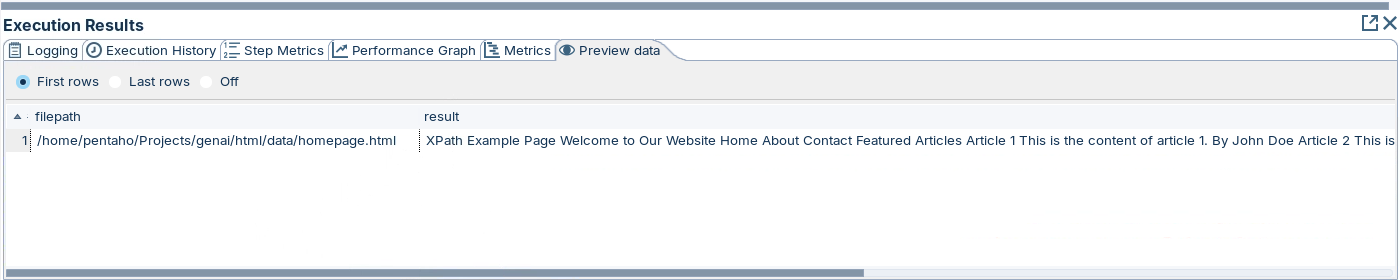
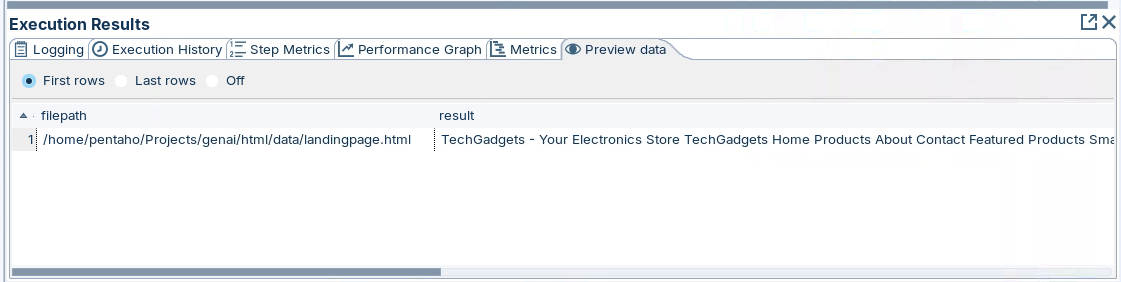
4. RUN and preview the results.
Results
x
x
x
{% endtab %}
{% tab title="HTML from stream" %}
{% hint style="info" %}
#### **HTML from stream**
The data source is referenced as \ in a data stream field.
Pentaho's data streams often use binary fields to handle various types of data, including large text objects like HTML. By using binary datum, you ensure that the entire HTML content is treated as a single, uninterpreted chunk of data within the Pentaho pipeline - represented as 0 or 1.
Storing the HTML as binary datum allows you to pass the raw content through various steps in your Pentaho transformation without Pentaho trying to interpret or modify the HTML prematurely.
{% endhint %}
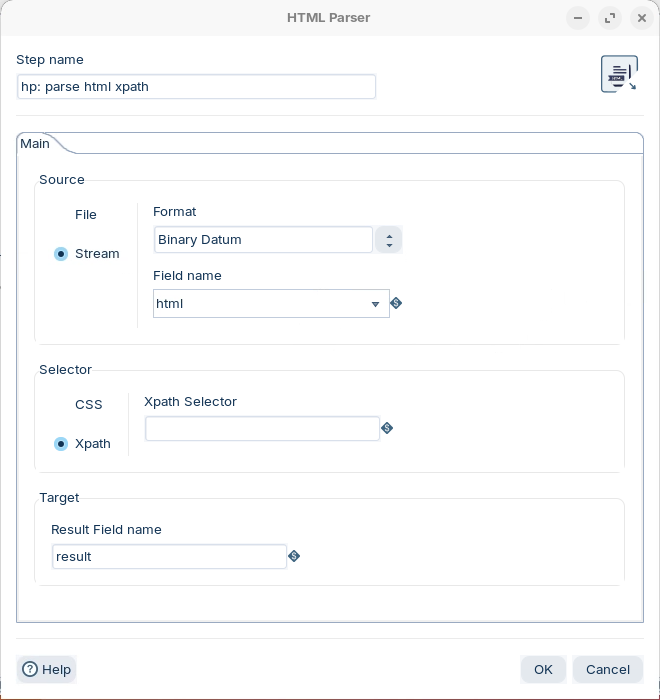
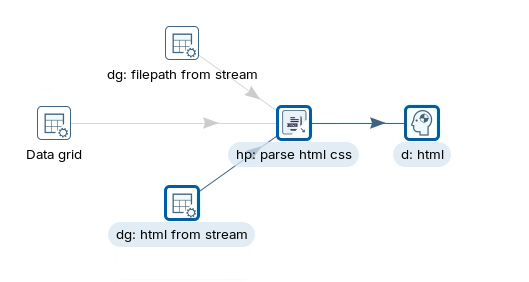
1. Enable the hop between: dg: html from stream -> hp: parse html xpath.
2. Disable the hop between: dg: filepath from stream -> hp: parse html xpath
Data Grid -> hp: parse html xpath
html from stream
3. Double-click on the hp: html and configure with the following settings:
html from stream
4. RUN and preview the results.
Results
{% tabs %}
{% tab title="Multiple Documents" %}
{% endtab %}
{% endtabs %}
{% hint style="info" %}
Base64 is a binary-to-text encoding scheme that represents binary data in an ASCII string format. It's widely used for transmitting data over media that are designed for textual data.
The BASE64 step is located in the Transform folder.
{% endhint %}
{% tabs %}
{% tab title="What is Base64" %}
{% hint style="info" %}
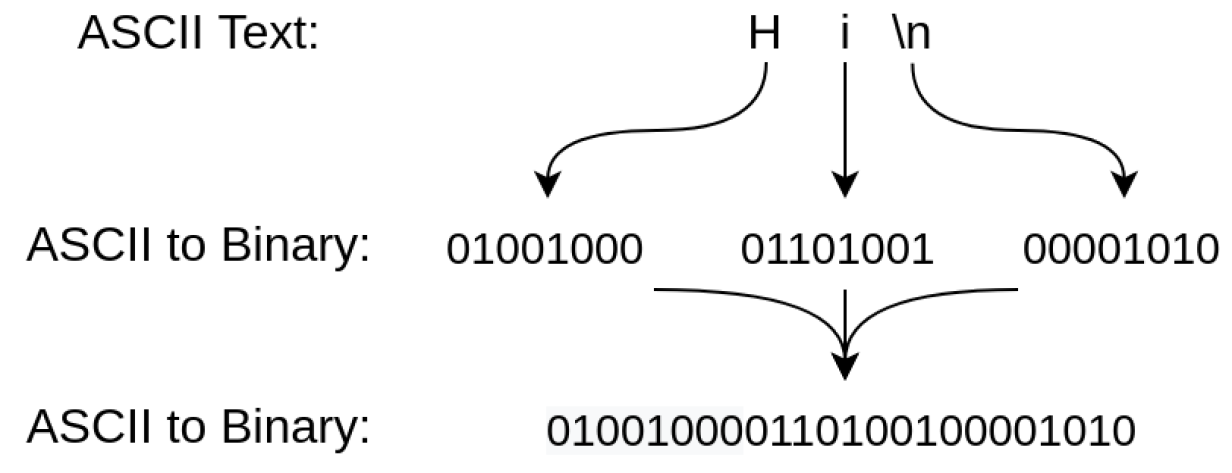
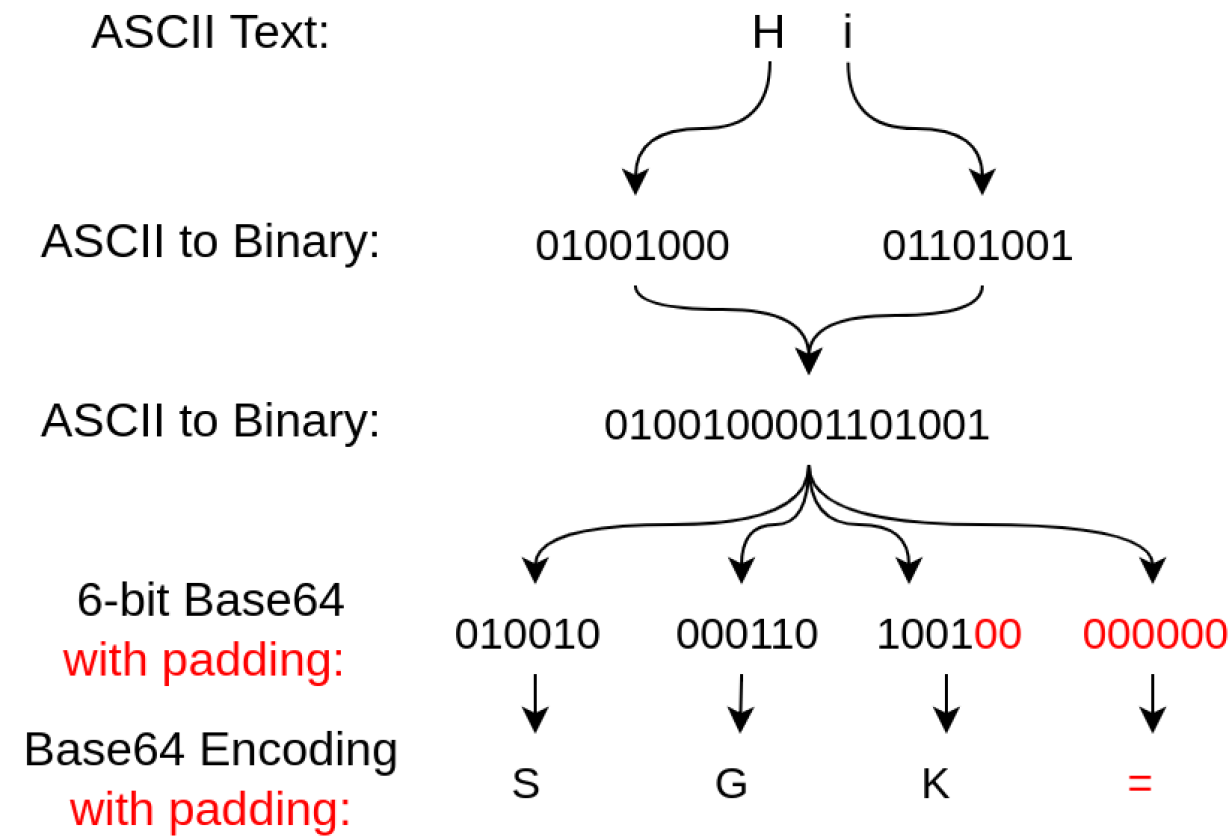
Consider the sentence **Hi**, where the **\n** represents a newline. The first step in the encoding process is to obtain the binary representation of each ASCII character. This can be done by looking up the values in an [ASCII-to-binary conversion table](https://www.rapidtables.com/code/text/ascii-table.html).
{% endhint %}
Text to ASCII bianry
{% hint style="info" %}
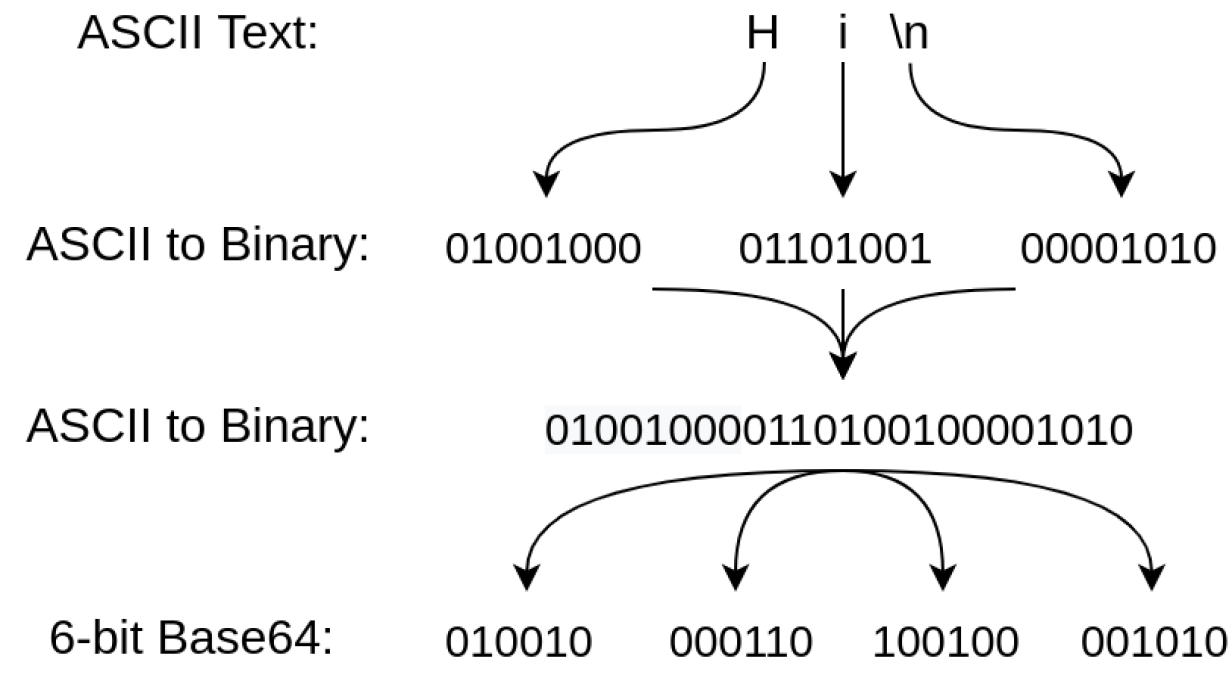
ASCII uses 8 bits to represent individual characters, but Base64 uses 6 bits. Therefore, the binary needs to be broken up into 6-bit chunks.
{% endhint %}
ASCII binary to 6-bit Base64
{% hint style="info" %}
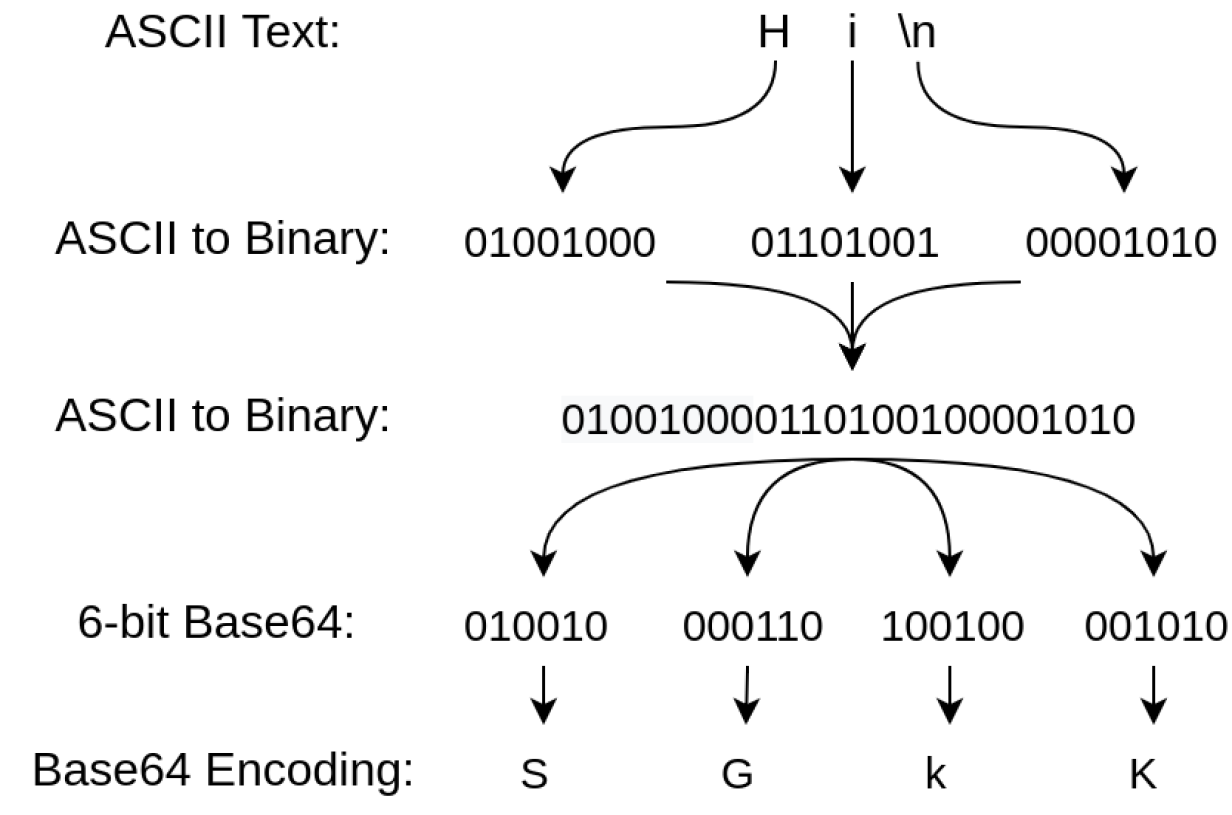
Finally, these 6-bit values can be converted into the appropriate printable character by using a [Base64 table](https://en.wikipedia.org/wiki/Base64#Base64_table_from_RFC_4648).
{% endhint %}
6-bit converted to character
{% hint style="info" %}
Since Base64 uses 24-bit sequences, *padding* is needed when the original binary cannot be divided into a 24-bit sequence. You have probably seen this type of padding before represented by printed equal signs (**=**). For example, **Hi** without a newline is represented by only two 8-bit ASCII characters (for a total of 16 bits). Padding is removed by the Base64 encoding schema when data is decoded.
{% endhint %}
Base64 with padding
{% endtab %}
{% tab title="Base64 Step" %}
{% hint style="info" %}
*Base64* is not necessarily used to protect information. It has the advantage that it can convert mostly any type of byte encoding into a human-readable ASCII.
{% endhint %}
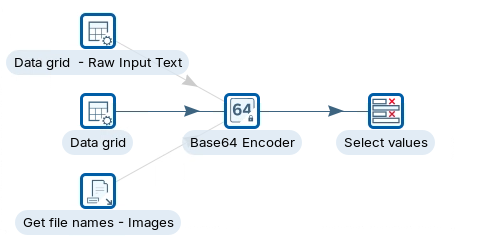
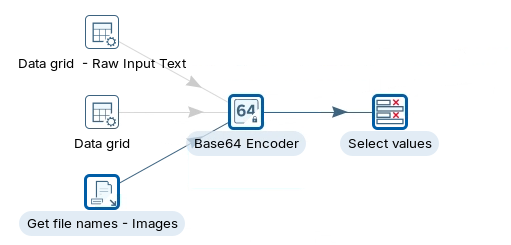
1. Open the following transformation.
Base64
**Windows**
C:/Projects/genai/base64/Base64 Encode.ktr
**Linux**
\~/Projects/genai/base64/Base64.ktr.
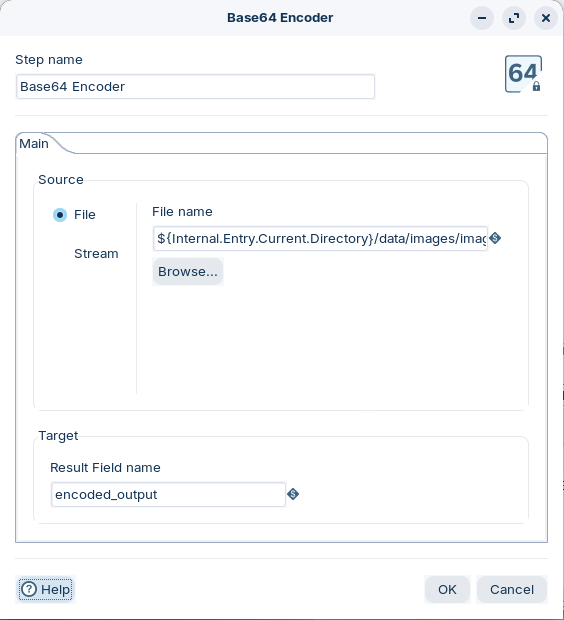
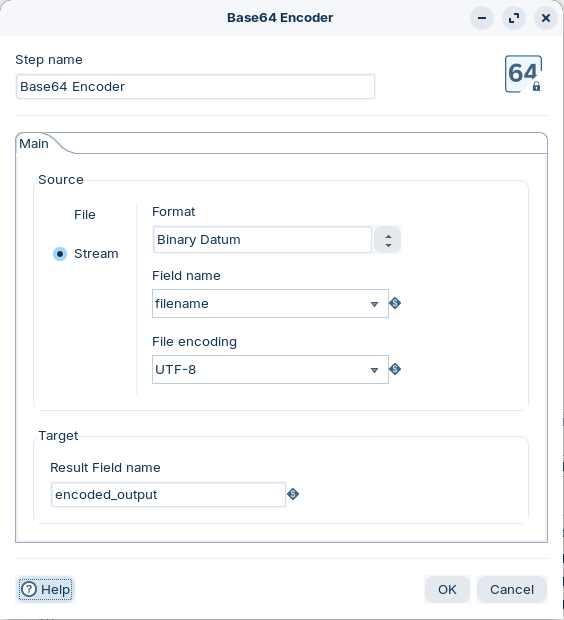
2. Double-click on the Base64 Encoder step and configure with the following settings:
Base64 encode an image
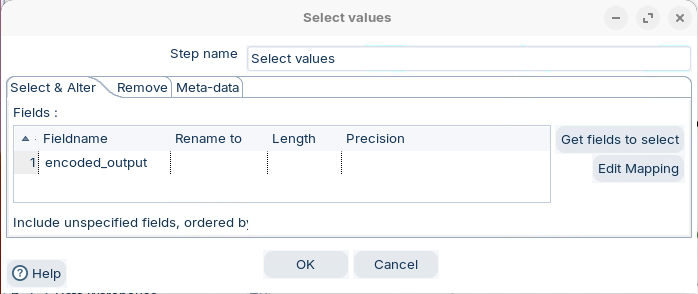
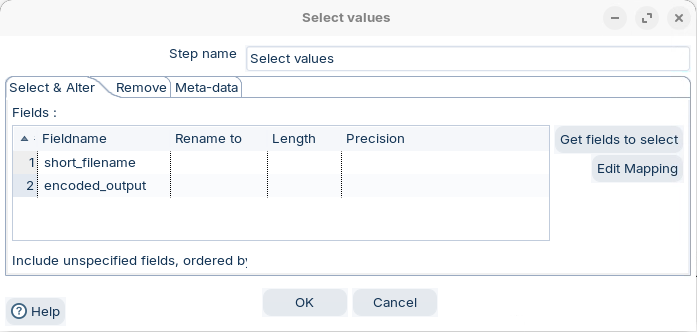
3. Check the Select values step.
Select values - encoded_output
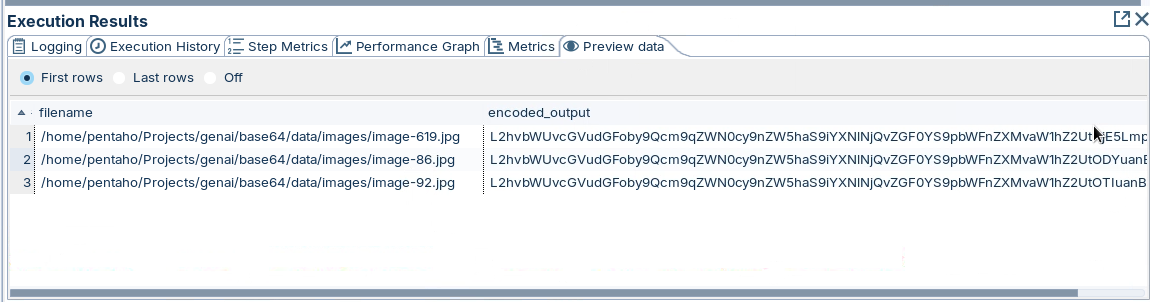
4. RUN and preview the results.
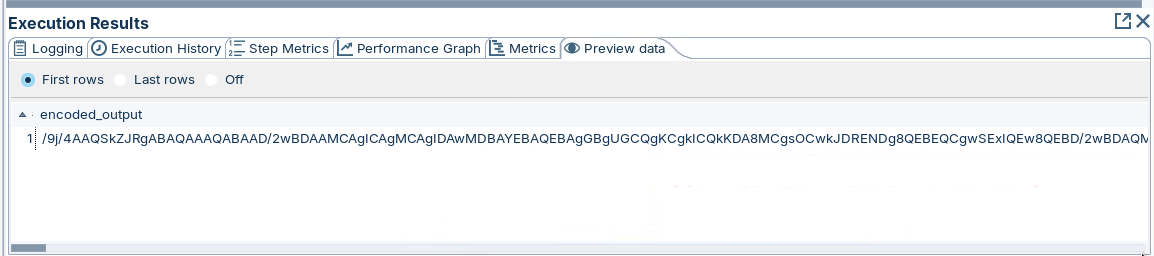
Encoded image-92.jpg
***
**RAW Text**
{% hint style="info" %}
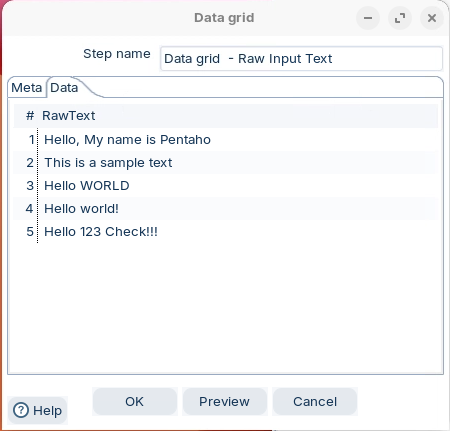
The Data grid holds the RAW Text that will be encoded.
{% endhint %}
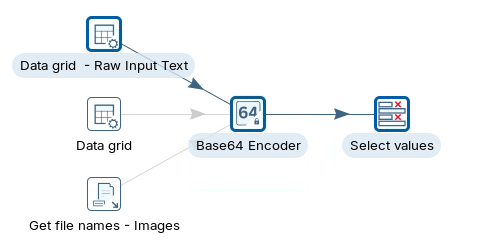
1. Enable the hop between: Data grid - Raw Text Input -> Base64 Encoder.
2. Disable the hop between: Data grid -> Base64 Encoder
Get file names images -> Base64 Encoder
RAW Text
3. Double-click on the Data grid -Raw Input Text step - Data tab
Data grid
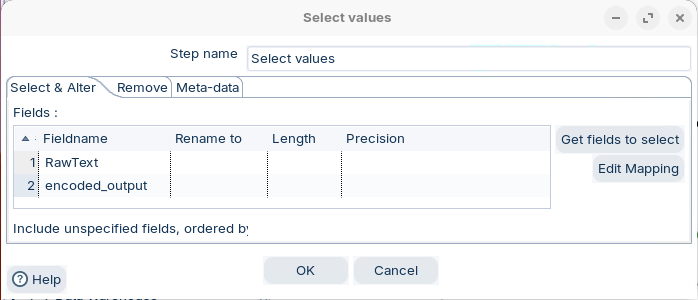
4. Check the Select values.
Select values - RAW Text
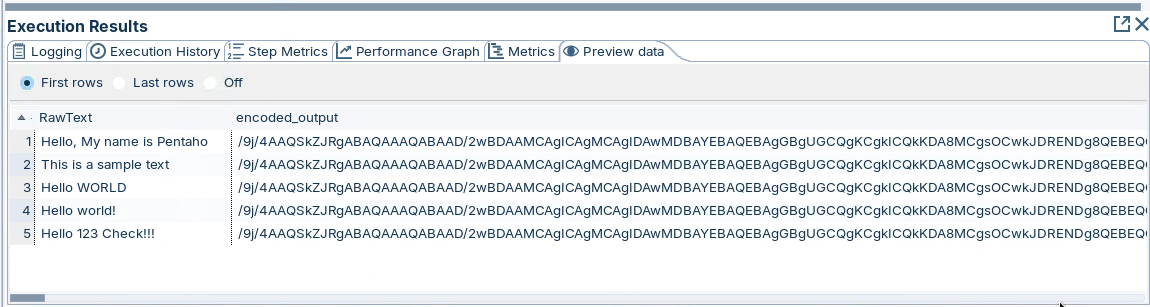
5. RUN and preview the results
Results - RAW Text
***
**Multiple Files**
{% hint style="info" %}
Encode multiple files.
{% endhint %}
1. Enable the hop between: Get file names - Images -> Base64 Encoder
2. Disable the hop between: Data grid - Raw Text Input -> Base64 Encoder.
Data grid -> Base64 Encoder
Multiple files
3. Double-click on the Get File names - Images step.
Expose all file names with .jpg extension
4. Double-click on the Base64 Encoder and configure with the following settings:
File name paths are held in the filename field
5. Check the Select values.
6. RUN and preview the results.
Results - multiple images
{% endtab %}
{% endtabs %}
{% hint style="info" %}
Pentaho GenAI is an extension of the Pentaho Data Integration that incorporates generative AI capabilities. It aims to enhance data workflows processes by leveraging large language models and other AI technologies.
OpenAI released an API platform that enables the creation of 'assistants' that can perform a wide range of tasks:
**Natural Language Querying**: Users can ask questions or provide prompts to large language models (LLMs) like OpenAI and Azure OpenAI, allowing for natural language interaction with data and systems.
**Document Analysis**: The plugin supports attaching documents for LLMs to process, enabling users to analyze and extract insights from text files and related documents.
**Sentiment Analysis**: The plugin can, for example, be used to determine the sentiment of text data, such as tweets.
**Log Analysis**: Process and analyze log files, potentially for troubleshooting or identifying patterns.
**Structured Data Generation**: The plugin supports generating responses in both text and JSON formats, allowing for the creation of structured data from natural language inputs.
**Data Extraction and Transformation**: The plugin can be used within Pentaho Data Integration (PDI) workflows, assisting in extracting and transforming data as part of larger ETL processes.
**Question Answering**: The plugin supports using document embeddings to efficiently answer multiple questions about a document(s), making it useful for information retrieval and FAQ-style applications.
**Prompt Engineering**: Users can create structured templates and use PDI environment variables for dynamic prompt generation, allowing for flexible and customizable interactions with LLMs.
**Moderation and Content Filtering**: The plugin includes options for response moderation, which can be used to filter / flag potentially harmful or inappropriate content.
{% endhint %}
**Resources**
{% embed url="" %}
Link to OpenAI
{% endembed %}
{% embed url="" %}
Link to OpenAI Assisants
{% endembed %}
{% embed url="" %}
Link to a great blog by the one and only Mr AI - Rishu Shrivastava
{% endembed %}
**Pentaho Data Integration**
Pentaho Data Integration + OpenAI Assistant
{% tabs %}
{% tab title="Simple Chat" %}
{% hint style="info" %}
Let's start exploring some simple chat scenarios:
* Enter the prompt directly.
* Pass the prompt and 'role' in data stream fields.
* Configure the step to use your own OpenAI account details.
The step is located in the AI folder.
{% endhint %}
**Enter Prompt**
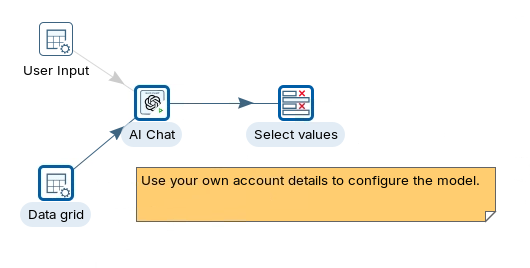
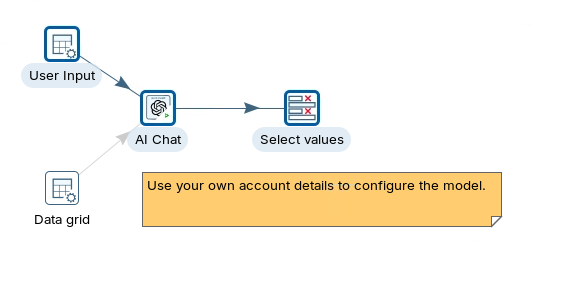
1. Enable the hop between: Data Grid -> AI Chat.
2. Disable the hop bewteen: User Input -> AI Chat.
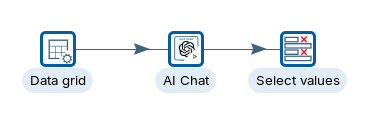
Simple AI Chat
1. Open the following transformation:
**Windows**
C:/Projects/genai/ai chat/.ktr
**Linux**
\~/Projects/genai/html/HTML Parser - Xpath.ktr
1. Double-click on the hp: html and configure with the following settings:
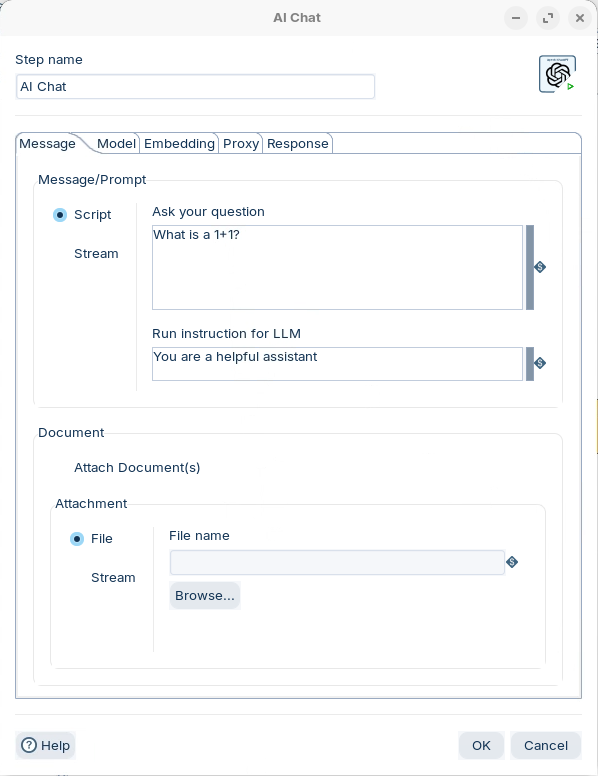
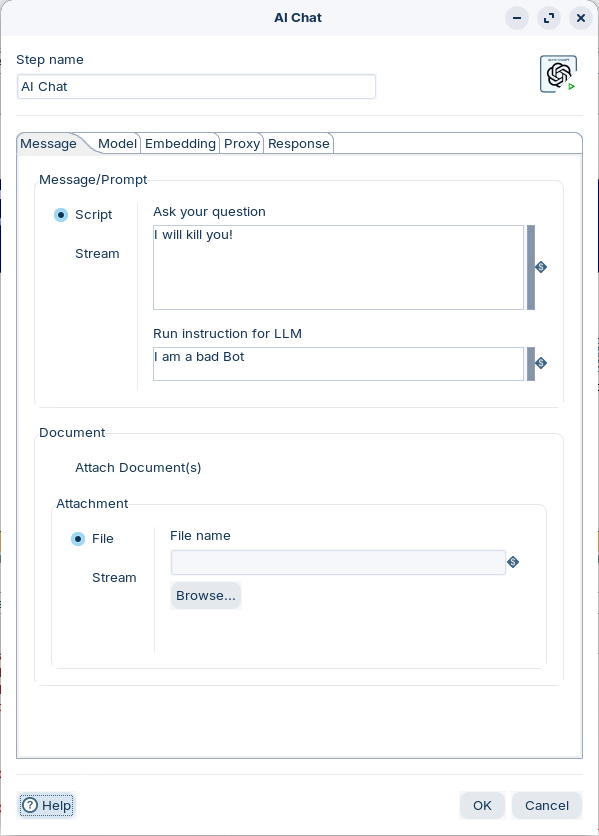
2. Double-click on the AI Chat step and configure with the following settings:
Enter your question?
{% hint style="info" %}
Run Instruction for LLM
Role-playing with Large Language Models (LLMs), such as ChatGPT, is an emerging field that explores the interaction between AI and creative, narrative-driven experiences. It leverages the advanced capabilities of LLMs to simulate human-like dialogue and human behavior within a role-playing context.
This process enables the AI to engage in dynamic conversations, mimic various characters, and respond to user inputs in a manner that aligns with the character’s predefined traits and narrative context, making use of powerful computation of large corpus of text data. In this way, this role-playing technique enhances its efficiency in tasks that require specific skills or knowledge, such as acting like a historian or providing historical facts and analyses.
{% endhint %}
4. Click on the Model tab.
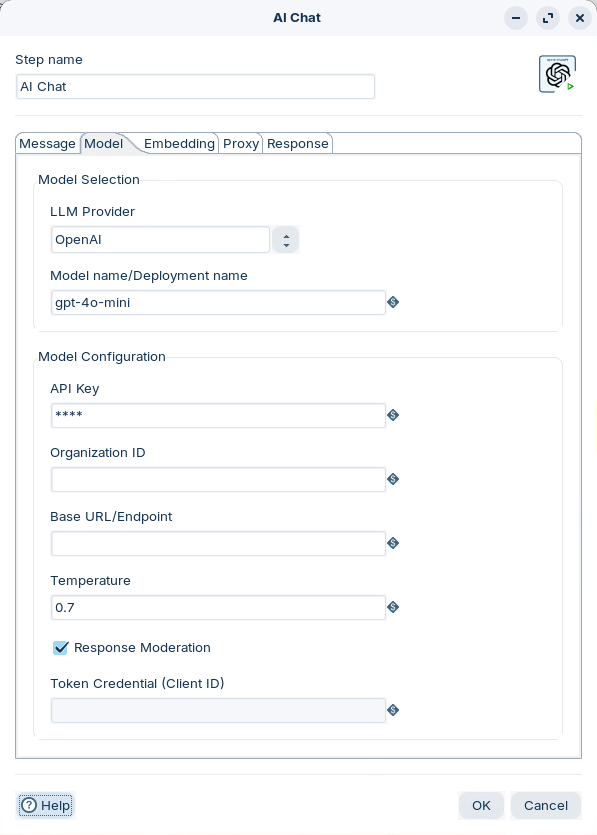
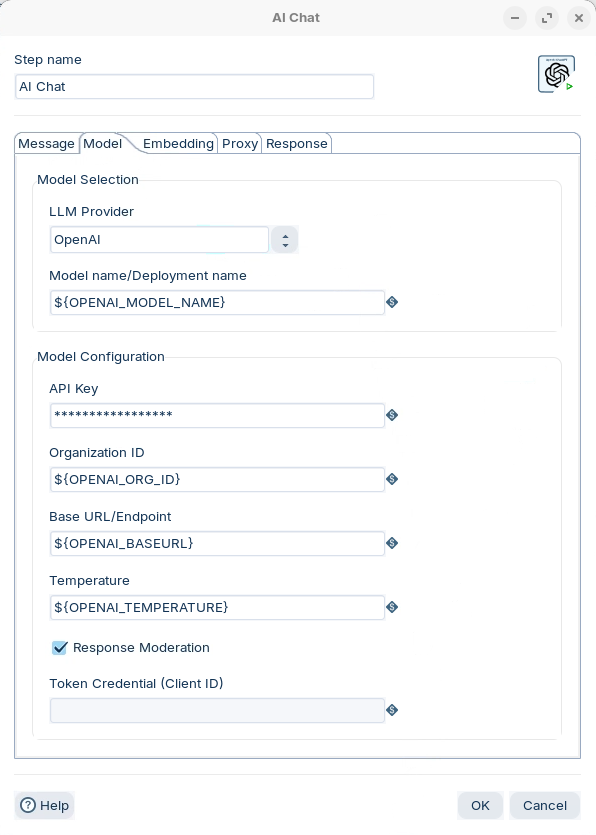
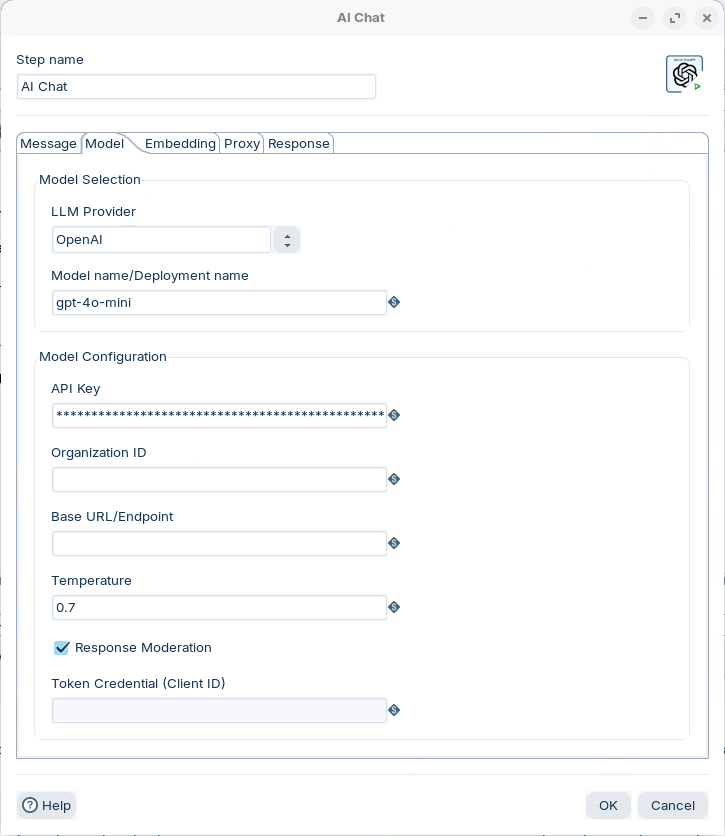
Model Configuration
{% hint style="info" %}
The temperature value ranges from 0 to 2, with lower values indicating greater determinism and higher values indicating more randomness.
The [moderations](https://platform.openai.com/docs/api-reference/moderations) endpoint is a tool you can use to check whether text is potentially harmful. Developers can use it to identify content that might be harmful and take action, for instance by filtering it.
{% endhint %}
Moderation
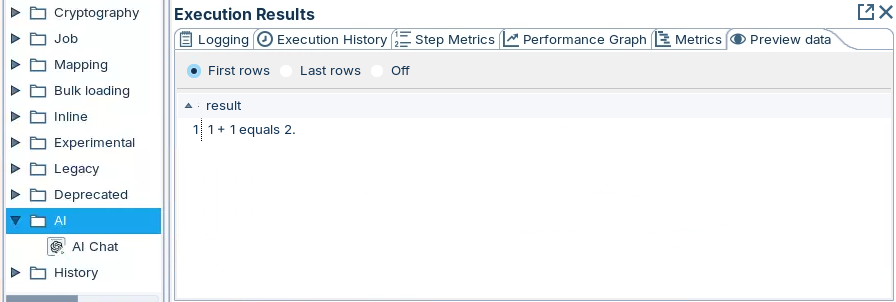
5. RUN and preview the result.
Results
***
**Prompt from Data Stream fields**
{% hint style="info" %}
You can send multiple questions to ChatGPT.
However, there are limits to the number of requests an LLM model can accept. The response will fail if the threshold limit is reached.
{% endhint %}
Prompt & Role set from data stream fields
1. Disable the hop between: Data Grid -> AI Chat.
2. Enable the hop bewteen: User Input -> AI Chat.
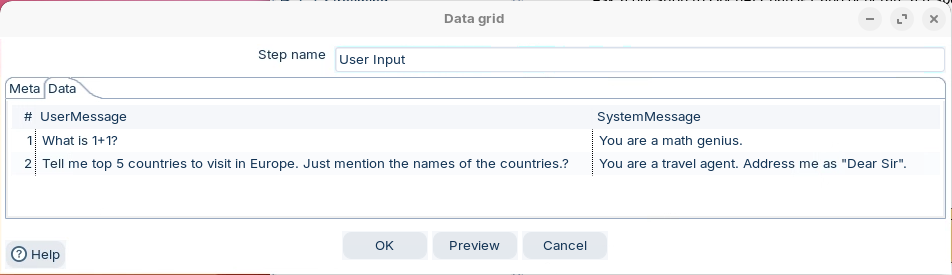
3. Double-click on the User Input step and the Data tab.
User Input
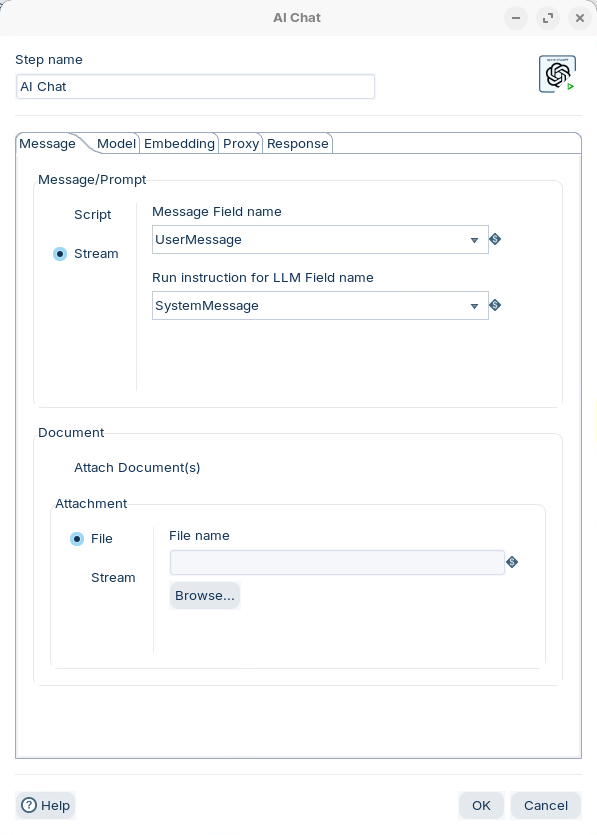
4. Double-click on the AI Chat step and configure with the following settings:
Stream - Message & 'Role'
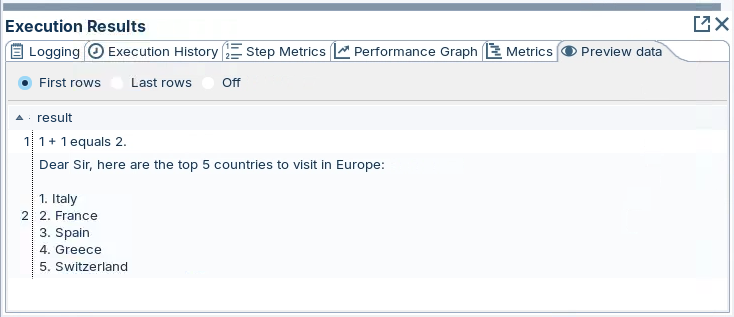
5. RUN and preview result.
Multiple prompts & 'roles'
***
**Configure Model with your own account details**
{% hint style="info" %}
The 'pipeline' configuration is the same as the previous scenario.
You will require to enter your own OpenAI key.
{% endhint %}
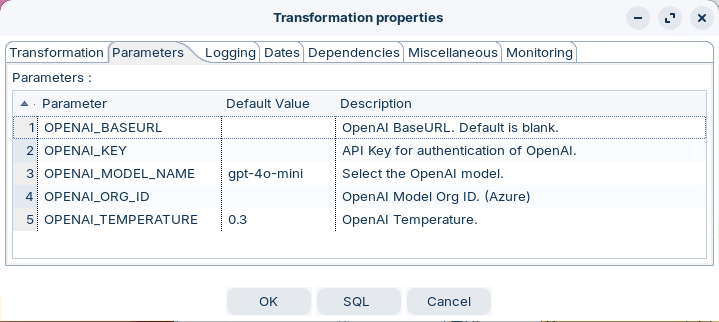
1. Double-click anywhere on the canvas to configure the Parameters.
Parameters
{% hint style="warning" %}
Enter your own OpenAI Key.
{% endhint %}
2. Double-click on the AI Chat step and configure with the following settings.
Configure Model
3. RUN and preview the result. Should be the same as the previous scenario ..!!
{% endtab %}
{% tab title="RAG" %}
{% hint style="info" %}
RAG (Retrieval-Augmented Generation) is a technique in artificial intelligence that combines information retrieval with text generation. It's particularly useful for keeping AI systems updated without constant retraining and for providing responses grounded in specific, retrievable facts.
{% endhint %}
**Non-persistant RAG**
{% hint style="info" %}
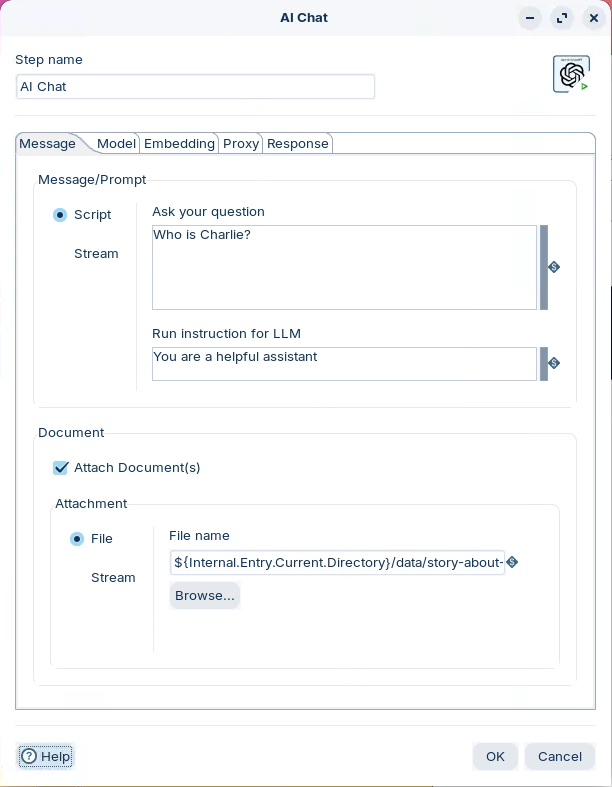
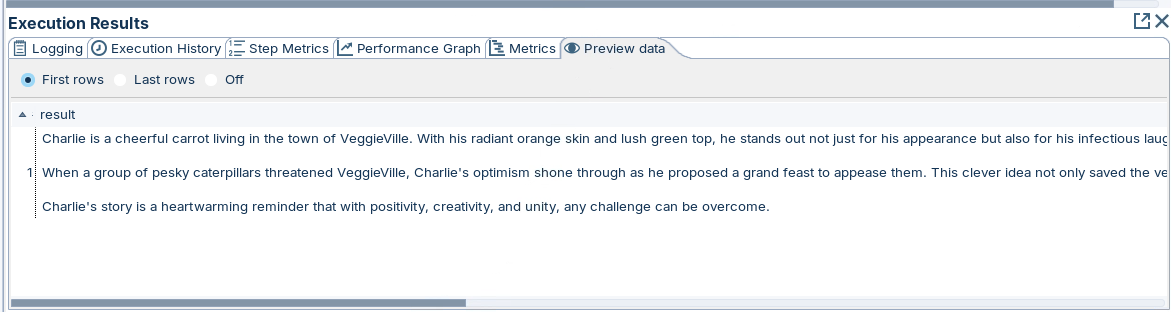
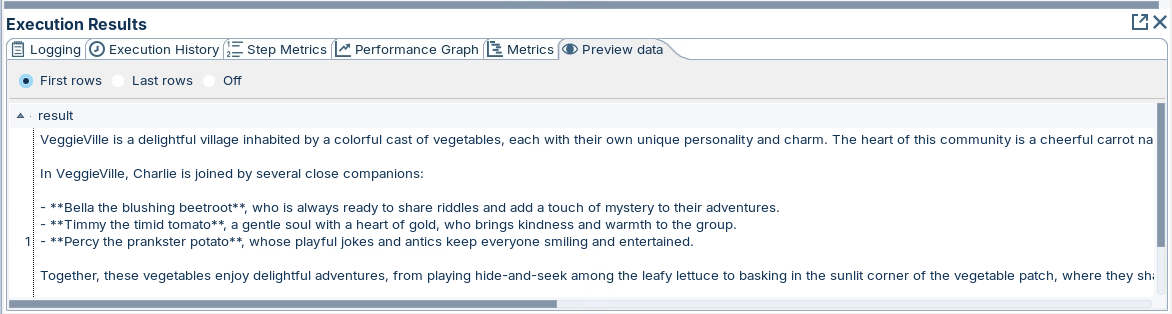
So .. in the data folder you will find a story about Charlie the happy go lucky carrot who, with his friends, lives in Veggeville ..
If you don't attch the document then the response will ask for more information as it can't place Charlie in any context.
{% endhint %}
1. Enable the hop between: Data Grid -> AI Chat.
RAG
2. Double-click on the AI Chat step and configure with the following settings:
Attach the Veggeville story for context
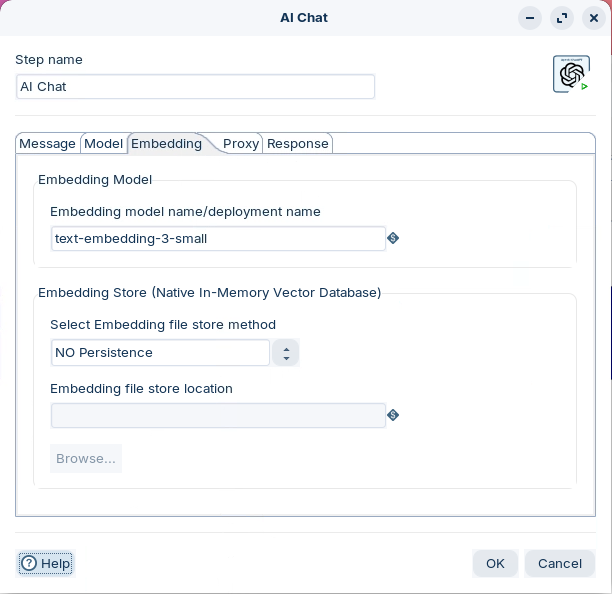
3. Click on the Embedding tab.
{% hint style="info" %}
An embedding model converts words, phrases, or other data into numerical vectors. These vectors serve as a bridge between raw data and machine learning algorithms by creating meaningful, computable representations of complex information.
{% endhint %}
3. RUN and preview the result.
Charlie the happy carrot ..
***
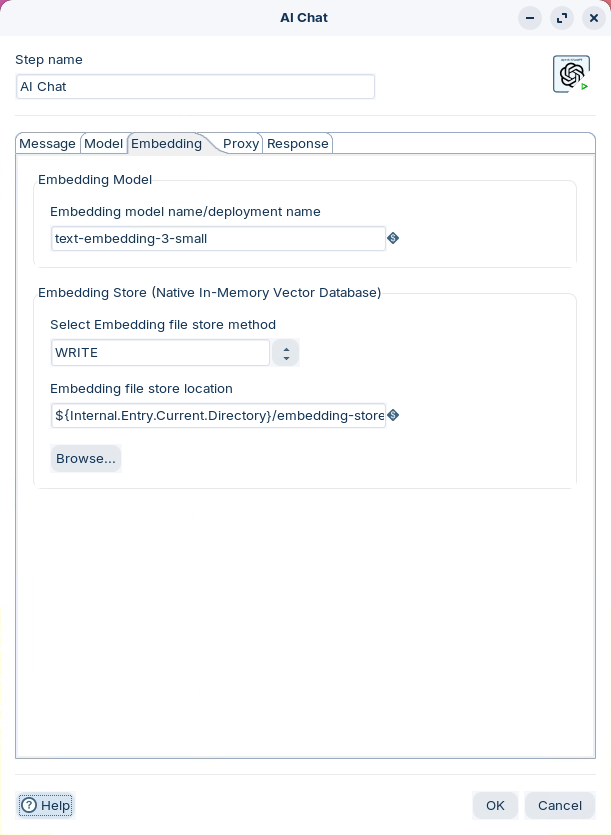
**Embedding - Write**
{% hint style="info" %}
Let's change the embbedding to store to WRITE to persist the results as a file -
openai-embedding-store.json.
This file is particularly useful in RAG (Retrieval-Augmented Generation) systems, where quick access to embeddings is crucial for efficient information retrieval.
{% endhint %}
1. Double-click on the AI Chat step and then on the Embedding tab.
2. Configure with the following settings.
Persist the Embedding
3. RUN & check that the embedding has been stored.
***
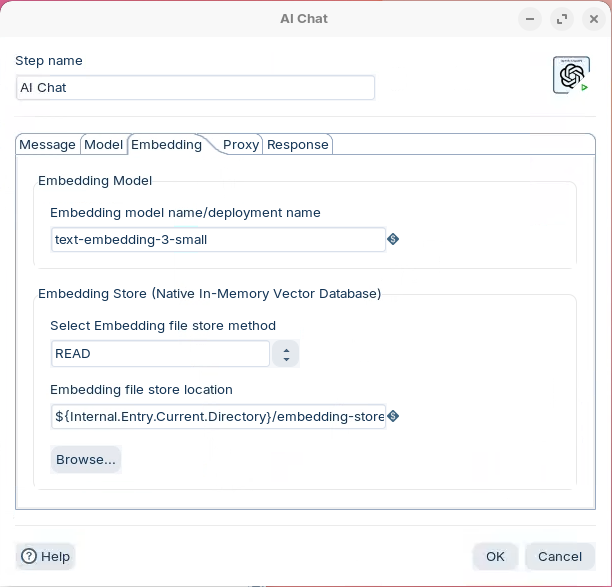
Embedding - READ
{% hint style="info" %}
Now that a Veggeville embedding has been created, we can ask questions leveraging the vector store: openai-embeeding-store.json
{% endhint %}
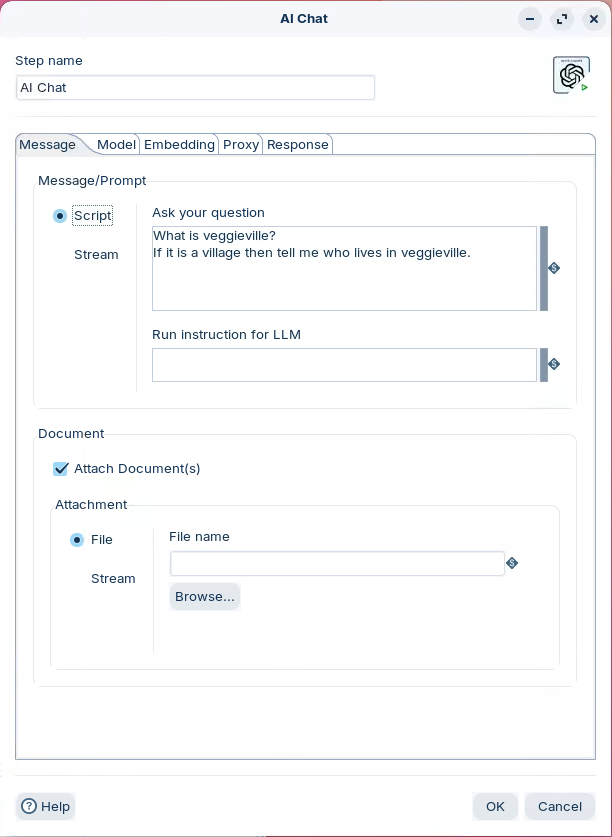
1. Double-click on the AI Chat step and configure with the following settings:
Enter new prompt ..
{% hint style="warning" %}
Ensure you select the Attach Document(s) option - enables the embedding options.
{% endhint %}
2. Click on the Embedding tab and confiure with the following settings:
READ the embedding.
3. RUN and preview the result.
Happy Veggeville
{% endtab %}
{% tab title="Prompts" %}
{% hint style="info" %}
A prompt is essentially the input given to an AI model to elicit a desired output or behavior. It can range from simple questions to complex instructions or examples.
Prompt engineering is the art and science of crafting these inputs to optimize the AI's performance for specific tasks. This involves carefully selecting words, providing context, and structuring the prompt to guide the model towards producing the most accurate, relevant, and useful responses.
{% endhint %}
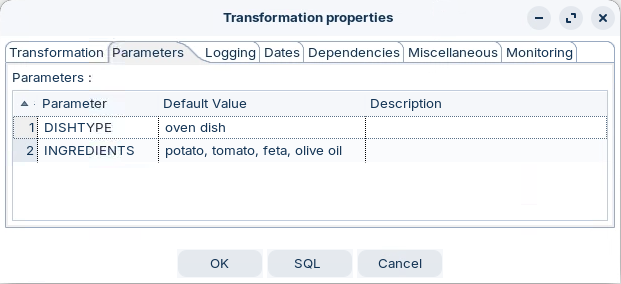
1. Double-click anywhere on the canvas to set the parameters.
Parameters
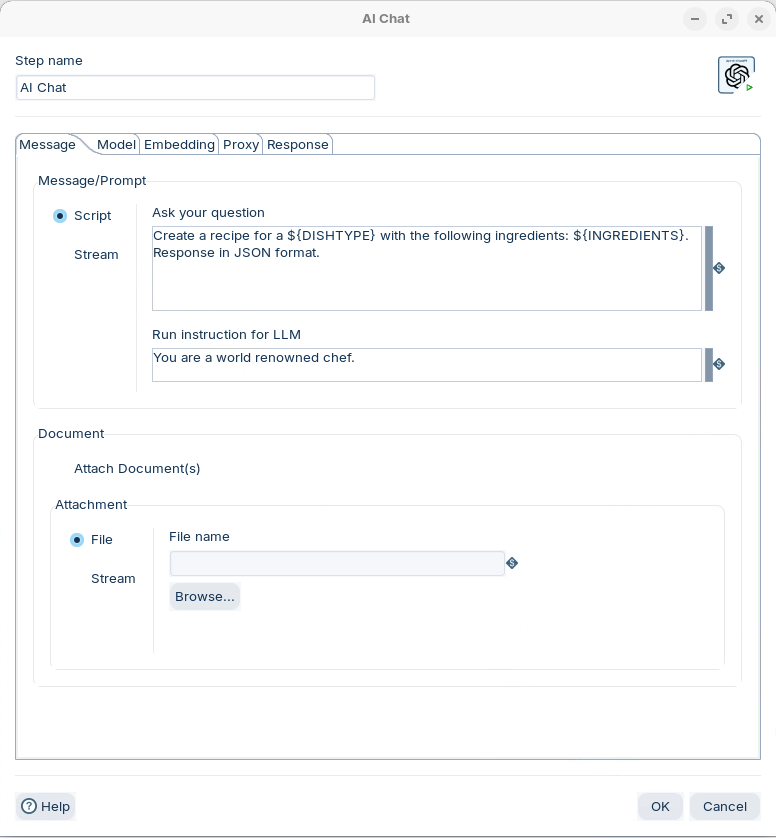
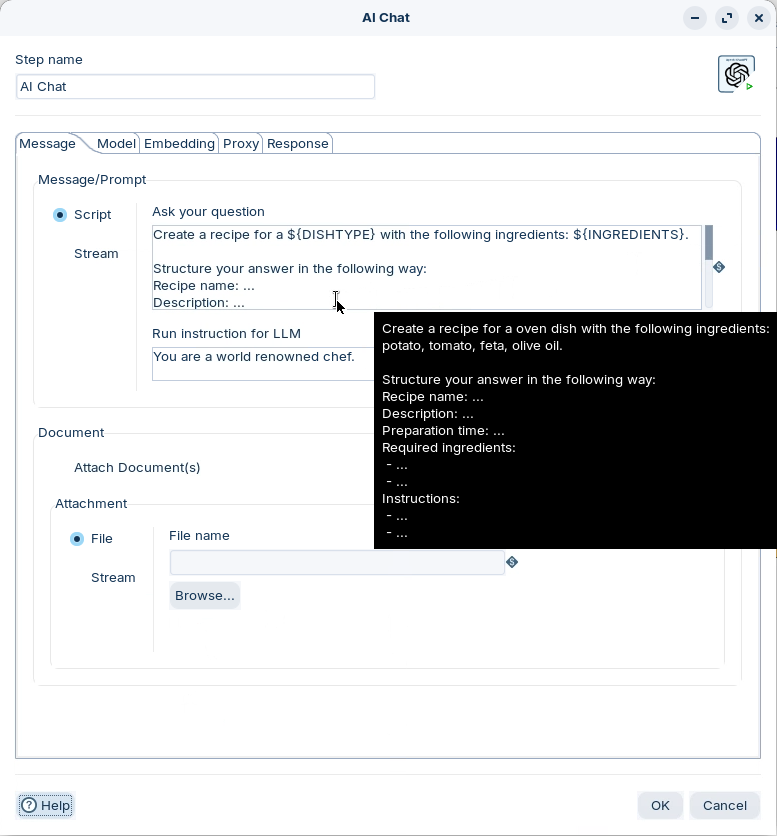
2. Double-click on the Chat AI step and configure with the following settings:
Prompt PDI variables.
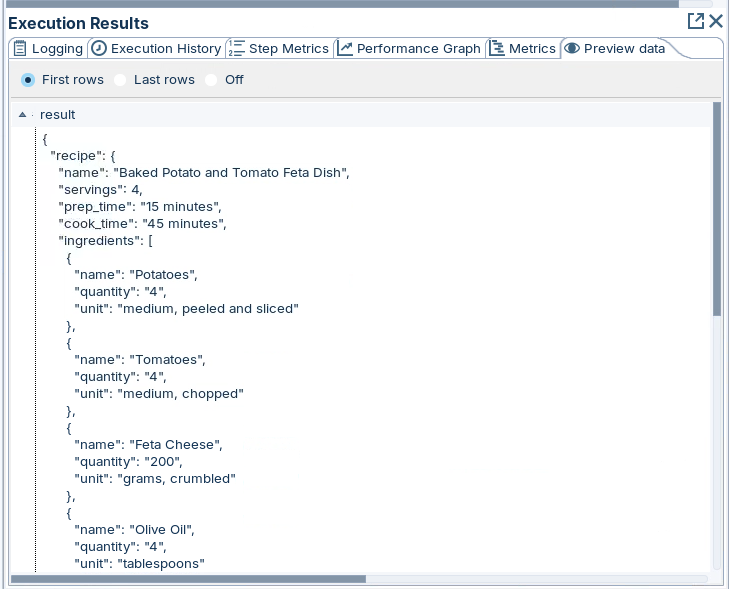
3. RUN and preview the result.
Results - JSON object
***
**Prompt - Template**
{% hint style="info" %}
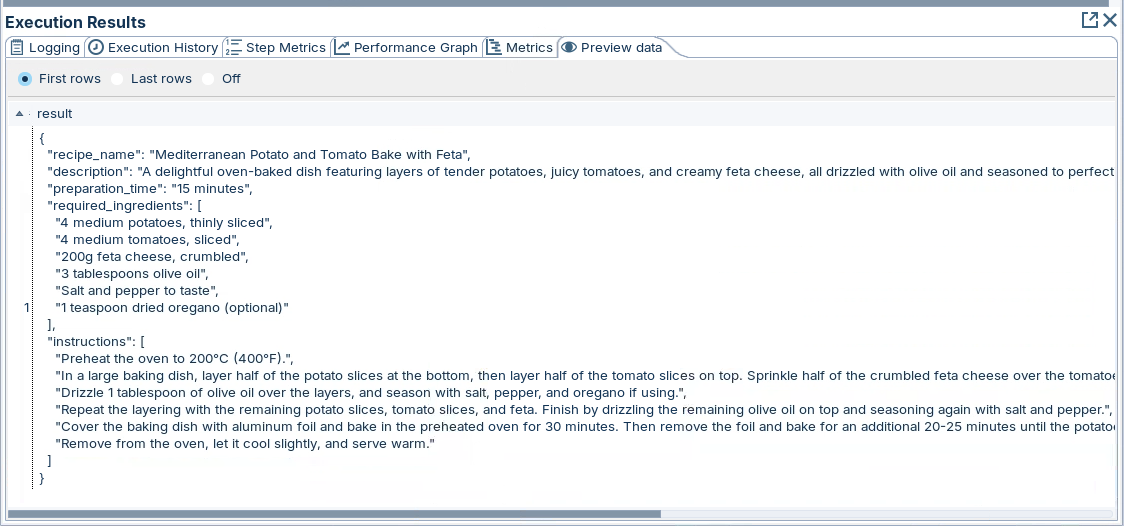
With a little prompt engineering, the response can populate a 'template'.
{% endhint %}
1. Double-click on the Chat AI step and configure with the following settings:
```
Create a recipe for a ${DISHTYPE} with the following ingredients: ${INGREDIENTS}.
Structure your answer in the following way:
Recipe name: ...
Description: ...
Preparation time: ...
Required ingredients:
- ...
- ...
Instructions:
- ...
- ...
Respond in JSON format.
```
2. RUN and preview the result.
Result - yum
{% endtab %}
{% tab title="Use Cases" %}
{% hint style="info" %}
Let's run through some Use Cases:
**Sentiment Analysis** - Determine the sentiment of a tweet: Positive, Neutral, Negative.
**Log Analysis** - Analyze multiple log files for any errors. The errors are hopefully resolved by AI Chat with the results written to a CSV file.
{% endhint %}
{% tabs %}
{% tab title="Log Analysis" %}
{% hint style="info" %}
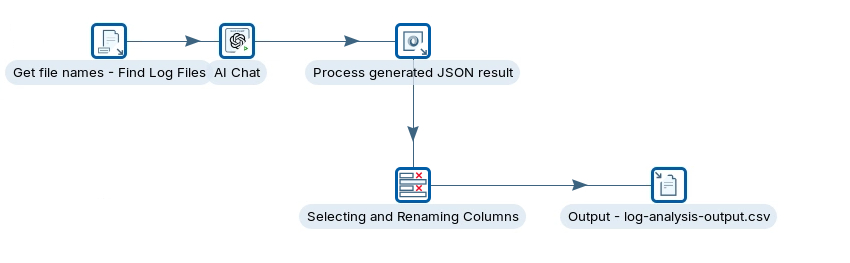
Analyzes multiple log files to identify errors, then using AI Chat to provide with a resolution. The generated result is in JSON format and the processed output is stored as a CSV file.
{% endhint %}
1. Open the following transformation:
**Windows**
C:/Projects/genai/aichat/Usecase - Log Analysis.ktr
**Linux**
\~/Projects/genai/aichat/Usecase - Log Analysis.ktr
2. Double-click on the hp: html and configure with the following settings:
Log Analysis
{% tabs %}
{% tab title="AI Chat" %}
{% hint style="info" %}
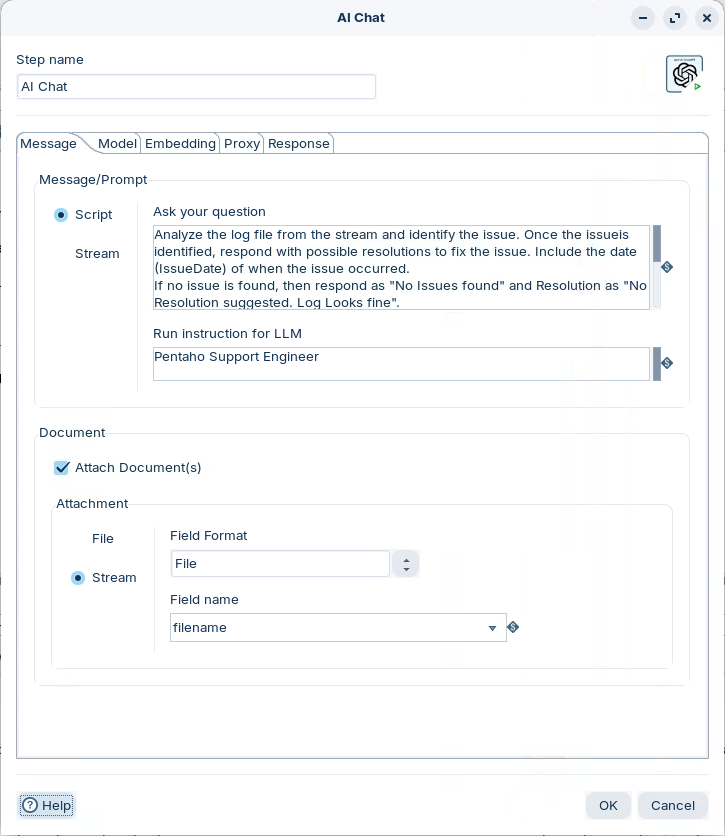
The Prompt has been engineered to analyze log files identifying errors. The errors are resolved using
{% endhint %}
1. Double-click on the AI Chat step to view the settings.
AI Chat
**Message / Prompt**
```
Analyze the log file from the stream and identify the issue. Once the issueis identified, respond with possible resolutions to fix the issue. Include the date (IssueDate) of when the issue occurred.
If no issue is found, then respond as "No Issues found" and Resolution as "No Resolution suggested. Log Looks fine".
Reply the answer in the below JSON template:
{
"Issue" : "...",
"IssueDate": "...",
"Resolution" : "..."
}
```
**Document**
{% hint style="info" %}
Determines location the data source:
File - Browse and enter the path to the data source
Stream - the data (or reference) is being passed in a data stream field. In this workshop the paths to the log files are being passed from the previous step in the filename data stream field.
{% endhint %}
***
**Model**
2. Click on the Model tab.
Model options
{% hint style="info" %}
The temperature value ranges from 0 to 2, with lower values indicating greater determinism and higher values indicating more randomness.
The [moderations](https://platform.openai.com/docs/api-reference/moderations) endpoint is a tool you can use to check whether text is potentially harmful. Developers can use it to identify content that might be harmful and take action, for instance by filtering it.
{% endhint %}
***
**Embedding**
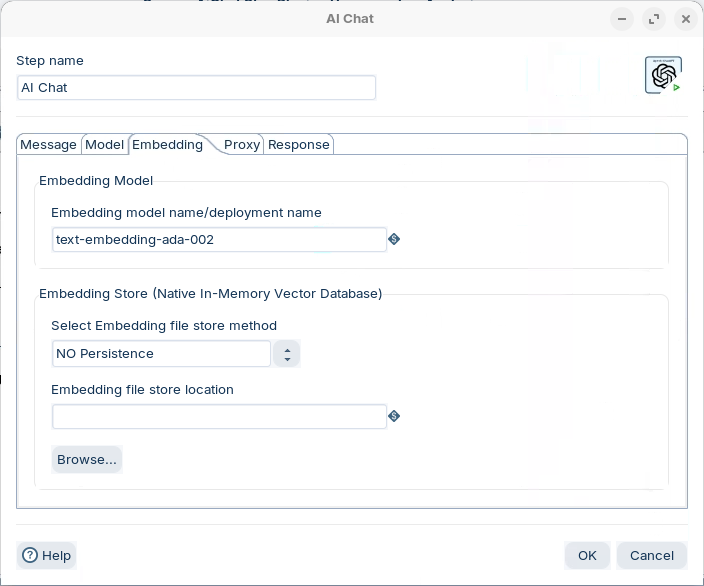
3. Click on the Embedding tab.
Embedding options
{% hint style="info" %}
Enter your embedding model and whether you want to create and persist in a file or keep it as default In-Memory.
Take a look at the [RAG workshop](#rag).
{% endhint %}
***
**Response**
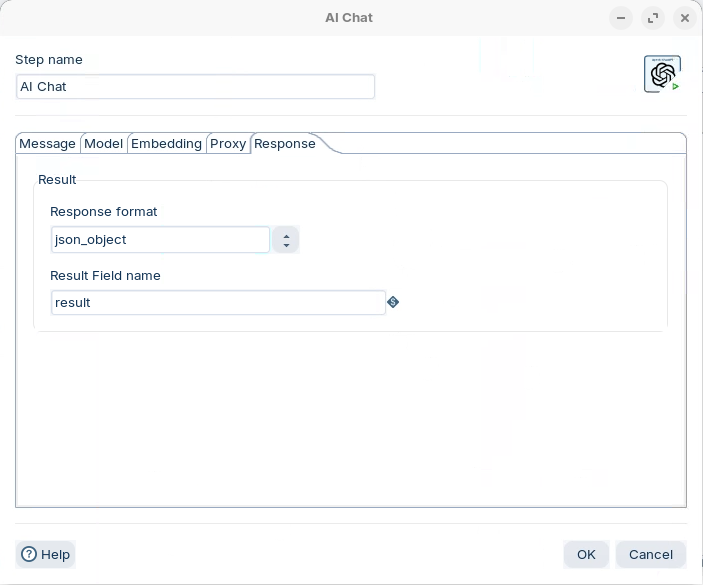
4. Click on the Response tab.
Response
{% hint style="info" %}
The response is held as a JSON object in the result field.
{% endhint %}
{% endtab %}
{% tab title="JSON" %}
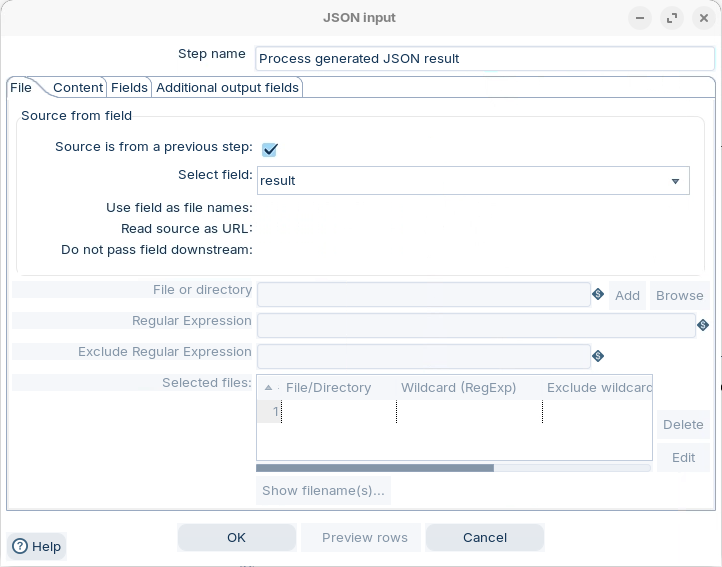
{% hint style="info" %}
The response JSON object needs to be parsed to create our data stream fields.
{% endhint %}
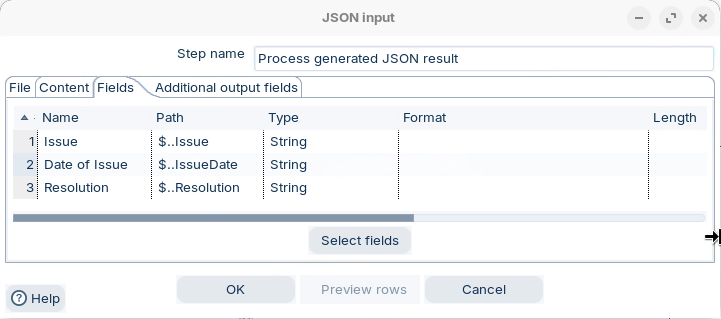
1. Double-click on the Process generated JSON result step.
File tab - data source is being passed in the result field from the previous step.
2. Click on the Fields tab.
Configure the path to the fields.
{% hint style="info" %}
Take a look at the result field (preview data in AI Chat step) to determine the structure of the JSON object / array.
This should reflect the structure of the prompt template.
{% endhint %}
```
{
"Issue": "Errors initializing Table output step and executing query job due to Simba driver limitations.",
"IssueDate": "2023-09-07",
"Resolution": "Use the GBQ Bulk Loader step instead of the regular Table output step to create the table and handle data inserts."
}
...
```
**JSON Notation**
JSON Exp
Description
Sample
$
Root object
$ returns the whole JSON structure
.
Child operator; it's used to access different levels of the JSON structure
$..Issue returns the Issue
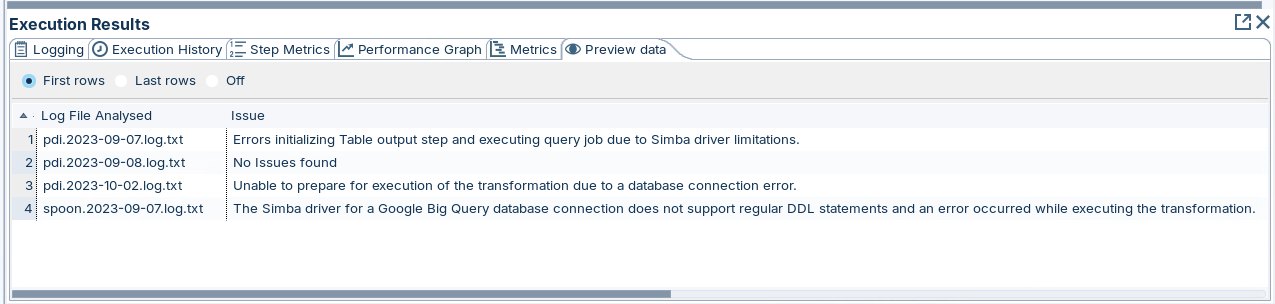
3. RUN and preview result - Output - log-analysis.csv
result - log analysis
{% endtab %}
{% endtabs %}
{% endtab %}
{% tab title="Sentiment Analysis" %}
{% hint style="info" %}
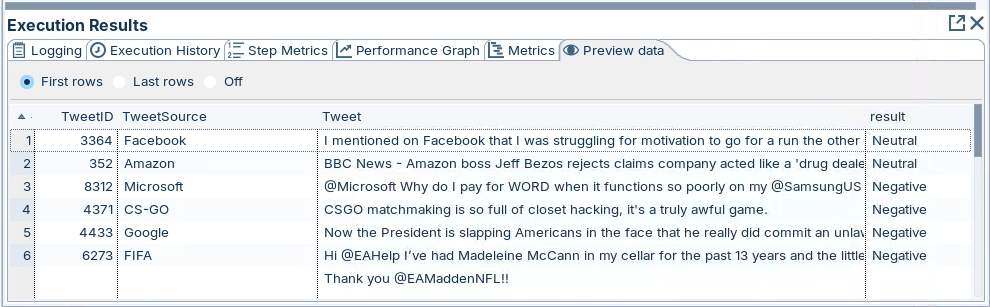
The `sentiment_analysis` function analyzes the overall sentiment of the discussion. It considers the tone, the emotions conveyed by the language used, and the context in which words and phrases are used.
{% endhint %}
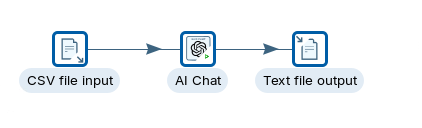
Sentiment Analysis
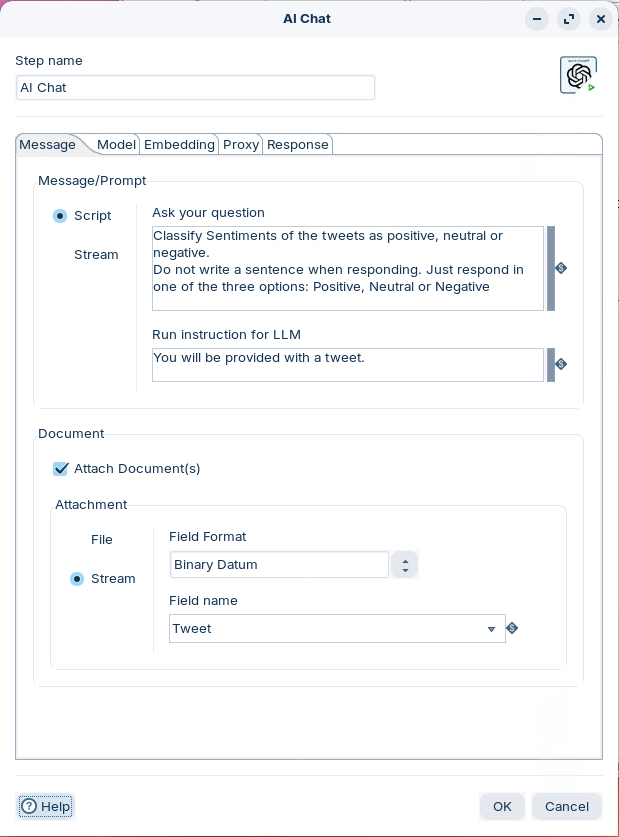
1. Double-click on the AI Chat step.
AI Chat - Sentiment Analysis
{% hint style="info" %}
Again a bit of prompt engineering enables the tweets from the Tweet data stream field.
{% endhint %}
2. RUN and preview result - Text file output.
result - sentiment analysis
{% endtab %}
{% endtabs %}
{% endtab %}
{% endtabs %}
{% hint style="info" %}
One of the most common problems for large, high-growth businesses is dealing with increasing volumes and varieties of financial data - more specifically, extracting the data from PDF documents such as quarterly reports, balance sheets, bank statements and cash flow statements.
Without a solution to handle these data extraction tasks at scale, operations quickly become error-prone and time-consuming. This is why a growing number of organisations are now implementing AI data extraction tools.
{% endhint %}
Analyze Finacial Reports
{% hint style="info" %}
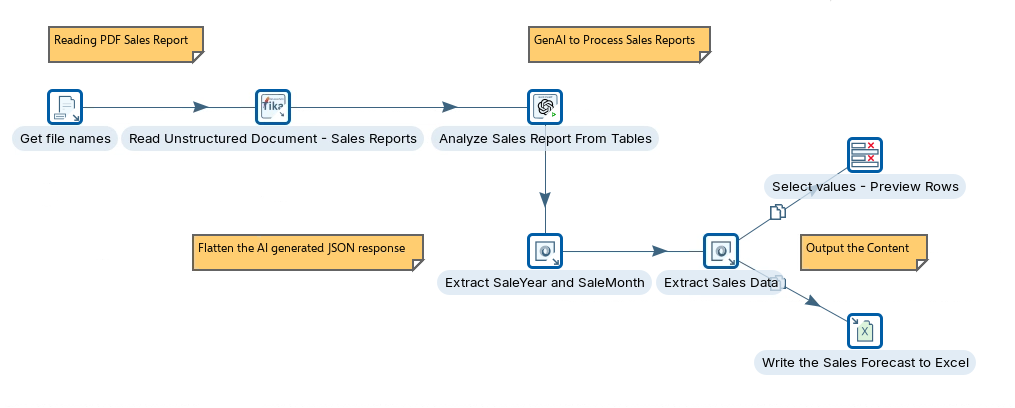
In this use case we're going to extract sales data from PDF reports, using Pentaho Data Integration.
{% endhint %}
Review the main steps of the
{% tabs %}
{% tab title="Read Document" %}
{% hint style="info" %}
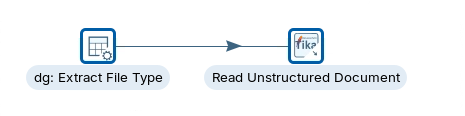
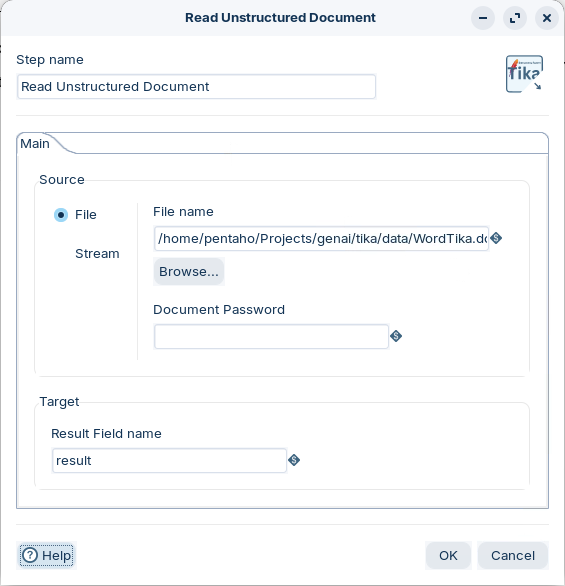
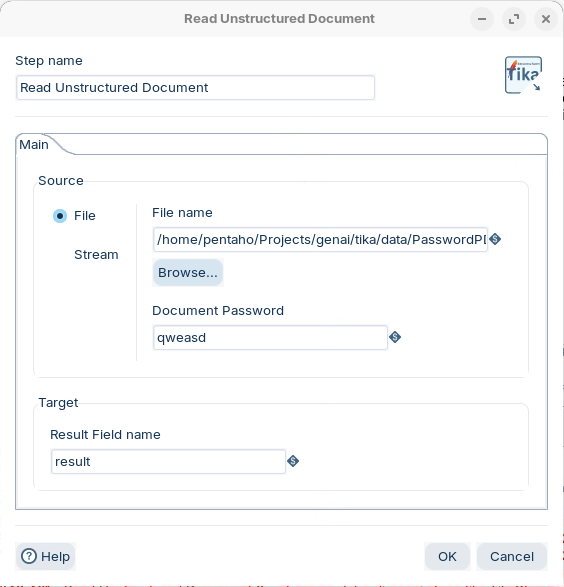
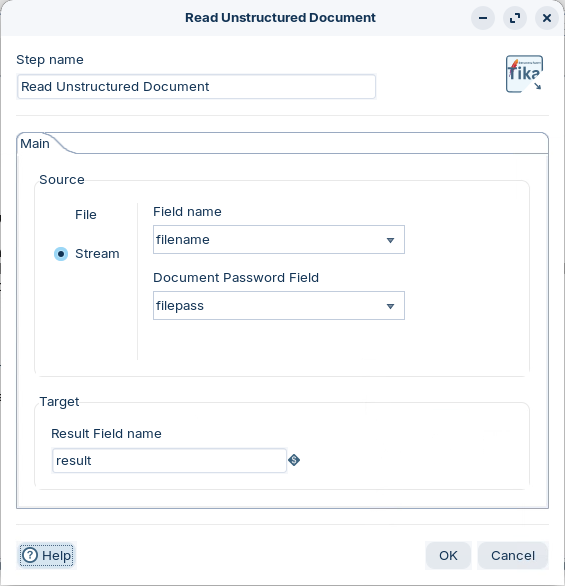
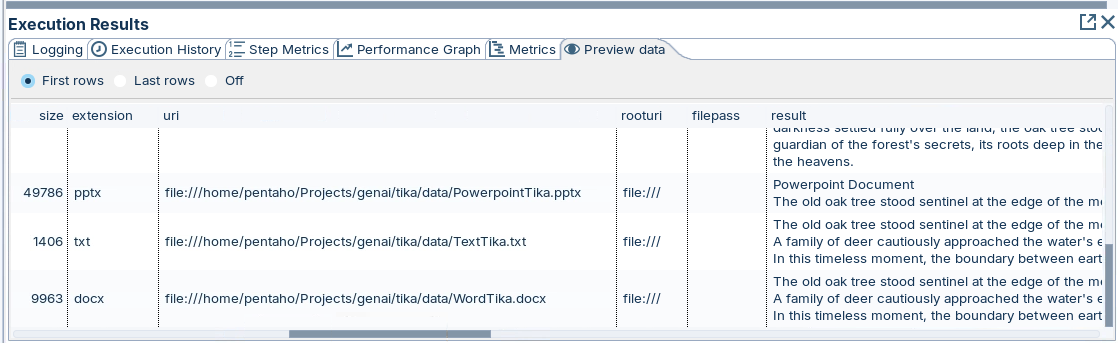
The Apache Tika™ toolkit detects and extracts metadata and text from over a thousand different file types (such as PPT, XLS, and PDF).
{% endhint %}
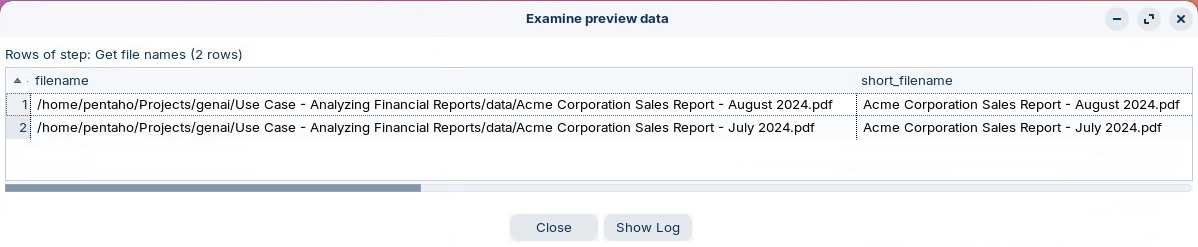
1. The previous step - Get file names returns the paths to the PDFs.
Get file names
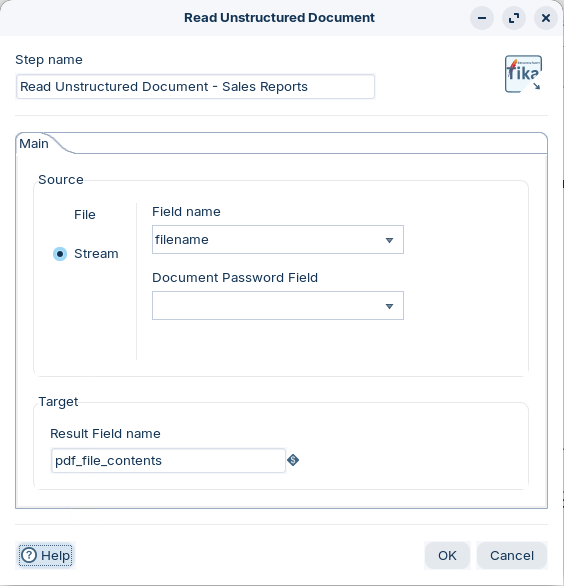
2. Double-click on the Read Unstructured Document step to view settings.
Tika step
{% hint style="info" %}
Based on the filenames passed in the filename field, the pdf contents are extracted and associated with the pdf\_file\_contents data stream field.
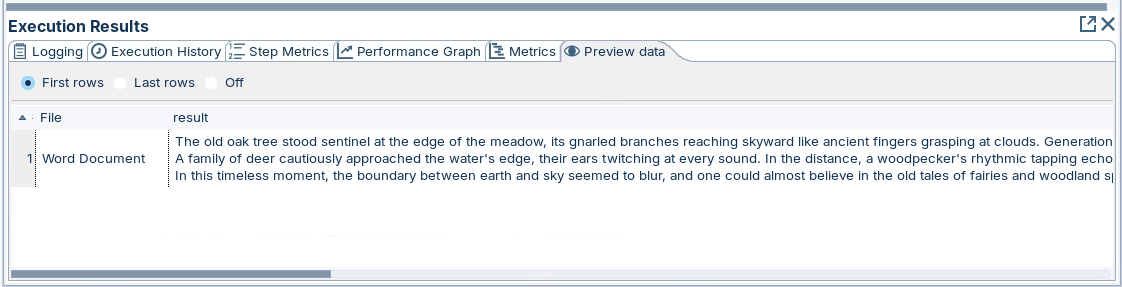
{% endhint %}
{% endtab %}
{% tab title="AI Chat " %}
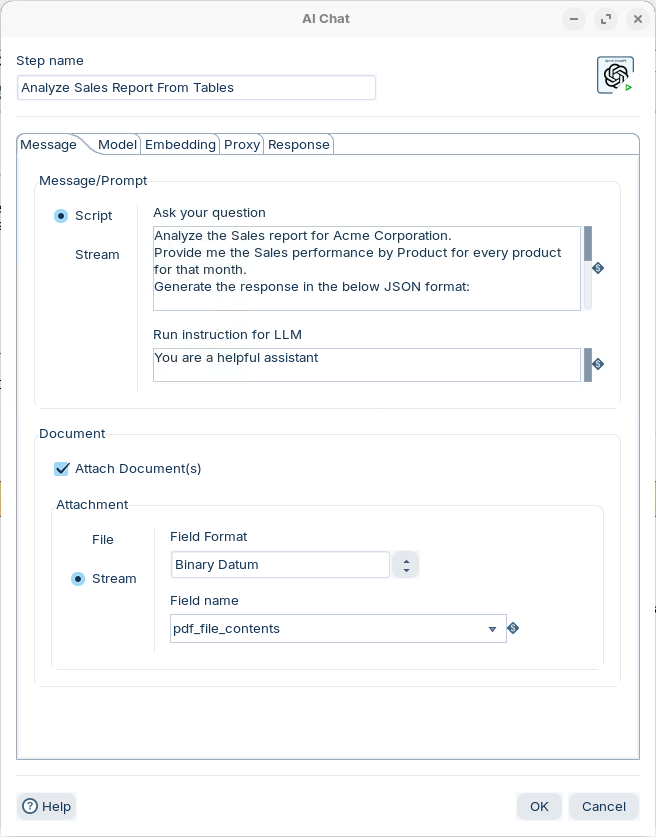
1. Double-click on the AI Chat step to view the settings.
Message - Templated prompt
{% hint style="info" %}
Under the Message tab, a templated prompt provides the model the instructions to extract the sales data, from the data stream field pdf\_file\_contents which has the extracted pdf.
{% endhint %}
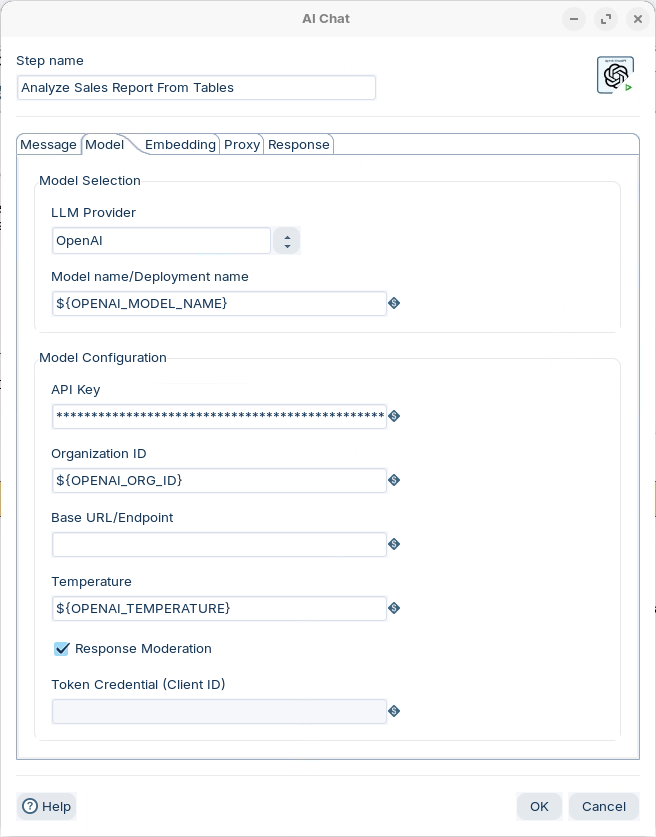
2. Click on the Model tab.
Model
{% hint style="info" %}
Based on parameters set in the transformation properties, the OpenAI model, API Key and Temeprature, are set.
{% endhint %}
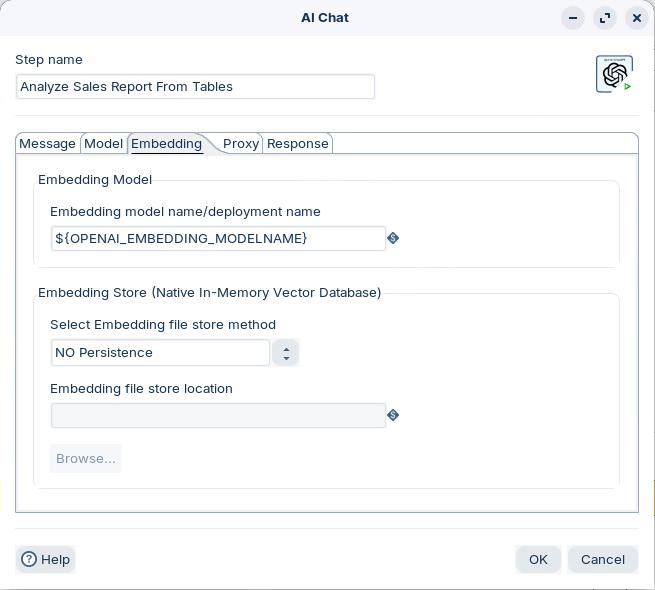
3. Click on Embedding tab.
Embedding
{% hint style="info" %}
Based on parameters set in the transformation properties, the Embedding model is set.
{% endhint %}
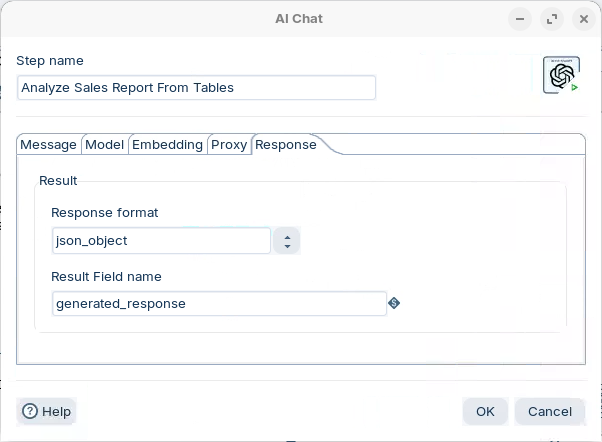
4. Click on the Response tab.
{% hint style="info" %}
The Response is returned as a JSON object associated with the generated\_response data stream field.
{% endhint %}
{% endtab %}
{% tab title="JSON Input" %}
{% hint style="info" %}
This is where we have to put our thinking caps on ..
In the generated\_response data stream field the SaleYear & SaleMonth sales data is defined as JSON objects with an array for each:
ProductCategory
UnitSold
Revenue
This will have to be a 2 stage process.
**Stage 1** - is to extract the SaleYear & SaleMonth.
Record: SaleYear: SaleMonth:
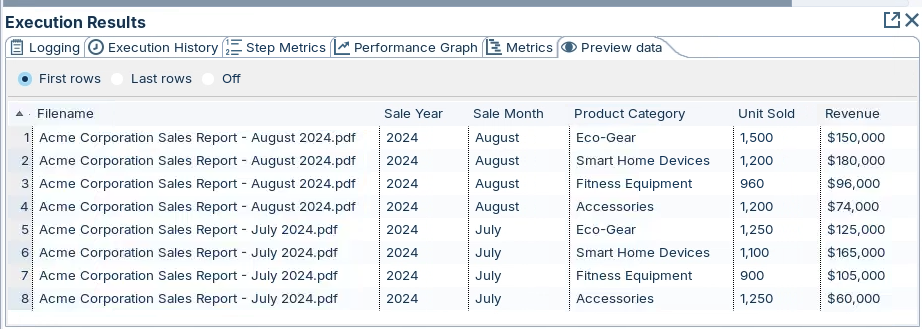
1. 2024 August
2. 2024 July
**Stage 2** - iterates through the SalesPerformanceByProduct\[array] for each Stage 1 record.
So .. on the first iteration SaleYear = 2024 SaleMonth = August
ProductCategory: UnitSold: Revenue:
Eco-Gear 1,500 $150,000
Smart Home Devices 1,200 $180,000
Fitness Equipment 960 $96,000
Accessories 1,200 $74,000
This is repeated for Record 2 ..
{% endhint %}
**generated\_response**
```
Conclusion
August 2024 was a positive month for Acme Corporation, marked by notable growth in sales and
customer retention. However, addressing regional disparities and capitalizing on successful
product lines will be crucial for sustaining this growth momentum in the coming months.
{
"SaleYear": "2024",
"SaleMonth": "August",
"SalesPerformanceByProduct": [
{
"ProductCategory": "Eco-Gear",
"UnitSold": "1,500",
"Revenue": "$150,000"
},
{
"ProductCategory": "Smart Home Devices",
"UnitSold": "1,200",
"Revenue": "$180,000"
},
{
"ProductCategory": "Fitness Equipment",
"UnitSold": "960",
"Revenue": "$96,000"
},
{
"ProductCategory": "Accessories",
"UnitSold": "1,200",
"Revenue": "$74,000"
}
]
}
Conclusion
July 2024 was a solid month for Acme Corporation, characterized by successful product launches
and moderate sales growth. While the overall performance was positive, addressing regional
disparities and improving competitive positioning in certain product categories will be essential for
sustaining growth in the coming months.
{
"SaleYear": "2024",
"SaleMonth": "July",
"SalesPerformanceByProduct": [
{
"ProductCategory": "Eco-Gear",
"UnitSold": "1,250",
"Revenue": "$125,000"
},
{
"ProductCategory": "Smart Home Devices",
"UnitSold": "1,100",
"Revenue": "$165,000"
},
{
"ProductCategory": "Fitness Equipment",
"UnitSold": "900",
"Revenue": "$105,000"
},
{
"ProductCategory": "Accessories",
"UnitSold": "1,250",
"Revenue": "$60,000"
}
]
}
...
```
{% hint style="info" %}
It would be interesting to give this a go using: [Hierachical Data Type (HDT)](/pentaho-data-integration/data-integration/ee-plugins/hierarchical-data-type.md) EE plugin
{% endhint %}
{% endtab %}
{% tab title="Select values / Excel Writer" %}
{% hint style="info" %}
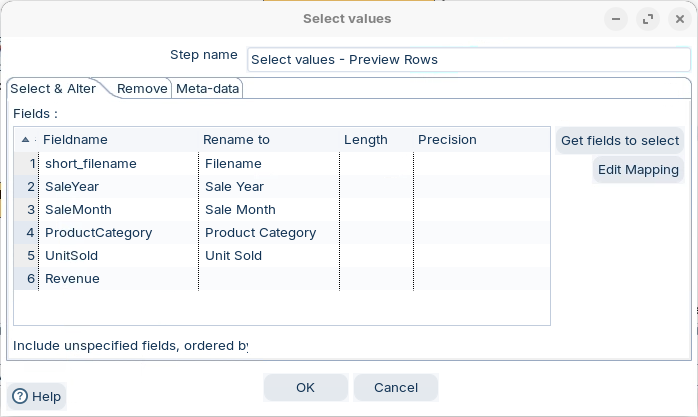
The Select values step can perform all the following actions on fields in the data stream:
* Select values
* Remove values
* Rename values
* Change data types
* Configure length and precision of values
{% endhint %}
1. Double-click on the Select values step.
Select values
2. RUN and preview the result.
result - Select values
***
{% hint style="info" %}
The Microsoft Excel Writer step writes incoming rows from PDI out to an MS Excel file and supports both the .xls and .xlsx file formats.
The .xls files use a binary format which is better suited for simple content, while the .xlsx files use the Open XML format which works well with templates since it can better preserve charts and miscellaneous objects.
{% endhint %}
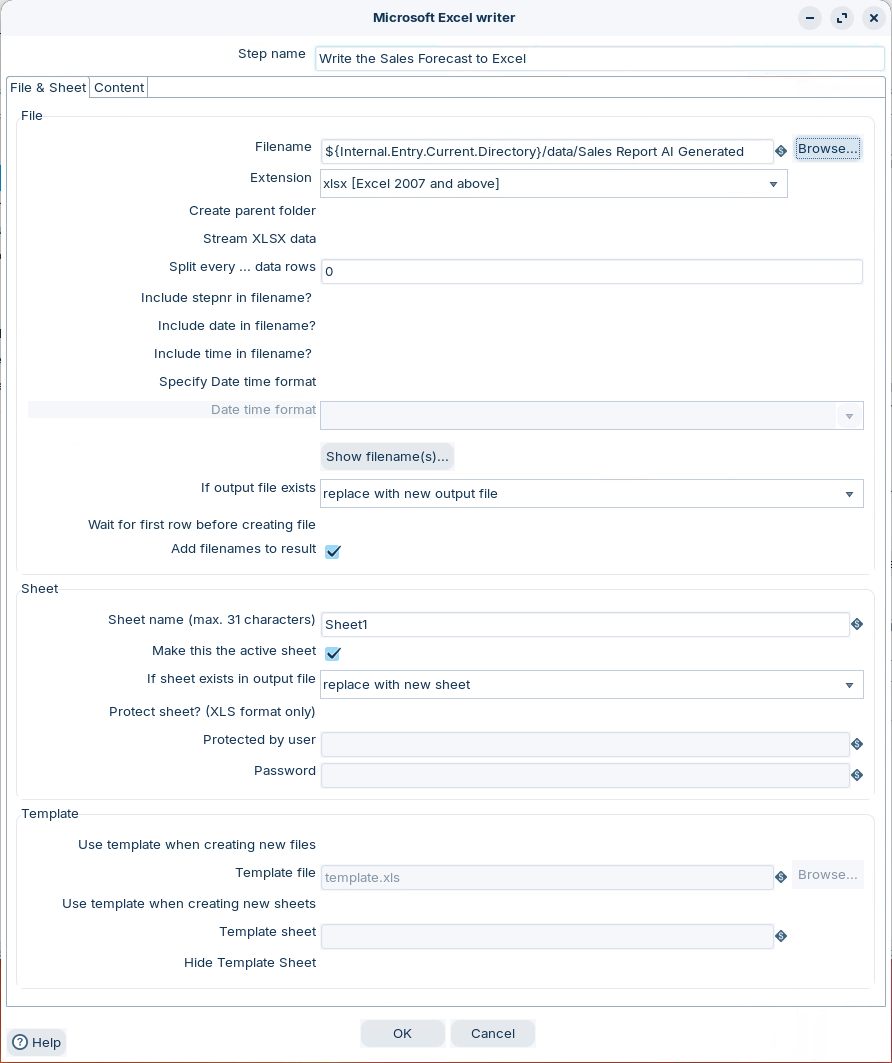
1. Double-click on Write the Sales Forecast to Excel.
Excel writer
{% hint style="info" %}
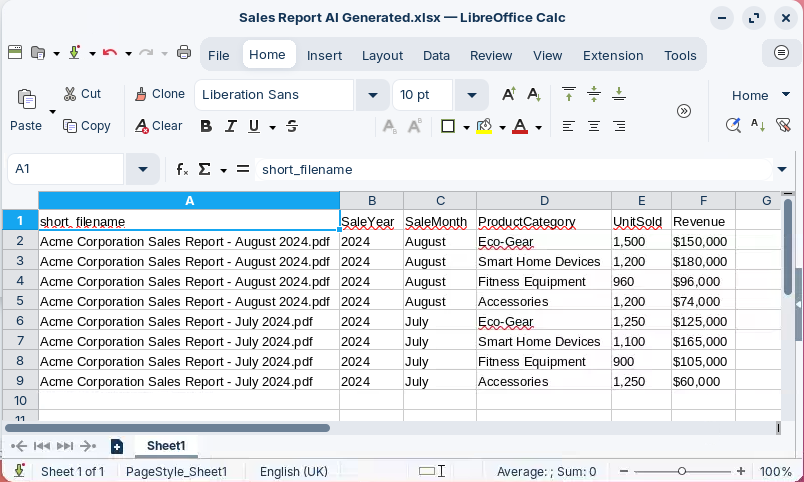
A 'Sales Report AI Generated' is created with an xlsx extension.
If the file exists, its replaced with 'new output file'.
The data set is written to active - Sheet 1.
{% endhint %}
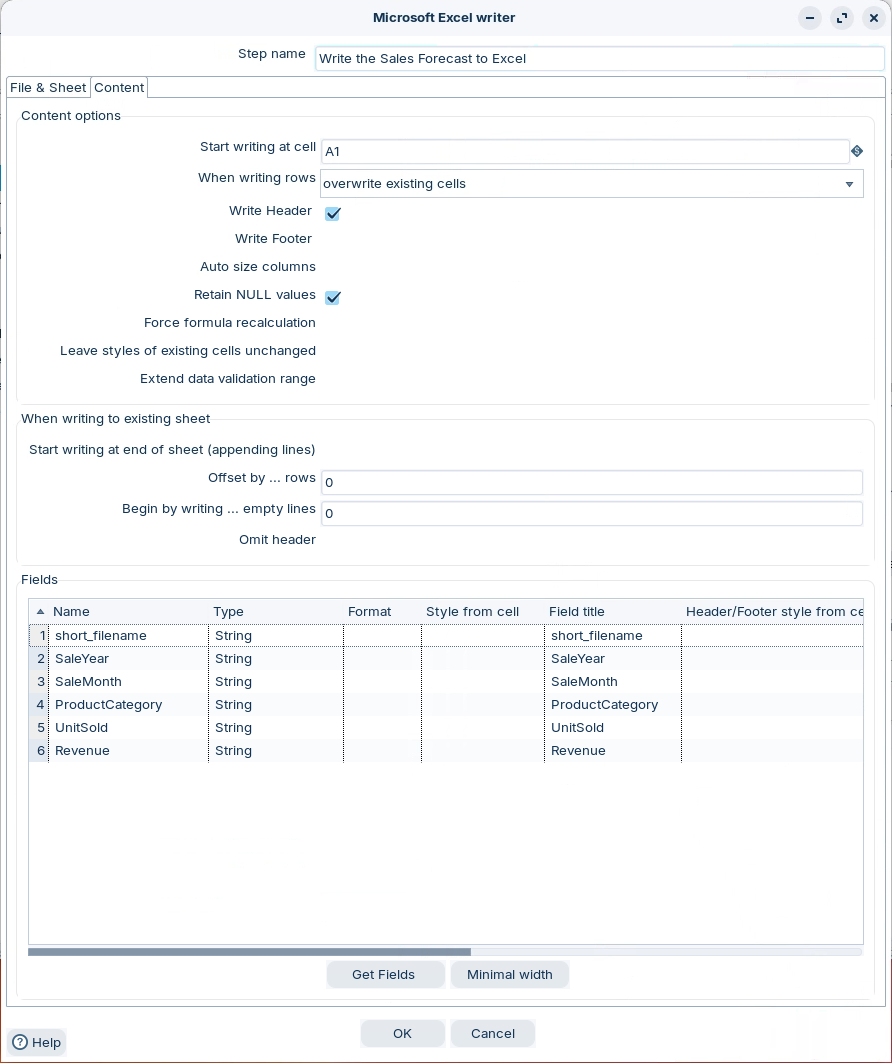
2. Click on the Content tab.
{% hint style="info" %}
The beginning data set is written to cell A1
Any existing cells are overwritten.
Header cells are wriiten.
Get Fields - retrieves the data stream fields.
{% endhint %}
3. RUN and open the file:
\~/Projects/genai/Use Case - Analyzing Financial Reports/data/Sales Report AI Generated.xlsx
Sales Report
{% endtab %}
{% endtabs %}
x
x
x
{% endtab %}
{% endtabs %}
{% endtab %}
{% tab title="CSS Selectors" %}
{% hint style="info" %}
CSS selectors are powerful tools for targeting specific HTML elements, and they're used not only for styling but also for selecting elements when extracting data from HTML documents.
Below are some examples of the syntax used to extract HTML snippets
{% endhint %}
**Basic Selectors**
a) Element Selector:
```css
p /* Selects all
elements */
div /* Selects all
elements */
```
b) Class Selector:
```css
.highlight /* Selects elements with class="highlight" */
p.highlight /* Selects
elements with class="highlight" */
```
c) ID Selector:
```css
#header /* Selects the element with id="header" */
```
d) Universal Selector:
```css
* /* Selects all elements */
```
**Combinators**
a) Descendant Selector (space):
```css
div p /* Selects all
elements inside
elements */
```
b) Child Selector (>):
```css
ul > li /* Selects all
elements that are direct children of
*/
```
c) Adjacent Sibling Selector (+):
```css
h1 + p /* Selects the first
element immediately after an
*/
```
d) General Sibling Selector (\~):
```css
h1 ~ p /* Selects all
elements that are siblings of
*/
```
**Attribute Selectors**
a) \[attribute]:
```css
[type] /* Selects elements with a type attribute */
```
b) \[attribute="value"]:
```css
[type="text"] /* Selects elements with type="text" */
```
c) \[attribute\~="value"]:
```css
[class~="highlight"] /* Selects elements with class containing "highlight" as a whole word */
```
d) \[attribute^="value"]:
```css
[href^="https"] /* Selects elements with href starting with "https" */
```
e) \[attribute$="value"]:
```css
[href$=".pdf"] /* Selects elements with href ending with ".pdf" */
```
f) \[attribute\*="value"]:
```css
[href*="example"] /* Selects elements with href containing "example" */
```
**Pseudo-classes**
```css
a:first-child /* Selects every element that is the first child of its parent */
p:last-child /* Selects every