> For the complete documentation index, see [llms.txt](https://academy.pentaho.com/llms.txt). Markdown versions of documentation pages are available by appending `.md` to page URLs; this page is available as [Markdown](https://academy.pentaho.com/pentaho-business-analytics/use-cases/mongodb-reports.md).
# MongoDB Reports
Create Analyzer & Interactive Reports from MongoDB ..
{% hint style="info" %}
Steel Wheels Inc has customer order information stored in a MongoDB.
{% endhint %}
{% hint style="info" %}
**Pentaho Data Integration**
To make the Use case more interesting, we're going to create a few pipelines in Pentaho Data Integration, that will load files, migrate tables, etc, to a MongoDB running in Docker.
**Pentaho Interactive Reporting**
The process starts similarly with establishing the MongoDB connection. In Interactive Reporting, you can create reports by dragging and dropping fields from your MongoDB collections directly onto the report canvas. You'll need to first create a metadata layer that translates MongoDB's document structure into a relational-style format that Pentaho can work with. This involves defining how nested documents and arrays should be represented in your reports.
**Pentaho Analyzer**
You'll need to set up the MongoDB data connection in the Pentaho Server by configuring the MongoDB connector. Once connected, you'll need to create a Mondrian schema that maps your MongoDB collections and fields to a multidimensional model that Analyzer can understand. The schema defines dimensions, measures, and hierarchies based on your MongoDB data structure.
For both reporting tools, it's important to note that performance optimization is crucial when working with MongoDB. This includes creating appropriate indexes in MongoDB to support your reporting queries, and carefully structuring your aggregation pipelines to ensure efficient data retrieval. You may also want to consider using MongoDB's aggregation framework to pre-aggregate data for complex reports.
{% endhint %}
{% tabs %}
{% tab title="Data Integration" %}
x
x
{% tabs %}
{% tab title="File" %}
{% hint style="info" %}
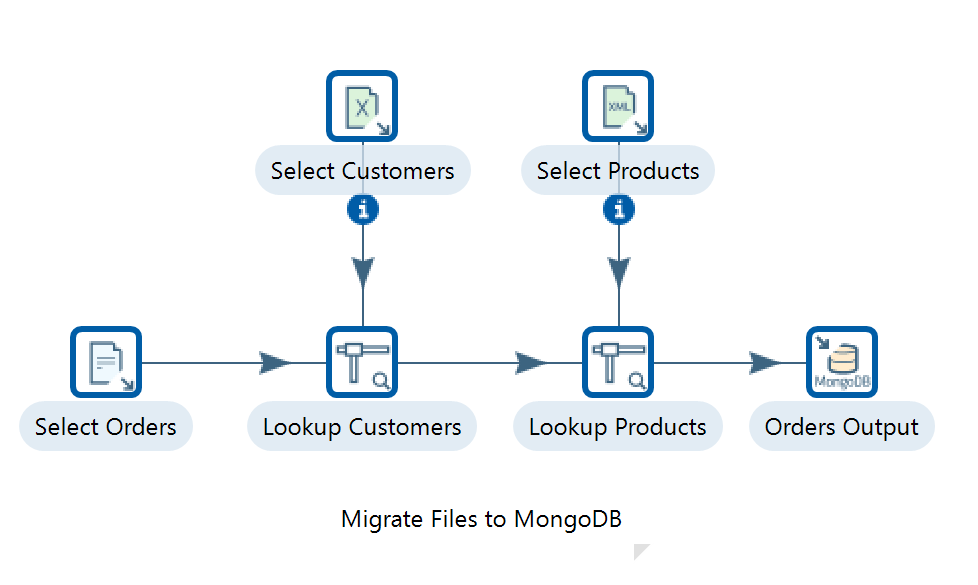
For this option, we will guide you through creating a transformation that loads data from different files in your filesystem, and then load them into a MongoDB Collection. Each of these files contains a key that we can use to join data in PDI before we send it to the MongoDB Output step.
{% endhint %}
#### Linux
1. Ensure the Pentaho Server is up and running.
```bash
cd
cd /opt/pentaho/server/pentaho-server/
sudo ./start-pentaho.sh
```
2. Ensure Pentaho Data Integration is up and running.
```bash
cd
cd ~/Pentaho/design-tools/data-integration
./spoon.sh
```
***
#### Create a New Transformation
Files
1. Select the Design tab in the left-hand-side view.
x
x
x
x
{% endtab %}
{% tab title="RDBMS" %}
{% hint style="info" %}
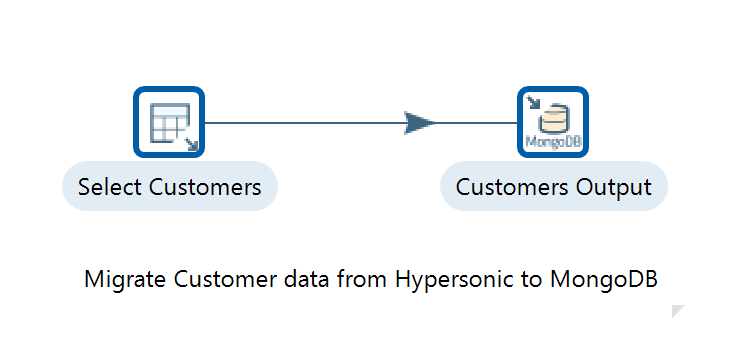
In this transformation you will transfer data from a sample RDBMS to a MongoDB database.
The sample data is called SteelWheels and is available in the Pentaho server, running on the Hypersonic Database Server.
{% endhint %}
#### Linux
1. Ensure the Pentaho Server is up and running. The Hypersonic Database Server - SteelWheels - is an embedded service.
```bash
cd
cd /opt/pentaho/server/pentaho-server/
sudo ./start-pentaho.sh
```
2. Ensure Pentaho Data Integration is up and running.
```bash
cd
cd ~/Pentaho/design-tools/data-integration
./spoon.sh
```
***
#### Create a New Transformation
Transformation - Migrate HSQLDB to MongoDB
{% hint style="info" %}
The Table Input step reads information from a connected database using SQL statements. Basic SQL statements can be generated automatically by clicking the Get SQL select statement button.
{% endhint %}
1. Select the Design tab in the left-hand-side view.
2. From the Input category folder, find the Table Input step and drag and drop it into the working area in the right-hand-side view.
3. Double-click on the Table Input step to open the configuration dialog.
4. Set the Step Name property to Select Customers.
{% hint style="info" %}
Before we can get any data from the SteelWheels Hypersonic database, we will have to create a JDBC connection to it.
{% endhint %}
1. Click on the New button next to the Database Connection pulldown. This will open the Database Connection dialog.
2. Enter the following details:
| | |
| - | - |
| | |
| | |
| | |
3. You can test the connection by clicking on the Test button at the bottom of the dialog. You should get a message similar to Connection Successful. If not, then you must double-check your connection details.
4. Click on OK to return to the Table Input step.
5. Now that we have a valid connection set, we are able to get a list of customers from the SteelWheels database. Copy and paste the following SQL into the query text area:
```sql
SELECT * FROM CUSTOMERS
```
6. Click on the Preview button and you will see a table of customer details.
x
***
{% hint style="info" %}
This step writes data to a MongoDB collection.
{% endhint %}
1. Under the Design tab, from the Big Data category folder, find the MongoDB Output step and drag and drop it into the working area in the right-hand-side view.
2. Create a Hop from the Table Input step to the MongoDB Output step.
3. Double-click on the MongoDB Output step.
4. Enter the following details:
| | |
| - | - |
| | |
| | |
| | |
5. Now, let's define the MongoDB documents structure. Select the Mongo document fields tab.
6. Click on the Get fields button, and the fields list will be populated with the SteelWheels database fields in the ETL stream.
7. By default, the column names in the SteelWheels database are in uppercase. In MongoDB, these field names should be in camel case. You can manually edit the names of the MongoDB document paths in this section also. Make sure that the Use Field Name option is set to No for each field, like this:
x
8. By clicking on Preview document structure, you will see an example of what the document will look like when it is inserted into the MongoDB Customers collection.
9. Click on the OK button to finish the MongoDB Output configuration.
***
#### RUN
x
x
{% endtab %}
{% tab title="MongoDB Aggregation" %}
{% hint style="info" %}
Just for interest let's explore the use of the MongoDB aggregation framework in the MongoDB Input Step. We will create a simple example to get data from a collection and show you how you can take advantage of the MongoDB aggregation framework to prepare data for the PDI stream.
{% endhint %}
#### Linux
1. Ensure the Pentaho Server is up and running. The Hypersonic Database Server - SteelWheels - is an embedded service.
```bash
cd
cd /opt/pentaho/server/pentaho-server/
sudo ./start-pentaho.sh
```
2. Ensure Pentaho Data Integration is up and running.
```bash
cd
cd ~/Pentaho/design-tools/data-integration
./spoon.sh
```
***
#### Create a New Transformation
1. Select the Design tab in the left-hand-side view.
2. From the Big Data category folder, find the MongoDB Input step and drag and drop it into the working area in the right-hand-side view.
3. Double-click on the step to open the MongoDB Input dialog.
4. Set the step name to Select 'Baane Mini Imports' Orders.
5. Select the Input options tab. Click on the Get DBs button and select the SteelWheels option for the Database field. Next, click on Get collections and select the Orders option for the Collection field.
6. Select the Query tab and then check the Query is aggregation pipeline option. In the text area, write the following aggregation query:
```sql
[
{ $match: {"customer.name" : "Baane Mini Imports"} },
{ $group: {"_id" : {"orderNumber": "$orderNumber",
"orderDate" : "$orderDate"}, "totalSpend": { $sum: "$totalPrice"} } }
]
```
7. Uncheck the Output single JSON field option.
8. Select the Fields tab.
9. Click on the Get Fields button and you will get a list of fields returned by the query.
10. You can preview your data by clicking on the Preview button.
11. Click on the OK button to finish the configuration of this step.
x
We want to add a Dummy step to the stream. This step does nothing, but it will allow us to select a step to preview our data. Add the Dummy step from the Flow category to the workspace and name it OUTPUT. 4. Create a hop between the Select 'Baane Mini Imports' Orders step and the OUTPUT step. 5. Select the OUTPUT dummy step and preview the data. 19
x
{% endtab %}
{% endtabs %}
{% endtab %}
{% tab title="Interactive Reports" %}
{% endtab %}
{% tab title="Analyzer Reports" %}
{% hint style="info" %}
To 'slice and dice' the dataset we'll need to create OLAP (short for Online Analytical Processing) schemas for Pentaho based on MongoDB.
Pentaho uses the ROLAP (short for Relational Online Analytical Processing) engine, called by Mondrian to convert MDX (short for Multidimensional Expressions) queries into SQL queries.
Let's start with a Mondrian 3.x schema using Schema Workbench. We'll first create a shared dimension, date. A shared dimension can be referenced in different cubes. However, in this particular case, it is not necessary to have a shared dimension because we'll have just one cube..!
{% endhint %}
x
x
x
{% tabs %}
{% tab title="Date" %}
x
#### Linux
1. Open the Schema Workbench application. With the Schema Workbench opened, let's configure the MongoDB database connection.
2. In the main menu, select Options -> Connection, and enter the following details:
| | |
| - | - |
| | |
| | |
| | |
3. Click on the Test button and you should get a success message box. Then click on the OK button.
***
#### Date Dimension
1. In the main menu, go to File -> New -> Schema.
x
2. Select the Schema object and set Orders as the field name.
3. Right-click on the Schema object and select Add Dimension.
4. Add a table to the hierarchy by right-clicking and selecting Add Table.
5. After selecting the table object added, select the -> date option for the name field.
6. In the default hierarchy (New Hierarchy 0), right-click and select the Add Level.
7. Let's define the year for this new level, enter the following details:
| | |
| - | - |
| | |
| | |
| | |
8. Add a new level and define the month; enter the following details:
| | |
| - | - |
| | |
| | |
| | |
9. Next, add a new level and define the day:
| | |
| - | - |
| | |
| | |
| | |
10. Select the hierarchy object, remove the default name (New Hierarchy 0), and select date for the primaryKey field.
11. Next, select the dimension object, and for the name field, set: date.
12. In the type field, select TimeDimension.
13. Finally, in the caption field, set Date.
x
x
x
{% endtab %}
{% tab title="Second Tab" %}
x
{% endtab %}
{% endtabs %}
{% endtab %}
{% endtabs %}
x
{% tabs %}
{% tab title="First Tab" %}
x
{% endtab %}
{% tab title="Second Tab" %}
x
{% endtab %}
{% endtabs %}
x
---
# Agent Instructions
This documentation is published with GitBook. GitBook is the documentation platform designed so that both humans and AI agents can read, navigate, and reason over technical content effectively. Learn more at gitbook.com.
## Querying This Documentation
If you need additional information that is not directly available in this page, you can query the documentation dynamically by asking a question.
Perform an HTTP GET request on the current page URL with the `ask` query parameter, and the optional `goal` query parameter:
```
GET https://academy.pentaho.com/pentaho-business-analytics/use-cases/mongodb-reports.md?ask=&goal=
```
`ask` is the immediate question: it should be specific, self-contained, and written in natural language.
`goal` is optional and describes the broader end goal you are ultimately trying to accomplish on behalf of the user. GitBook uses it to tailor the answer towards what is most useful for that goal.
The response will contain a direct answer to the question and relevant excerpts and sources from the documentation.
Use this mechanism when the answer is not explicitly present in the current page, you need clarification or additional context, or you want to retrieve related documentation sections.